


What do you get when you take a plastic skull and shove it into a funkin foam pumpkin? Epic awesomeness is what you get my friends! Think that’s overselling it just a bit? Well, maybe it is, but after looking at the wicked Pumpkin Demon prop The-Hog-Flu built by doing just that I am content with that designation. The prop started by cutting a hole in the funkin and shoving the skull inside. Some sculpting material was then added to fill the gap between the skull and the pumpkin and to also give the face a little bit more detail. Once the sculpting material was applied and sanded down a base coat of a darker blend of orangish-brown paint was applied. The eyes were crafted out of ping pong balls and it appears that the teeth were cut from an opaque plastic bottle (the tongue is a mystery). Note to self: hot glue makes for a nice coating of drool. The lower body was constructed with a hybrid 1 x 2 wood base and a PVC spine that was wrapped with some tree branches where visible, as well as chicken wire near the lower legs. The upper chest consists of a piece of plywood. The-Hog-Flu added some spray foam over the plywood and then inserted another branch for the neck of the pumpkin demon where the head will be attached. The lower portion was also spray foamed and a variety of skulls and lesser pumpkins were peppered throughout. Once completed the upper torso was given a coat of purple spray paint while the lower body was a mixture of blood red and green. The-Hog-Flu fabricated a rib cage and some incredibly detailed arms out of branches. The word epic is too easily tossed around, but if a picture is worth a thousand...
Home Made Pressure Plate...
posted by Tony
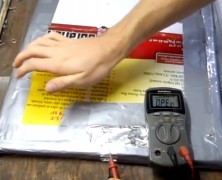
A while back I mentioned that I’m not much of an electrician, and this tutorial pretty much puts the exclamation point on that thought. I’m pretty sure there should be more than just cardboard and aluminum foil needed to generate power of any kind, but that’s literally all that’s needed to power the Pressure Plate that Rick Osgood made in this tutorial. It’s a great way to save a few bucks and still get a trigger for your props!...
How To Build A Treasure Chest...
posted by Tony
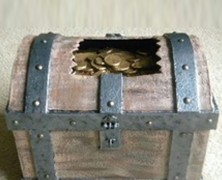
If you’re planning on going with a pirate themed haunt you’re going to need a treasure chest, and IMU posted a great tutorial on how to make a treasure chest out of a cardboard box at the HalloweenForum. Start by cutting the side flaps of your box into half rounds and then hot glue the front flaps to the side. You’ll have to cut a thin piece of cardboard to add to the center since the front flaps are now extending further since the sides are rounded. IMU cut out a space on top that the treasure will peek out through. The metal banding consists of foam core along the top and bottom edges as well as the side and centers. Once completed the gaps were smoothed out with a little paper towel mâché and then some wood grain was applied using monster mud. After applying a latch and some hinges crafted from a plastic coat hanger (if you don’t have access to a similar hanger you can buy some small hinges and a latch) it’s ready for paint! IMU gave it a base coat of black rubber spray paint since it would be sitting outside. Some various wood colors were dry brushed on as well as 2 varieties of metal colored paint for detail. The final touch was adding some rivets throughout the metal bands to give it a really sturdy appearance. The finished chest looks amazing, IMU did a spectacular job with this and it costs next to nothing to make. Items needed to complete this include: Cardboard box Foam core Hot glue Rivets Black spray paint Wood colored paint Metal colored paint ...
Blair Witch Dolls
posted by Tony
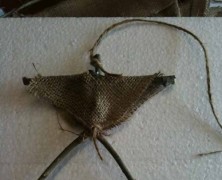
There are few things in life as disconcerting as waking up after a night camping in the woods than to see a bunch of these creepy totems hanging from the trees surrounding you. And thanks to the tutorial posted by pooky73 over at the HalloweenForum I’ll be well prepared to instill a bit of the Blair Witch fear into everybody on our next trip because these things are incredibly easy to make! Start by cutting some branches for your dolls, you’ll need an equal amount of “Y” pieces and straight pieces for however many you choose to make. Add some hot glue where you want your straight piece to sit and when it’s dry flip it over and add some more hot glue to reinforce the other side of it. Grab a piece of burlap and then fold it diagonally to form a triangle, then fold it diagonally again to form an even smaller triangle and cut the tip off of it. You’ll now have a perfect piece of burlap with a square hole in the dead center for you to slip over the doll. Add some hot glue to the stem of the doll as well as the arms, slide the burlap over it and press down so the glue will stick to the burlap. You’ll need to do this to both the front and back of your dolls. The final step is to cut a couple of pieces of jute. The first piece should be wrapped around your dolls waist to look like a belt and the other can be tied to the top of the doll to hang it from a tree. These dolls are easy to make and are a great way to add a little extra atmosphere to any haunt (or backyard). ...
Anti-Gravity Machine
posted by Tony
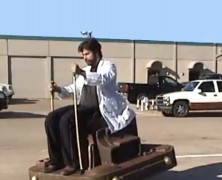
So is it a prop or is it a costume? That’s the question I was left with after watching the tutorial on the Anti-Gravity Machine that Brick in the Yard Mold Supply created. However you decide to categorize it, there is no question that it is completely awesome. It’s an incredibly intricate build that was definitely worth the effort. While an anti-gravity machine may not fit in a haunt (or be comfortable to wear at a Halloween party for that matter), the concept behind it could certainly be implemented and is worthy of at least a cursory look....

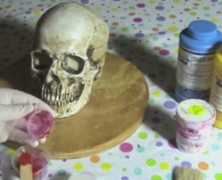
Burlap Skulls
posted by Tony
If you’re looking for a creative alternative to the paper mache skull then feast your eyes on the tutorial for Burlap Skulls that OctART posted over at the HalloweenForum. It’s pretty much the same process as making a paper mache skull (although considerably less messy) and the finished burlap skull looks amazingly creepy with a tea light inside. You’ll need to start by wrapping your skull with aluminum foil and then cut your burlap into strips. Grab your hot glue gun and start to apply the burlap over the foil covering as much of the skull as necessary. You’ll want to make sure that you don’t use too much glue in the back so you’ll be able to pull it off the skull. Also, if you’re planning on using a tea light, make sure you’re only applying one layer of burlap where your light will shine through. You’ll have to remove the foil from those areas as well. Once all the burlap is in place and dried you can remove it from the skull and spray it will some of your sealant. Items needed to complete this include: Skull Aluminum foil Burlap Hot glue Spray sealant Tea lights...

How to Build a Rumble Bridge...
posted by Tony
If you’re looking to add a little excitement to your haunt, or just want to give the trick or treaters a quick startle before sugaring them up for the season, then a rumble bridge might be just what you need. It’s a pretty simple project to build and the guys over at CreepyCreations have created a great video detailing how its done. How to Build A Rumble Bridge The completed Rumble Bridge: Items needed to complete this inlclude: (1) – 3/4″ sheet of plywood (4) – 2×2 wood, 36″ long (4) – 2×2 wood, 30″ long (1) – 2×2 wood, 48″ long (2) – 2×4 wood, 43″ long (4) – 2×4 wood, 25″ long (4) – 4×4 wood, 6 to 8″ long (2) – 4″ diameter rubber balls (1) – clamp (1) – bracket (1) – 2 oz fishing weight (8) – 7″ bolts with nuts & washer – 1/2″ diamter Assorted screws, nuts & bolts for weight Hot glue Metal strapping High speed motor...

Clear Plastic Tube Candles...
posted by Tony
Everybody loves PVC candles. They’re easy to make and offer some nice ambient lighting without having to fear burning your house down. They’re also incredibly realistic looking, with the one exception being that they are not as translucent as an actual candle when lit. That’s precisely what led Sipesh at the HalloweenForum to come up with a Slightly Different Take on the PVC Candle, utilizing clear plastic fluorescent light bulb protectors instead of PVC. They’re available at Home Depot and come in four foot lengths. The process is the same as when making PVC candles. You’ll start by cutting you tube to the desired length and then dripping some hot glue along the outside edge of the tube so that it runs down the side. Once covered with glue you’ll need to give it a coat of spray paint. Lighter colors will achieve the translucent effect better than dark but don’t let that stop you from experimenting. After the spray paint has dried you’ll need to build a base for your tea light. Sipesh recommends putting a piece of styrofoam in there as a base, but I suspect you could spray a small amount of great stuff in the tube so that it rises to the desired height you want the tea ligh at as well. That’s all there is to it, but the end result looks great, these really glow nicely. Items needed to complete this include: Clear plastic tubes Hot glue Spray paint Styrofoam base Tea...

Installing a Servo in a Bucky Skull...
posted by Tony
There’s nothing more satisfying than creating your own talking skull. I would have no way of knowing this since I opted to purchase one for fear that I would horribly botch the installation, but I honestly suspect there’s nothing more satisfying than creating your own. With that in mind, Scary Terry has a great tutorial on Installing a Servo in a Bucky Skull. You’ll start by building a mounting bracket for your servo out of aluminum and then you’ll mount the servo bracket in the Bucky skull (ok, there’s a little more to it, but trust me, you’re going to need to check out Scary Terry’s Tutorial). You’re going to break the jaw of your skull next and reconnect it utilizing the zip ties as the new pivot point of the jaw. You’ll next drill a hole in the skull and connect the servo to the jaw using a piece of the music wire. That’s all there is to it, more or less, but you’ll still need an audio circuit to drive the servo. Luckily, Scary Terry has an audio circuit solution as well! Items needed to complete this include: Bucky Skull Servo (HiTec HS-425BB – See details at ServoCity) (2) 3/4″ long 1″x1″x1/16″ angle aluminum 0.039″ Music wire, aka piano wire (1) 1/2″ #6 screw, nut, washer Servo mounting hardware (#4/ 40 screws and nuts) (2) 4″ Zip ties...
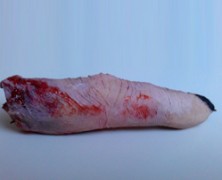
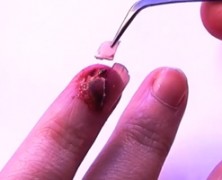
Severed Finger
posted by Tony
If you’re looking to serve Ladyfingers you’ll want to pair them with tea, pudding, or ice cream. If you’re looking to sever Lady fingers, on the other hand, you’ll probably want to take a look at the tutorial that Rachel from SplatterFactoryTV posted. She details a remarkably easy way to make a quick casting of your own finger using liquid latex and makeup. The great thing is, all of the details of your finger will be imprinted on your castings, giving it a remarkably realistic appearance. The process is so simple you’ll have no problem making enough for everybody to eat! Items needed to complete this include: Liquid latex Tissue paper Hair dryer Flesh tone makeup/foundation...

Creepy Scarecrow
posted by Tony
I love scarecrows. There’s something eerily majestic about the way they stand guard over isolated fields, just swaying in the wind. They’re selfless as they monitor everything that happens, day and night, silently watching. Waiting. I’m pretty sure they eat the birds that make the mistake of landing on them, and its entirely possible that they do get off their perches and walk around while I’m asleep, but, I can’t confirm that. With all of that said, if you’re interested in building a scarecrow, Nightfisher posted some great details on the build of his Creepy Scarecrow over at the HalloweenForum that are worth looking at. This project started by hot glueing some burlap over a foam skull and stretching it tight so most of the features of the skull would be visible through the burlap. After adding some stains and shadows Nightfisher added some large metal staples along the scarecrows mouth. The skull itself rests on a PVC spine. The shoulders and arms of the scarecrow were crafted with some heavy branches. The torso was created by spraying some Great Stuff over a 2 inch block of styrofoam. Nightfisher did an awesome job of spraying the ribs with expanding foam because I’ve got to imagine that was a fairly stressful process. A few vines were sprayed over the ribs as well to complete the torso. Once completed some black latex was painted in between the ribs and all of the crevices of the torso. A base coat of brown was dry brushed on after the black latex dried followed by another layer of black and a final coat of light brown. The vines were given a coat of green paint. Finishing touches included adding some stitches to the eyes, wrapping some twine around the joints of the arms and hands, and of course, adding a...

Cheap Skeletal Rib Cage...
posted by Tony
If you need a rib cage for your haunt and are down to you last few bucks, don’t worry, be happy, because the Count over at the HalloweenForum has created a tutorial on how to create a Cheap Skeletal Rib Cage. It all starts with a trip to WalMart to pickup one of their 18″ high, plain white plastic trash cans. You’ll want to draw your ribcage, sternum and spine on the trash can (the Count recommends using 1/2″ masking tape to delineate the ribs). Once your outline is complete you’ll need to grab a pair of tin snips and carefully cut out the dead space between the ribs. Make sure to save the bottom and top for last to provide extra stability to the trash can. Once the ribcage is cut it’s time to put some meat on those ribs! The Count mixed and quickly spread several batches of a two part polyurethane foam on his ribcage. Once dried a few layers of reddish brown and black latex paint were added followed by a final coat of lacquer. The finished ribcage looks great and I never would have guessed that it came from WalMart! Items needed to complete this include: 18″ White trash can 2 part Polyurethane foam Reddish brown latex paint Black latex paint...
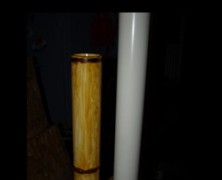
Faux Bamboo
posted by Tony
Bamboo, while often being mistaken for wood, is actually an incredibly strong grass. It’s got an ultimate tensile strength of 265 MPa (Megapascals), which is pretty incredible when you consider that cast iron only carries with it an ultimate strength of 200 MPa (spider silk has an incredible 1200 MPa, fyi). This is no doubt the reason that a single 8 foot bamboo cage could contain 5 stranded castaways so well. PVC on the other hand only carries an ultimate strength of 52 MPa, but since it is considerably cheaper and easier to get than bamboo you might want to consider using petejc’s tutorial to make some Faux Bamboo if you have the need to build a cage. You’ll start by using some acetone to clean all of the writing off of the PVC. Once the PVC has been cleaned you’ll want to cut some notches with a razor blade around the pipe for the bamboo nodes. Petejc recommends going around the pipe a couple of times to get the notch deeper for a better effect. Once the nodes are notched in you’re going to need to grab a blow torch and heat your PVC up a bit. This will not only give it a slight discoloration, but will also allow you to compress the pipe a little bit to give the nodes an actual raised appearance. Once the nodes are complete it’s time to sand and stain the PVC. Petejc went with an amber shellac instead of stain on his bamboo. Sanding the pipe adds some texture to the pipe allowing the shellac to adhere to. The shellac when applied with a rag gives a great uneven finish that looks amazingly like real bamboo. Items needed to complete this include: PVC Blow torch...

Gorey Eyeballs
posted by Tony
It’s one thing to make realistic looking eyeballs for use in a skull or creature, but what if you want eyeballs that have been freshly plucked from their sockets? You know what I’m talking about, the eyeball that’s being pecked at by a crow with muscles and optic nerve still attached. If that’s what you’re looking for, and trust me, you definitely want some of these, then you’re going to want to check out the Gorey Eyeballs tutorial that Chiapetrescue posted. You’ll start with your pristine, perfectly round eyeball and add a few layers of hot glue to the bottom of it. Once you’ve got a couple layers of hot glue added you’re going to start turning it upside down to let the hot glue start running. Once you’ve built up enough layers of hot glue to give the appearance of an extended optic nerve, you’re ready for painting. Chiapetrescue did an awesome job of painting these by starting with a base coat of red spray paint for a bit of a splatter effect and then added an additional coat of red acrylic to it. Some black acrylic paint was then dry brushed over the base to add a darker finish to it. A final coat of polyurethane was applied to give it a glossy appearance. The finished eye balls look fantastically gruesome and are incredibly easy to make. Items needed to complete this include: Plastic eyeballs Glue Gun Glue Sticks Red Spray Paint Red Acrylic Paint Black Acrylic...
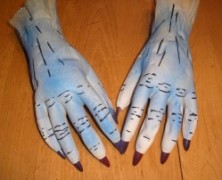
Easy Monster Hands
posted by Tony
Ok, remember when you were getting ready to use the Frankenstein Plans to build your very own Frankenstein and it said you’d have to supply your own set of hands? Well unless you were able to run out to your local Halloween store and buy a pair of hands you were out of luck. And a Frankenstein without hands isn’t very scary now is it? Making your own hands isn’t that difficult though, and the crew over at Screaming Scarecrow Studios have created a simple tutorial on how to make really great looking monster hands using latex gloves, witches fingers, and some expanding foam. You’ll start by turning the glove inside out and cutting a small slit in the tips of the fingers of your rubber glove. Once you’ve got your witches fingers securely inserted into each of the fingers you’ll need to get a 12″ piece of 1/2″ pvc pipe for an arm bone. You’ll need to drill a hole in both the bottom and top of your pipe approximately an inch from the bottom. Once you’ve got your holes drilled you’re going to thread some wire through the hole in the pipe to secure the hand to the bone. You’ll also need to secure the wire through the witch’s fingers which is what will keep the hand secured to the bone once its filled with foam. Once you’ve got your hand securely wired to the arm bone you’re ready to add some foam. You can hang the hand by threading another wire through the hole you drilled in the top of the pvc. It may take a while for the foam to fully cure (2 to 3 days), but once they’ve hardened you can remove the glove from around the hands. You’ll need...
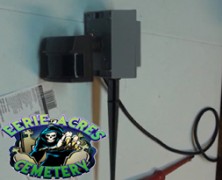
Motion Detector Hack
posted by Tony
If you’ve ever wanted a motion sensor to trigger your Halloween props but didn’t feel like laying out the cash for an overpriced store bought unit then pay close attention. The reality is, they’re not that difficult to make if you’ve got a moderate amount of electrical skills and you’ll end up with a unit that is tailor made for your use. You’ll also end up saving yourself a lot of money because once you realize how easy it is, you’ll want to make more! I’m sure the folks at Eerie Acres Cemetery wouldn’t mind you sending some of that extra cash their way because they’ve posted a really descriptive tutorial on how to create a motion sensor that will more than get you up and running creating your own. Items needed to complete this include: Replacement motion sensor GFCI outlet 4 hole single gang outdoor outlet box (metal) Outdoor electrical outlet cover (metal) Clamps for gang box PC power cable Threaded ground stake Silicone...
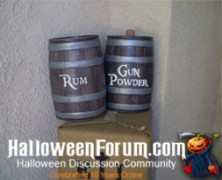
Small Faux Wood Barrel...
posted by Tony
Any Halloween prop that necessitates the drinking of beer is naturally going to pique my interest. After all, Halloween prop building and beer go together like peanut butter and jelly, right? I’m pretty sure Ollieee who posted a great tutorial over at the HalloweenForum detailing how to make a small faux wood barrel using an empty 5 liter mini-keg would agree with me. Ok, truth is, you don’t really have to buy a keg filled with beer to get this done, you can purchase empty mini-kegs from Midwest Supplies and save a few bucks, but what fun is that. You’ll start by emptying the barrel if you opted for one filled with beer, you can use whatever method you like for this step, however a pint sized glass works best for me. Once emptied make sure you give it’s good rinse out to remove any leftover suds and the give the exterior a light sanding. Ollieee gave the barrel a solid base coat of flat black paint, then an additional coat of a dark brown flat paint. Once the brown base is completed you’ll want to add some faux wood grain to your barrel. Once the wood grain is completed you’re going to want to paint some metal bands around the barrel as well as any additional decorative text to complete your barrel. The finished product is pretty great looking and the barrel is just the right size to make me feel like a giant pirate, Arrr! Items needed to complete this include: 5 liter mini-keg A drinking buddy (optional)...
Silicone Skull Mold
posted by Tony
If you’re interested in making your own skulls, and I’m talking seriously making a lot of your own skulls, then you’re going to need a pretty serious mold to cast them in. You can use the Cheap Easy Skulls method provided by Dr. Kreepy, but if you’re interested in some serious skulls you’re going to want to checkout the tutorial that The Devil’s Workshop posted. Creating your mold is a pretty elaborate process but this two part tutorial will walk you through the process from start to finish. http://youtu.be/QetqLES6MXA...
Bottomless Pit
posted by Tony
I’ve always wanted to do a bottomless pit but it’s always seemed like more effort than It was worth. I’ve always told myself that if I had an extra two way mirror that I’d build one for sure. That’s not really a valid excuse, though, because I could always make a Two Way Mirror. Bottom line, I guess I’m just too lazy to make this prop, but that shouldn’t stop you because it’s really not that difficult of a build. Trisha Morse put together a nice tutorial based on Larry Lund’s original build that employs the use of a home made plexiglass two way mirror. You’ll start by building the support frames for the two mirrors. You’re going to cut a groove in the length of your 2×4 to slide the mirror into. Once you’ve got all grooves cut in your four frame pieces you can screw three of them together, slide your mirror in and attach the final 2×4. The walls of the pit are framed with 3/8″ plywood that are secured together using L-brackets. Wood blocks on the outside bottom and top of the walls of the pit allow for it to sit on top of the frame with the regular mirror, while the frame holding the two way mirror can sit on top. This allows the pit walls to run straight into the bottom mirror which is reflecting the two way mirror above, which is also reflecting the pit walls. Since you’ll be viewing it through the two way mirror side, you won’t have to worry about seeing your own reflection. You can add styrofoam rocks to both the inside and outside of your pit to make it look a bit more realistic and you’ll want to be sure to add...

Creepy Shelly
posted by Tony
I used to know a girl named Shelly, and while she was hardly what I would consider creepy, I couldn’t help but think of her when I saw undead_october’s tutorial for Creepy Shelly. And that would probably bum her out because Creepy Shelly is terrifying! I mean, I genuinely find it unsettling. Job well done undead_october. I also have to give a tip of the hat to undead_october because I had heretofore never heard of snot rag mâché, or the process of utilizing Kleenex, glue, and water, in place of the typical paper mâché. Again, job well done! This macabre masterpiece started with a child sized skull sculpted using DAS clay. It was hot glued to a two liter bottle that was then attached to a wood base. After extending the neck over the bottle with more clay some aluminum foil arms and shoulders were attached to the bottle with more hot glue. The legs were created with wood dowels attached to the undersized of the wood base and the feet were crafted using oval pieces of craft wood. Once the full frame was in place the entire body was snot rag mâchéd. The final part of the body was the hands, which were sculpted with more clay. Once the body is fully sculpted and mâchéd it was given a coat of brown paint. Undead_october did more than just slap some brown paint on Shelly, though, the highlights added give a truly decayed look to Shelly. Items needed to complete this include: DAS modeling clay Aluminum foil 2 liter bottle Wood base Wood dowel 2 – Oval wood plaques Kleenex Elmer’s glue Brown paint Old dress...
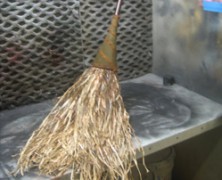
Deluxe Witches Broom
posted by Tony
My mother was the driving force behind my love for all things Halloween. She was born on October 31st so I suppose there was little chance that she wouldn’t love Halloween herself, but It was more than just Halloween. She had a great appreciation for classic horror films, too. I remember on Saturday evenings our local UHF channel (UHF, how’s that for dating yourself!?) would show a classic horror film followed with a few of the old Flash Gordon episodes. Saturday Night at the Movies was a staple at our house and those films have always been a major source of my inspiration. For that I have my mother to thank, and while I can’t imagine my mother doing many of the tutorials on HauntersList, this Deluxe Witches Broom tutorial that Stanley Basconbe (aka Gary Benson) posted is exactly the kind of crafting project that my mother would have loved to do. And she would have owned it, too. You’ll need to start off with a standard straw broom. You’re going to want to remove the metal band if it has one and then cut off the twine that holds the bristles in place. Once you’ve got the twine removed you’ll have a pretty nicely fanned out broom. You’ll want to remove the outer layer of the bristles to create a more narrow broom. At this point you’ll want to focus your attention on creating the ferrule, which is crafted from an automotive oil funnel. You’ll need to cut it down so that it will fit down the broom handle. Once you’ve got the ferrule in place you’re going to want to hot glue some grass skirt to the top of the bristles which will complete your witches broom. Of course you can decorate...
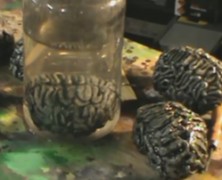
Easy Brain in a Jar
posted by Tony
Allen Hopps has a brain the size of a baked potato. Ok, now that I’ve got your attention I should probably rephrase that. Allen’s got a great tutorial on how to easily make a brain in a jar that starts out roughly the size of a baked potato and requires far fewer ingredients than I would put on said potato. His method starts by balling up some aluminum foil and then adding some caulk to it to create the sulci and gyri (brain grooves). Once you drop it in a jar filled with water the size of the brain looks deceptively larger! Items needed to complete this include: 1 gallon jar Aluminum foil Gray silicone caulk Black paint White acrylic paint Polyurethane spray...
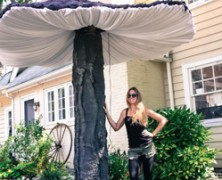
The Build of Giant Mushrooms...
posted by Tony
Ever hear the phrase “Go big or go home”? Well I’m pretty sure Rania Peet has, and her larger than life Halloween props sure live up to that standard. This time she’s set her sites on The Build of Giant Mushrooms, and her finished fungi could not have turned out any better! Her mushroom build is broken down into three core parts: the stem, the cap and the underside gills. Realistically, I could get the stem and the cap done, but I’d probably fail miserably on the gills. The top and bottom of the stem was made from 3/4″ plywood. She used (3) 2x4s in the center to create an approximately 18″ diameter stem. The 2×4’s are secured to the base using lag screws and washers for extreme strength and stability. For her build, Rania was lucky enough to have access to a wood cable spool which provided the perfect oversized round base. The stem was then wrapped with chicken wire. The build of the mushroom cap is pretty ingenious, it consists of a 1′ piece of 4×4 that is securely screwed to a sheet of plywood with lag screws. She then proceeded to bore four holes through the four by four and ran some rigid electrical conduit through it. Once in place the conduit was bent to provide the cap with a more “mushroom” shaped appearance. Some 3/4″ poly-flex tubing was screwed to the end of the rigid conduit to give the cap a finished, rounded edge. A layer of chicken wire was then added to the cap which was covered with a dense cheesecloth to hold the layers of spray foam. Think Rania bought a couple of cans of Great Stuff? Guess again, because this is where she takes this project up a...
Aging Wood Quickly
posted by Tony
There’s nothing worse than a building a toe pincher coffin with pristine looking lumber. Yeah, it still looks good, but you probably want it to look as though it’s fresh from the ground instead of Home Depot. If you’re lucky enough to have some old pallets or some weathered wood laying around, then read no further, but if you’re anything like me you’re going to want to age it pretty quickly. Terror Tom has a great technique for aging wood that’s easy to achieve and only takes 1 night to prep for. You’ll need to fill a mason jar with as much white vinegar as you think you’ll need to coat your wood and add a nicely rusted item to it. You can use rusty nails, screws, or even steel wool. Let it soak over night and when you wake up you should have a rather rusty (and pungent) solution that will quickly age your wood. Items needed to complete this include: Rusty nails or steel wool Mason jar White...
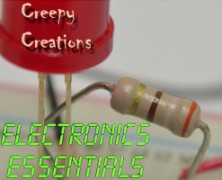
LED Lunacy
posted by Tony
I’ve got a confession to make. I’m clueless when it comes to basic electrical circuitry. In fact, pretty much all of the concepts of electricity other than don’t stick your fingers in the outlets seem to be over my head (ok, well, don’t stick your fingers in the outlets while your standing in water, yeah, I got that one too). So when it came to buying the components to make my own Homemade LED Spotlights my inexperience with a few basic LED concepts was a definite confidence killer. The worst part is that up until this point every written tutorial I’ve seen on this has been a complete snoozer. Thankfully, CreepyCreations have posted a really simple to follow tutorial that outlines all of the essentials you’ll need to purchase the correct resistors to power your LED’s without fear of them blowing up on you. The tutorial is really well made and it’s really simple to follow....

Make a Fake Brain
posted by Tony
It turns out the Scarecrow didn’t need to make a pilgrimage to see the Wizard of Oz after all, he just needed to check in with a Girl In Winnipeg! Her tutorial on how to make a fake brain is awesome in its simplicity and seems like the kind of project that the whole family can participate in. You’ll start with a base of crumpled newspaper covered in duct tape to form your brain mass. The next step is to painstakingly roll your playdough into long round lengths so you’ve got enough to completely cover your brain. After applying some spray adhesive to your duct taped brain mass, the playdough is simply placed on it in a sufficiently wavy brain pattern. Once your gray matter is in place you can paint it in whatever color scheme pleases you. Items needed to complete this include: 2 parts red playdough, 1 part blue newspaper duct tape spray adhesive corn syrup food...

Cheap Rusty Chain
posted by Tony
I must admit that when I first glanced at the tutorial that Lake of the Dead penned over at the HalloweenForum for Cheap Rusty Chain I was a bit underwhelmed. The opening photos of the PVC used to create the chain left me skeptical that the finished product would deliver. Luckily I didn’t stop reading because the finished chain looks amazing and it’s incredibly easy to create. You’ll need to start by cutting all of the links for your full chain. Next, using a PVC pipe cutter you’re going to cut a slit in 1/3 of your links to easily attach the rest of the links. Once you’ve got all your links threaded you can paint the chain using a rust colored paint. Rust-Oleum’s multicolored texture sprays are perfect for this. Items needed to complete this include: 3/4 PVC pipe Rust colored...

Kitchen Accident
posted by Tony
If you’re looking for a gruesome looking makeup effect for your scare actors then CrazyHappy08 has a tutorial that may suit your needs. Its a super simple effect to achieve (assuming you’re reasonably adept at applying makeup) and the results look amazing. You’ll need glue, foundation, some makeup, and a bit of a depraved imagination. ...
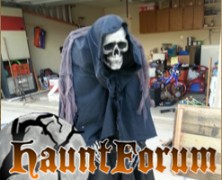
1-2-3 EZ Creep
posted by Tony
It’s 5 pm on Halloween night and you’ve put up no decorations to great your trick or treaters. Actually, if you’re a regular at Haunter’s List, there’s probably no chance that this has ever happened to you, but it might be the type of recurring dream that plagues you. If anyone you know finds themselves in this predicament, though, tell them not to panic, because they’ve probably got all the materials they need to create this cheap and EZ Creep that SpookySam from HauntForum created. You’ll take your ladder and attach your skull (and arms if you’ve got them) to a piece of scrap wood and then set it on the paint shelf. You can add a cardboard box to the top rung of the ladder and attach it to the scrap wood. This will add a little bulk to your Creep as well as hold both items in place. The final step is to add your fabric or clothes to your creep, which can be stapled to itself to keep its shape. This creep looks great and is the perfect last minute no hassle prop to build. Items needed to create this include: Step stool (preferably with paint shelf) Foam skull (arms and hands optional) Scrap board Cardboard box Scrap cloth or landscaping...
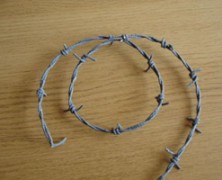
Cheap Fake Barbed Wire...
posted by Tony
If you’ve got a scene that requires realistic looking barbed wire your best bet is to head over to Home Depot and pick up a roll, it’s only $65 for 1300 feet! I mean, what’s the worst that can happen? Someone grabs it to see if it’s real and cuts their hand, or rips their clothing on it, or actually falls into it and slices themselves up real good leaving a bloody mess on your floor, and if any of that happens you know what that means… BEST HAUNT EVER!!!! It’s probably not worth the liability, though, so with that said, you may want to checkout the tutorial that msraynsford created on how to create Cheap Fake Barbed Wire You’ll start by folding your length of string in half, tying one end of it down and twisting the string whichever direction you prefer. Once you’ve got it good and twisted you’ll dip it completely in your glue. You can mix your paint directly into the glue to ensure a nice even color. Let it dry making sure that it doesn’t touch itself or unwind during this time. You’ll next need to add your barbs, which are nothing more than lengths of 10cm (3 inch) string dipped in the glue and then wrapped around the main string. Once you’ve got the barbs wrapped around the main string and they’ve dried completely, simply cut the barbs on an angle to give them a sharp pointed appearance. Once your barbed wire is completely dried your wire is ready to hang. It looks realistic and won’t cut anybody (probably). Items needed to complete this include: String (roughly 2.5 times more string than you want barbed wire) PVA glue (Elmer’s) Grey...

How to Chop Someone in Half...
posted by Tony
Seeing a person cut in half can be a life altering event. The kind of event that makes you want to try to recreate yourself, which is ok, provided you see the person cut in half at a haunt and not in some back alley in the wee hours of the night. And that’s pretty much how I’ve felt ever since I was 10 years old and got to see this done at the March of Dimes Haunted House. It was a terrifying and exhilarating thing for a kid to see, and while it may seem a bit campy by today’s standards, it’s still one of my fondest haunt memories. I’ve seen several tutorials that tackle this prop, but I really like the video tutorial that HauntingHooligan has created. The tutorial is fairly general, but will give you everything you need to get started creating this effect. http://youtu.be/Baqe4MBphUg Items needed to complete this include: 16′ – 1 x 3″ lumber (approximate) 2′ x 6′ sheet of 1/4″ plywood (approximate) Wire Styrofoam Cloth to cover platform Great stuff Newspaper Old pants Old shirt...

Monster Mud Reaper
posted by Tony
Nothing looks better than a well crafted Monster Mud Reaper standing guard over your cemetery. As he welcomes recently departed souls to their final resting grounds, this dark and foreboding spirit will cause all eyes to focus their attention to him if for no other reason than to make sure he isn’t actually alive. And the best part is, he’s pretty easy to build if you follow the tutorial that Jimmyzdc wrote up at HalloweenForum. The frame of your reaper will be created by securing a steel flange to a 2 x 2′ piece of MDF board and then threading a 4” steel pipe to the flange. You’ll connect the PVC that will create your reaper’s spine to the 4″ steel pipe and then connect your 4 way PVC cross fitting to the top so you can add your arms. Once the PVC frame is complete you’ll wrap some chicken wire around the skeleton for the reaper’s body and then measure out your burlap and drape it on the chicken wire to verify you have the correct size and shape for the reaper you want. Once you have the reaper shaped to your liking you’ll peel your burlap off and dip it in your monster mud until its completely submerged in the mud. Once coated, remove it from the mud and squeeze off the excess mud as you pull. Re-drape it on your frame and continue until you’ve got all of your burlap reassembled on the reaper. Once coated in monster mud, make sure you use a some Drylock masonry sealer to weather proof your reaper otherwise you may have a mess on your hands if it rains. Items needed to complete this include: (2) 90 degree PVC elbows (3) 45 degree PVC elbows (1) 4-Way PVC...
Rickety Floor
posted by Tony
An unstable, rickety old floor is a great way to catch visitors to your haunt off guard, especially when lights are low. It’s a simple project, and if you’re so inclined (pun intended), Raymond from RFHaunt has a tutorial on how to quickly and easily add this effect to your haunt. Your floor will be made of plywood and is best suited to a hallway section where you can have it extend from wall to wall. You’ll start by making a stationary section which consists of your piece of plywood with sections of 1 x 2 lumber nailed to the entire length of the center and both sides. For the rocking piece you’ll simply nail the 1 x 2 to the length of the center which will allow it to rock back and forth when you walk on it. You’ll want to be careful to make sure there are no gaps between the two sheets of plywood because you don’t want anyone getting their feet stuck in between and a piece of carpet draped on top of it allows for worry free enjoyment. Items needed to complete this include: Two large plywood boards On thin length of wood (Optional) Thick...

Faux Moss Application...
posted by Tony
A rolling stone gathers no moss, but a tombstone (and my patio) gathers plenty. So if you want a realistic looking tombstone you’re going to need to find a way to add some realistic moss that will stick to it. Troy from Halloween Hellmouth has a great method that produces a great looking moss for any prop utilizing a mixture of pre-dried moss and paint. You can buy dried moss at most craft stores, but if you have access to moss you can dry it out for a couple of days and use it. You’ll start by puréeing the dried moss in a blender and then you’re going to start mixing your paint until you get your desired color. Once you’ve got the correct color mix you’re ready to start spreading it onto your prop. Use your fingers to spread it and don’t worry if you’re a bit sloppy because moss doesn’t exactly grow straight. After you’ve spread the moss mixture onto your prop you’re going to want to wait for a good three days for the entire mixture to set, which sounds like an inordinate amount of time to wait for something to dry, but trust me, it’s worth it. The end result looks amazing. Troy adds even more detail by tea staining his moss application, but even before doing this his method is a success. Items needed to create this include: Bag of moss (or actual dried moss) Paintbrush Mixing stick Mixing bowl Spray bottle filled with water Drip pan (for water to drip in to) Acrylic paint...
Tombstone Lettering
posted by Tony
Nothing spoils a good tombstone more than poor lettering carved into it. No matter how realistic your tombstone looks, all eyes will eventually focus on the text, and if you want it to look really good, you’ll want to check out the video tutorial that Eerie Acres Cemetery put together on effective tombstone lettering. It covers some very simple but essential techniques for creating really good looking tombstone text....
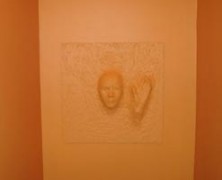
Spirit Panel
posted by Tony
If you want to add a bit of subtle detail to your haunt walls, Violetkitty has an instructable for a Spirit Panel that could very easily be used. The tutorial is based on an original idea titled Ghosts in the Bookcase Halloween Project, and it’s a simple way to add some depth to any flat surface. In a nutshell you’re going to glue or screw down the item you want protruding from the wall. You’ll then start to cover the protruding items with your paper mache mixture so that it completely covers them and appears to be stretching the wall. After you’ve got the items coated you’ll need to let them dry a bit and then cover the entire surface with the paper mache mixture. Once completely coated you can sand it down a bit and paint it. The great thing about this idea is that you can use plastic masks, skulls, prop hands, pretty much whatever you want to appear to be coming through the walls. It’s not a tricky project, and it can add a nice wrinkle to an otherwise plain wall. Items needed to complete this include: Plywood (or the flat surface of your choice) Plastic Mask Manicure plastic hand Gorilla glue Celluclay paper- mache Sandpaper Latex...
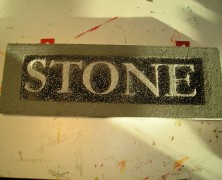
Carved Granite From Foam...
posted by Tony
Acetone will eat away at your styrofoam, and while that’s not exactly what I would call a newsflash here, but Creativeman uses it to great advantage in his instructable on how to use this to create really good looking granite lettering. This is a great way to create a sandblasted stone sign for use on cemetery columns, or to add depth to your tombstone, and it requires only the most rudimentary of skills. The process is simple. Cut your pre-printed letters out with an exacto knife, glue them to your styrofoam, and then spray paint the styrofoam. It’s literally easier than breathing, but it adds a great level of detail to your lettering or sign. Items needed to complete this include: Styrofoam Printout of your letters (each letter cut) Elmer’s glue Spray paint containing...
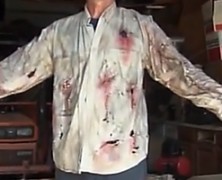
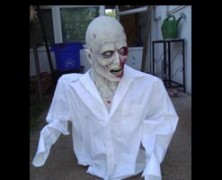
Making Zombie Clothes...
posted by Tony
If a zombie can take the time to dig its way out of its grave, the least you can do is make sure he’s got some appropriate looking clothes, right? And if you’ve taken the time to build a Full Sized Zombie Prop, or just plan on becoming the zombie yourself, you should probably pay equal attention to the clothing since it’s a major part of your zombie’s appearance. If you want truly realistic looking zombie clothing you’re going to want to give Robertb7864’s video a look. This twenty minute trek through zombie clothes modification features a full five minutes dedicated to Robertb7864 taking a belt sander to a shirt. The end result is pretty great looking, though, and is way more authentic looking than you’d achieve by tearing or cutting the cloth yourself....
Full Size Zombie
posted by Tony
If you’re looking to build a full size zombie that you can leave outside you’re going to need something that is a little more solid, and once again, Dr. Kreepy has just the tutorial you’re looking for. The lower body is framed using 2 x 4’s for legs attached to a 1 x 6 waist while the spine, shoulders, and arms are crafted out of PVC. After the frame is in place you’ll need to bulk out the torso and the legs. You can certainly wrap the legs and body with foam and duct tape it tight, or you can use the Dr. Kreepy method and use balled up newspaper or plastic. When mounting it you can use a plywood base and screw the legs to it, otherwise you can grab a pair of old boots and throw in some quick drying cement. You’ll need to add your favorite mask and a pair of prop hands if they’ll be visible. Items needed to complete this include: 2 – 2×4 approximately 35″ 1 – 1 x 6 appoximately 17″ 1 – 20″ 2 x 4 6 pieces 3/4 PVC 4 – 3/4″90 degree PVC 3/8″ or thicker 2′ x 2′ plywood Old clothes Skull or mask Duct Tape Newspaper or foam Screws ...
Quick & Easy Armature...
posted by Tony
I’ve got to tip my hat to Nightrideproductions from the HalloweenForum, who has proof that literally everything you own can be incorporated into your next prop build. This Quick and Easy Armature is built using a tomato cage and is all you’ll need to get a few more last minute zombies popping out of your cemetery without exerting much effort along the way. You’ll start by flipping your tomato cage so the largest circle is on the ground and then bend the two side wires so they form shoulders and arms. The third and final wire should be bent inward and then up 90 degrees so the styrofoam head can slide down onto it. The newspaper and duct tape should be added around the shoulders and arms to add a little body to your armature before adding your mask and shirt, but that’s pretty much all there is to it. Bend the wires back into place when your done using it and it’ll be ready for the spring tomato crop. Items needed to complete this include: Tomato cage Styrofoam head Tent stakes Newspaper Duct tape Wire...
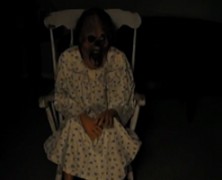
Rockin’ Granny
posted by Tony
There’s something completely unsettling about a decrepit looking old lady slowly rocking back and forth in her chair. If you know a decrepit looking old lady then you’re half way there, but if you don’t, you can always follow ScareFX’s tutorial and make your own Rockin’ Granny prop. What you’re building in this tutorial is a self contained rocking mechanism that you’ll build your Granny on top of. The frame is built of 2×6 material with the wiper motor mounted vertically. A piece of aluminum flat bar connects the wiper motor to a piece of 2×6 that is connected to the base via a 4″ hinge which will allow it to rock back and forth when the motor spins. The upper part of the Granny is built on the 2×6 that is hinged by connecting some 1″ PVC to the 2×6 and then creating some shoulders with the 90 degree elbows and adding some sections of pool noodles over the PVC for the upper arms. You’ll need to add some prop hands if they’ll be visible. The lower body is connected to the base and consists of a PVC T connection which connects some 1″ PVC to two 90 degree elbows and forms the legs. Again, you’ll need to add some prop legs if they’ll be visible. Once your mechanism and skeleton is complete, the entire device is connected to the rocking chair with clamps to prevent it from flying forward once it gets rocking. After you’ve got everything clamped down it’s time to put the Styrofoam head on it and you’ll probably want to put a mask on it as well. Oh, and don’t forget to put some clothes on Granny! Items needed to complete this include: Rocking Chair Wiper motor 4′ of 2×6 board 4×4 post cap & brackets (or...

Sparking Fence
posted by Tony
Want to create an impressive looking spark effect for your haunt that’s absolutely harmless? Bradsboobarn has a video tutorial on how you can achieve this effect and it’s easier than you think. If you take one thing away from this video, it should be that in order to achieve this effect safely, you’ll need to utilize a car battery charger, and not just a car battery. Using a regular car battery in place of the battery charger could potentially cause the battery to heat up and explode. Items needed to complete this include: Chain link fence Jumper cables Car battery charger Long metal object...

Don’t Blink
posted by Tony
I’ve never really watched Dr. Who, but I’m sure glad that MacabreRob over at HalloweenForum has because the “Blink” episode of the British television series gave him the inspiration to build two life-sized angel statues for his haunt. To say that the statues are constructed out of paper mache and expanding foam insulation really underscores the amount of work that went into these. Several coats of paper mache were carefully coated onto a mannequin and then cut and removed in sections. After they were carefully pieced back together, 1″ wood boards were inserted to add some support and it was filled with expanding foam insulation. The wings were created using a similar technique with the form created using styrofoam and then coated with paper mache. MacabreRob went even so far as to cast his daughters face in alginate to provide for the face on Angelica, the passive angel. Once the bodies were complete he dressed them in robes made from bed sheets and thoroughly coated them in monster mud. Both angels turned out amazing and it’s really cool to see a family working together on a Halloween project. It’s definitely an intricate build, but if you can pull it off you’ll have the best looking cemetery in the neighborhood. ...
Rotisserie Motor Torture Rack...
posted by Tony
If you’re a fan of The Wheel of Death prop but don’t want to create something quite as heavy duty then the Rotisserie Motor Torture Rack that Toktorill constructed may be just what you’re looking for. This torture rack relies on an inexpensive lazy susan and a 110v rotisserie motor to spin a cardboard wheel. The cardboard was covered with a woodgrain patterned self-adhesive contact paper, which looks remarkably realistic. It’s a fairly simple prop to create and looks fantastic, just make sure it doesn’t get wet. Items needed to complete this include: 110v Rotisserie motor Lazy susan Cardboard Assortment of 1×2 & 1×4 wood Woodgrain patterned contact paper Victim for...
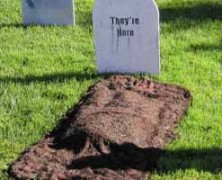
Halloween Graves
posted by Tony
You’ve built your fence, carved your tombstones, and even built a grave grabber to put in your cemetery. Job well done, but if you want to add a touch of that “freshly buried” look to your cemetery you do have a couple of options. You could dig down about 2 inches into your yard removing the top layer of nicely manicured green grass and mix up your dirt until it’s nicely mounded, or you could follow the tutorial provided by Adrian McCarthy on creating Halloween Graves. His method utilizes a beach towel, some chicken wire, and some potting soil. No need for a shovel or grass seed when you’re done! Items needed to complete this include: an old beach towel brown fabric dye spray glue potting soil or mulch chicken wire or newspapers several 3-inch nails (optional) tombstone (optional) skeletal hands and feet...
Foam Masonry
posted by Tony
If you’re in need of some stone or brick panels for your haunt, you’re definitely going to want to check out the tutorial that HIY Productions created. This tutorial takes you through the process of creating brick panels out of styrofoam from start to finish. The tips provided in this tutorial are invaluable if you’re planning on creating any sort of stone or brick for your haunt. The finished product looks amazingly real....
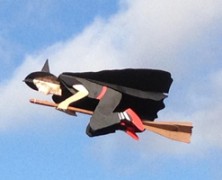
The Broom Flyer Witch...
posted by Tony
If you have some serious crafting skills and a ton of ambition, you too can create a Flying Witch prop just like the one that Otto Dieffenbach created. Or you could just watch the video of Otto’s prop and marvel at his creation. Seriously, this prop is one of the coolest builds I’ve ever seen, it turned out amazing, but the third sentence of the tutorial pretty much rules me out from ever attempting it: “This is a difficult build and should not be attempted by a newcomer to the hobby. There is a lot of wood work involved. You may want to find a friend with superior build skills if you are a newcomer.” I’m not even sure I could find a friend with enough moxy to try to build this, but if you can find one, the full tutorial is posted over at the RCgroups.com website. Items needed to complete this include: Frame Broom Flyer cutouts in 6 mm Depron (available from Hoosier Cutout Service) Two 0.196″ OD x 0.125″ ID x 40″ Carbon Fiber square tubes (Midwest Products) One 0.125″ OD x 0.060″ ID x 40″ Carbon Fiber tube (Midwest Products) One .034″ x .121″ x 40″ Carbon Fiber strip (Midwest Products) 1/8 inch plywood sheet 1 ft x 2 ft ¼ inch plywood sheet 6 x 12 inches 8 Sheet metal screws 8 x ½ E-Flite Sea Fury retract landing gear (Optional) Master Air Screw 3 blade 10 x 7 propeller Two packages of Dubro micro pushrods #852 One bag of 15 Dubro Hinges #117 Two 1 7/8 inch wheels (Parkzone T-28 or F4u) Clear Gorilla Glue Foam safe CA and activator 5 minute epoxy 30 minute epoxy Paint Electronics: At least a 3 channel full range receiver Three...
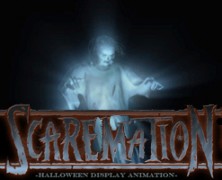
Scaremation Halloween Displays...
posted by Tony
If you’re a fan of projected Halloween displays there’s a good chance that Scaremation has an animation in their catalog that will appeal to you. These inexpensive animations can easily be rear projected onto a plain white bedsheet and incorporated into your haunt, or used just as a cool effect for the trick or treaters. Setup is a snap and the digital files are loopable for hassle free operation. http://youtu.be/hIwiEFnKLO4 Scare-1: Rough Night, 4 minutes (Loopable) – Price:$45 http://youtu.be/B21czGK1FmQ Scare-2: Mansion Parlour 1, 4 minutes (Loopable) – Price:$20 (anniversary pricing) http://youtu.be/6F6H0A9Gsxc Scare-3: Window Slammer, 1/2 minute – Price:$10 http://youtu.be/P2Bg4JH4MJg Scare-4: Skeleton Zombies!, 3 minutes (Loopable) – Price:$35 http://youtu.be/9NUBpZBuiZI Scare-5: Spider Lab, 3 minutes (Loopable) – Price:$45 http://youtu.be/l-dqFwef3AQ Scare-6: Underworld, 4 minutes (Loopable) – Price:$45 http://youtu.be/DsI5qkc9gdw Scare-7: Spectre, 55 seconds (Loopable) – Price:$20 http://youtu.be/1u-TqHsLQcI Scare-8: Zombie Slammer, 1 minute (Loopable) – Price:$25 Scare-9: Mansion Parlour 2, 8 1/2 minutes (Loopable) – Price:$45 http://youtu.be/jUEr3cLoc1U Scare-10: Gorewall, 3 minutes (Loopable) –...

Making LED Spotlights...
posted by Tony
I love mini LED spotlights, and they truly don’t cost that much to buy, but if you’re anything like me (is uber-frugal better than saying cheap?), it’s hard to justify paying for something that’s pretty simple to make. There are tons of tutorials online to guide you through the process of making your own LED spotlights, but none of the tutorials I’ve read have so clearly articulated the process as the video tutorial posted below. And with that being said, it should come as no surprise that it was created by Allen Hopps of Stiltbeast Studios. ...
I Ripped Up My Nail!
posted by Tony
I’ve never considered wearing artificial nails, and I’ve never actually had a reason to want to. Those are things I used to say prior to coming across this video tutorial from KlairedelysArt. The fact of the matter is that if you’re taking the time to do you own makeup, you’re probably already doing your hands as well, but if your willing to take the time to do your nails, the results can be truly gruesome. I must admit, the beginning of this video is hard to stomach, but well worth it....