


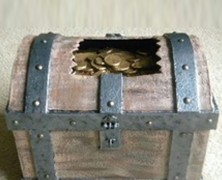
If you’re planning on going with a pirate themed haunt you’re going to need a treasure chest, and IMU posted a great tutorial on how to make a treasure chest out of a cardboard box at the HalloweenForum. Start by cutting the side flaps of your box into half rounds and then hot glue the front flaps to the side. You’ll have to cut a thin piece of cardboard to add to the center since the front flaps are now extending further since the sides are rounded. IMU cut out a space on top that the treasure will peek out through. The metal banding consists of foam core along the top and bottom edges as well as the side and centers. Once completed the gaps were smoothed out with a little paper towel mâché and then some wood grain was applied using monster mud. After applying a latch and some hinges crafted from a plastic coat hanger (if you don’t have access to a similar hanger you can buy some small hinges and a latch) it’s ready for paint! IMU gave it a base coat of black rubber spray paint since it would be sitting outside. Some various wood colors were dry brushed on as well as 2 varieties of metal colored paint for detail. The final touch was adding some rivets throughout the metal bands to give it a really sturdy appearance. The finished chest looks amazing, IMU did a spectacular job with this and it costs next to nothing to make. Items needed to complete this include: Cardboard box Foam core Hot glue Rivets Black spray paint Wood colored paint Metal colored paint ...
Blair Witch Dolls
posted by Tony
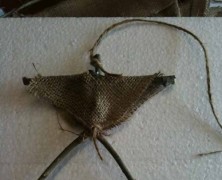
There are few things in life as disconcerting as waking up after a night camping in the woods than to see a bunch of these creepy totems hanging from the trees surrounding you. And thanks to the tutorial posted by pooky73 over at the HalloweenForum I’ll be well prepared to instill a bit of the Blair Witch fear into everybody on our next trip because these things are incredibly easy to make! Start by cutting some branches for your dolls, you’ll need an equal amount of “Y” pieces and straight pieces for however many you choose to make. Add some hot glue where you want your straight piece to sit and when it’s dry flip it over and add some more hot glue to reinforce the other side of it. Grab a piece of burlap and then fold it diagonally to form a triangle, then fold it diagonally again to form an even smaller triangle and cut the tip off of it. You’ll now have a perfect piece of burlap with a square hole in the dead center for you to slip over the doll. Add some hot glue to the stem of the doll as well as the arms, slide the burlap over it and press down so the glue will stick to the burlap. You’ll need to do this to both the front and back of your dolls. The final step is to cut a couple of pieces of jute. The first piece should be wrapped around your dolls waist to look like a belt and the other can be tied to the top of the doll to hang it from a tree. These dolls are easy to make and are a great way to add a little extra atmosphere to any haunt (or backyard). ...

Burlap Skulls
posted by Tony
If you’re looking for a creative alternative to the paper mache skull then feast your eyes on the tutorial for Burlap Skulls that OctART posted over at the HalloweenForum. It’s pretty much the same process as making a paper mache skull (although considerably less messy) and the finished burlap skull looks amazingly creepy with a tea light inside. You’ll need to start by wrapping your skull with aluminum foil and then cut your burlap into strips. Grab your hot glue gun and start to apply the burlap over the foil covering as much of the skull as necessary. You’ll want to make sure that you don’t use too much glue in the back so you’ll be able to pull it off the skull. Also, if you’re planning on using a tea light, make sure you’re only applying one layer of burlap where your light will shine through. You’ll have to remove the foil from those areas as well. Once all the burlap is in place and dried you can remove it from the skull and spray it will some of your sealant. Items needed to complete this include: Skull Aluminum foil Burlap Hot glue Spray sealant Tea lights...

Clear Plastic Tube Candles...
posted by Tony
Everybody loves PVC candles. They’re easy to make and offer some nice ambient lighting without having to fear burning your house down. They’re also incredibly realistic looking, with the one exception being that they are not as translucent as an actual candle when lit. That’s precisely what led Sipesh at the HalloweenForum to come up with a Slightly Different Take on the PVC Candle, utilizing clear plastic fluorescent light bulb protectors instead of PVC. They’re available at Home Depot and come in four foot lengths. The process is the same as when making PVC candles. You’ll start by cutting you tube to the desired length and then dripping some hot glue along the outside edge of the tube so that it runs down the side. Once covered with glue you’ll need to give it a coat of spray paint. Lighter colors will achieve the translucent effect better than dark but don’t let that stop you from experimenting. After the spray paint has dried you’ll need to build a base for your tea light. Sipesh recommends putting a piece of styrofoam in there as a base, but I suspect you could spray a small amount of great stuff in the tube so that it rises to the desired height you want the tea ligh at as well. That’s all there is to it, but the end result looks great, these really glow nicely. Items needed to complete this include: Clear plastic tubes Hot glue Spray paint Styrofoam base Tea...

Creepy Scarecrow
posted by Tony
I love scarecrows. There’s something eerily majestic about the way they stand guard over isolated fields, just swaying in the wind. They’re selfless as they monitor everything that happens, day and night, silently watching. Waiting. I’m pretty sure they eat the birds that make the mistake of landing on them, and its entirely possible that they do get off their perches and walk around while I’m asleep, but, I can’t confirm that. With all of that said, if you’re interested in building a scarecrow, Nightfisher posted some great details on the build of his Creepy Scarecrow over at the HalloweenForum that are worth looking at. This project started by hot glueing some burlap over a foam skull and stretching it tight so most of the features of the skull would be visible through the burlap. After adding some stains and shadows Nightfisher added some large metal staples along the scarecrows mouth. The skull itself rests on a PVC spine. The shoulders and arms of the scarecrow were crafted with some heavy branches. The torso was created by spraying some Great Stuff over a 2 inch block of styrofoam. Nightfisher did an awesome job of spraying the ribs with expanding foam because I’ve got to imagine that was a fairly stressful process. A few vines were sprayed over the ribs as well to complete the torso. Once completed some black latex was painted in between the ribs and all of the crevices of the torso. A base coat of brown was dry brushed on after the black latex dried followed by another layer of black and a final coat of light brown. The vines were given a coat of green paint. Finishing touches included adding some stitches to the eyes, wrapping some twine around the joints of the arms and hands, and of course, adding a...
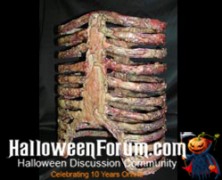
Cheap Skeletal Rib Cage...
posted by Tony
If you need a rib cage for your haunt and are down to you last few bucks, don’t worry, be happy, because the Count over at the HalloweenForum has created a tutorial on how to create a Cheap Skeletal Rib Cage. It all starts with a trip to WalMart to pickup one of their 18″ high, plain white plastic trash cans. You’ll want to draw your ribcage, sternum and spine on the trash can (the Count recommends using 1/2″ masking tape to delineate the ribs). Once your outline is complete you’ll need to grab a pair of tin snips and carefully cut out the dead space between the ribs. Make sure to save the bottom and top for last to provide extra stability to the trash can. Once the ribcage is cut it’s time to put some meat on those ribs! The Count mixed and quickly spread several batches of a two part polyurethane foam on his ribcage. Once dried a few layers of reddish brown and black latex paint were added followed by a final coat of lacquer. The finished ribcage looks great and I never would have guessed that it came from WalMart! Items needed to complete this include: 18″ White trash can 2 part Polyurethane foam Reddish brown latex paint Black latex paint...
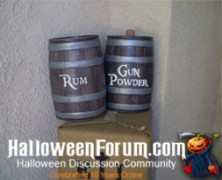
Small Faux Wood Barrel...
posted by Tony
Any Halloween prop that necessitates the drinking of beer is naturally going to pique my interest. After all, Halloween prop building and beer go together like peanut butter and jelly, right? I’m pretty sure Ollieee who posted a great tutorial over at the HalloweenForum detailing how to make a small faux wood barrel using an empty 5 liter mini-keg would agree with me. Ok, truth is, you don’t really have to buy a keg filled with beer to get this done, you can purchase empty mini-kegs from Midwest Supplies and save a few bucks, but what fun is that. You’ll start by emptying the barrel if you opted for one filled with beer, you can use whatever method you like for this step, however a pint sized glass works best for me. Once emptied make sure you give it’s good rinse out to remove any leftover suds and the give the exterior a light sanding. Ollieee gave the barrel a solid base coat of flat black paint, then an additional coat of a dark brown flat paint. Once the brown base is completed you’ll want to add some faux wood grain to your barrel. Once the wood grain is completed you’re going to want to paint some metal bands around the barrel as well as any additional decorative text to complete your barrel. The finished product is pretty great looking and the barrel is just the right size to make me feel like a giant pirate, Arrr! Items needed to complete this include: 5 liter mini-keg A drinking buddy (optional)...

Cheap Rusty Chain
posted by Tony
I must admit that when I first glanced at the tutorial that Lake of the Dead penned over at the HalloweenForum for Cheap Rusty Chain I was a bit underwhelmed. The opening photos of the PVC used to create the chain left me skeptical that the finished product would deliver. Luckily I didn’t stop reading because the finished chain looks amazing and it’s incredibly easy to create. You’ll need to start by cutting all of the links for your full chain. Next, using a PVC pipe cutter you’re going to cut a slit in 1/3 of your links to easily attach the rest of the links. Once you’ve got all your links threaded you can paint the chain using a rust colored paint. Rust-Oleum’s multicolored texture sprays are perfect for this. Items needed to complete this include: 3/4 PVC pipe Rust colored...

Monster Mud Reaper
posted by Tony
Nothing looks better than a well crafted Monster Mud Reaper standing guard over your cemetery. As he welcomes recently departed souls to their final resting grounds, this dark and foreboding spirit will cause all eyes to focus their attention to him if for no other reason than to make sure he isn’t actually alive. And the best part is, he’s pretty easy to build if you follow the tutorial that Jimmyzdc wrote up at HalloweenForum. The frame of your reaper will be created by securing a steel flange to a 2 x 2′ piece of MDF board and then threading a 4” steel pipe to the flange. You’ll connect the PVC that will create your reaper’s spine to the 4″ steel pipe and then connect your 4 way PVC cross fitting to the top so you can add your arms. Once the PVC frame is complete you’ll wrap some chicken wire around the skeleton for the reaper’s body and then measure out your burlap and drape it on the chicken wire to verify you have the correct size and shape for the reaper you want. Once you have the reaper shaped to your liking you’ll peel your burlap off and dip it in your monster mud until its completely submerged in the mud. Once coated, remove it from the mud and squeeze off the excess mud as you pull. Re-drape it on your frame and continue until you’ve got all of your burlap reassembled on the reaper. Once coated in monster mud, make sure you use a some Drylock masonry sealer to weather proof your reaper otherwise you may have a mess on your hands if it rains. Items needed to complete this include: (2) 90 degree PVC elbows (3) 45 degree PVC elbows (1) 4-Way PVC...
Quick & Easy Armature...
posted by Tony
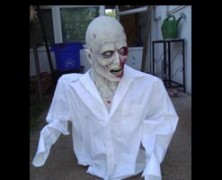
I’ve got to tip my hat to Nightrideproductions from the HalloweenForum, who has proof that literally everything you own can be incorporated into your next prop build. This Quick and Easy Armature is built using a tomato cage and is all you’ll need to get a few more last minute zombies popping out of your cemetery without exerting much effort along the way. You’ll start by flipping your tomato cage so the largest circle is on the ground and then bend the two side wires so they form shoulders and arms. The third and final wire should be bent inward and then up 90 degrees so the styrofoam head can slide down onto it. The newspaper and duct tape should be added around the shoulders and arms to add a little body to your armature before adding your mask and shirt, but that’s pretty much all there is to it. Bend the wires back into place when your done using it and it’ll be ready for the spring tomato crop. Items needed to complete this include: Tomato cage Styrofoam head Tent stakes Newspaper Duct tape Wire...

Don’t Blink
posted by Tony
I’ve never really watched Dr. Who, but I’m sure glad that MacabreRob over at HalloweenForum has because the “Blink” episode of the British television series gave him the inspiration to build two life-sized angel statues for his haunt. To say that the statues are constructed out of paper mache and expanding foam insulation really underscores the amount of work that went into these. Several coats of paper mache were carefully coated onto a mannequin and then cut and removed in sections. After they were carefully pieced back together, 1″ wood boards were inserted to add some support and it was filled with expanding foam insulation. The wings were created using a similar technique with the form created using styrofoam and then coated with paper mache. MacabreRob went even so far as to cast his daughters face in alginate to provide for the face on Angelica, the passive angel. Once the bodies were complete he dressed them in robes made from bed sheets and thoroughly coated them in monster mud. Both angels turned out amazing and it’s really cool to see a family working together on a Halloween project. It’s definitely an intricate build, but if you can pull it off you’ll have the best looking cemetery in the neighborhood. ...
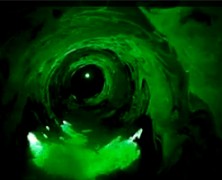
Simple Laser Vortex Construction...
posted by Tony
I’ve always wanted to post a link to a tutorial on how to build a laser vortex but I’ve not been able to find one that wasn’t either too detailed to the point of confusion, or lacking in detail, which is equally confusing. Luckily, UrDaddyO31 posted a short video detailing the design of the laser vortex he used for his prop. It’s not so much a tutorial, but it does lay out the design he used which was originally created by kimcfadd who has them for sale on HalloweenForum. This ultra-simplistic design incorporates a mirror mounted on a cpu fan. The cpu fan and the laser are mounted to blocks of wood and as the cpu fan spins the mirror projects the circular laser effect which will become your laser vortex when you add a little fog. ** Warning: Lasers can cause serious and/or permanent eye damage. Never look directly at a laser or point it directly in someone’s eyes. Consult Safety Recommendations for Laser Pointers for more...

Sand Casting Skulls
posted by Tony
If you have access to a sandbox, or even just have some sand and a box you can put it to good use in making some skulls using the sand casting tutorial that partsman at HalloweenForum wrote. You’ll need some play sand, a box, some great stuff, and a foam skull (or whatever you chose to cast). Once you’ve got all your supplies, you’re basically just pressing the skull into the sand and packing the sand really tight around it. Once it’s packed, just remove the form and add some great stuff to the impression you’ve created. As you can see the resulting product has a really great looking stone appearance to it....
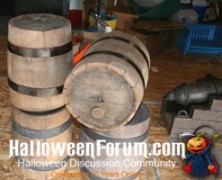
Foam Barrels
posted by Tony
Ok, since September 19th was International Talk Like a Pirate Day, (and I was completely unaware of this fact), I thought I’d post the tutorial that fravak from HalloweenForum penned on how to make foam barrels. The barrels are crafted using styrofoam blocks, the kind that are used to stack small flatbed trailers, and while these may be hard to come by, even if you don’t need barrels and have access to these, they are gold, take them. Since the foam blocks start out square, fravak utilized the lid from a 5-gallon bucket to outline the round shape you’ll need. From there the corners were cut off using a hot wire cutter and the entire block was sanded down using a drywall rasp to round it out. Once this is complete the detailing of the barrel will actually begin. A soldering iron will be needed to carve out the individual pieces of wood on all sides of the barrel. Once this is complete you can add some finer detail by adding graining to all the wood planks with the soldering iron. Fravak utilized paper mache for the straps around the barrels and a piece of blue foam for the plug. Once all of these steps are complete it’s time to paint it up. The base is a browish color while the top he top is covered with a black wash that fravak rubbed all over the barrel to make the color more uneven. The end result is phenomenal, these barrels look completely realistic they don’t cost much, and they’re light as a feather. So next International Talk Like a Pirate Day, don’t forget to grab one of your barrels as you strut around town saying “Ahoy, me hearties, let’s see what crawled out of the bung hole.”, it’ll just make a lot more...
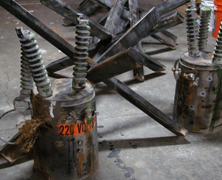
Making an Electrical Transformer...
posted by Tony
High voltage is not something you want to be messing around with unless you really know what you’re doing. Luckily, Terra from HalloweenForum really knows what she’s doing, and she’s created a video tutorial on how to make authentic looking electrical transformers. They’re created with trash cans, pool noodles, pvc and rope, but you can make them as intricate as you’d like. When you put a strobe light under the trash can it really gives the appearance that the transformer is arcing, which, coupled with some high intensity audio will scare the heck out of anybody! Items needed to complete this include: Two trash cans in a good transformer shape One pool noodle 14″ thick manila twisted rope Four 18″ lengths of 3/4″ PVC pipe Two 12″ lengths of 1/2″ PVC pipe Two 1/2″ PVC elbow connectors Two 19″ lengths of plastic plumber’s tape Two scraps of 1 1/2″ foam (6 1/2″ long, 3″ wide) Two 12″ metal strappings Four car model wheels or something similar 220 volt sticker Bullet hole stickers Portable strobe light Hot glue sticks Gray latex Drylok...
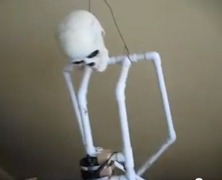
PVC Skeletons
posted by Tony
Not all grave grabbers need to be motorized, and if you’re interested in building an inexpensive one that still looks good then checkout LastHouse’s tutorial over at HalloweenForum. It’s a pretty easy project that allows for plenty of artistic freedom, but you will need a little bit of skill to cut the PVC for the rib cage, and of course you’ll need a blowtorch to get the PVC hot enough to bend. Once the ribcage is done, though, you’re all set to pose and bring your skeleton to life. The nice thing about this prop is that while it may look like a complete disaster while you’re framing it, once you’ve coated it with the Great Stuff and painted it up, it’ll take on a life of its own. And don’t forget to reference LastHouse’s tutorial on skeletal hands to add to your skeleton. Items needed to complete this include: Two 3/4 ” pieces of PVC 3 PVC T’s Some scrap 2 x 4 Hot glue ( LOTS) Liquid Nails Great Stuff Some Scrap foam Duct tape Drylock paint Model Magic clay...
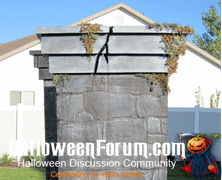
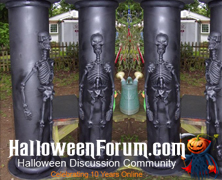
Nightmare on Bayshore Crypt Cemetery Columns...
posted by Tony
There are numerous tutorials on how to make cemetery fence so it stands to reason that there would be multiple tutorials on how to make cemetery columns, and Camsauce from HalloweenForum has a highly detailed tutorial on how to easily build some really realistic looking columns. These columns are solidly built around a 2 x 2″ lumber and OSB / Plywood base. The joint compound is spread around the entire structure to create the stone facade, which is easy to do and looks great. Once you’ve got your joint compound spread you’re ready to black wash the columns to suit your taste. It’s really that simple, and the finished product couldn’t look any more realistic without a trowel! Camsauce’s tutorial includes some optional skeletal sconces, which seem like a lot of extra work, but judging from the photo below are well worth the time and effort. Items needed to complete this include: 2 x 2″ (approx 85′) 2 x 4 (approx 16′) 2 x 6 (approx 14′) 5 sheets 4 x 8′ OSB board (or plywood) 2 sheets 2″ Styrofoam insulation 2 gallons joint compound Exterior primer Acylic paints to black wash Optional items: Moss Skeletons Candles...
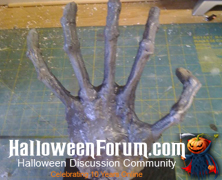
Cheap and easy Skeleton Hands...
posted by Tony
Since many of the prop builds featured on HauntersList involve PVC frames it’s probably not a bad idea to post another tutorial on how to create hands for those frames. LastHouse from HalloweenForum has a tutorial on how to make some gruesome looking skeletal hands that won’t take you too long and the cost is next to nothing. They’re made of styrofoam and wood dowels coated with a little hot glue and then painted. The hardest part about this tutorial is melting the styrofoam to give them a more natural boney look. Make sure to do this step in a well ventilated area as burning styrofoam can be highly toxic (it’s a good idea to wear a respirator). Items needed to complete this include: Styrofoam Hot Glue Wooden dowels Drylock Paint...
Grime Up Props
posted by Tony
Making a prop from scratch takes skill, but aging the prop so that it looks like it’s been around for a few years takes talent. Now, it’s well known that Terra from HalloweenForum can build anything. I mean, I honestly think she could build a structurally sound house out of styrofoam if she wanted to. But when she needs to make something look old, or grunged up, she’s definitely got the talent to make it so. Her video tutorial on how to Grime Up Props details exactly how she does it, and it’s the perfect guide for anyone who needs help making props look and feel like they’ve been around for years. ...

Clockwerk’s Ghost Girl...
posted by Tony
Clockwerk from HalloweenForum has built a really eerie, almost cartoonish looking Ghost Girl and has posted some great pictures and a brief tutorial on how it was constructed. This creepy little girl sits atop her tombstone with an ominous glow beckoning passers by to enter her cemetery. There’s nothing I don’t like about this prop. Heck, I think the tombstone alone looks great, but Clockwerk has really shown some artistic skill with this girl. It seems like a pretty easy prop to build, but the arms, legs, and head may take some skill to craft (ok, so maybe it’s not that easy). You’ll need to create and mount a PVC frame to the tombstone. The head is constructed out of a styrofoam craft ball with ping pong balls (with LED’s implanted) for eyeballs, while the legs and arms are created using a combination of paper mache and Crayola model magic. Items needed to complete this include: Tombstone Styrofoam craft ball Ping Pong balls LED lights Paper Mache Crayola Model Magic (4) – 90 degree 3/4″ pvc (2 or 3) – 3/4″ pvc T joints 4 feet – 3/4″...
Steel Haunt Panels
posted by Tony
If you’ve ever browsed the HalloweenForum you’re no doubt familiar with Terra. Suffice to say, she’s a prop making goddess. Her video tutorial on making steel haunt panels showcases the kind of cool, realistic looking props you can make for your haunt if you’ve got a little bit of skill and a lot of desire. This prop is not hard to create by any stretch of the imagination and won’t cost you a lot of money to create. Items needed to create one panel include: Little over one 3/4″ thick pink or blue foamboard panel Three 8′ furring strips Twelve 4″ x 1 1/2″ pieces of plywood Four 2 1/2″ coarse drywall screws Twenty-four 1 5/8″ coarse drywall screws Foamboard glue Super 77 glue Twenty 3/8″ tile spacers Quart of exterior gray Glidden Gripper paint (exterior) Silver latex paint (had used Ralph Lauren) Raw sienna acrylic paint Rust colored monster mud Light rust colored monster mud Flat black acrylic paint Clear gloss acrylic varnish Paper towels Optional Accessories include: 4 mini louvers 3″ (air vents) 1/2″ thick pink or blue foamboard panel PVC drain strainer Plastic rafter vent 16″ x 8″ air vent 16″ x 4″ air vent Hooks and zip ties for mounting to house Cement...
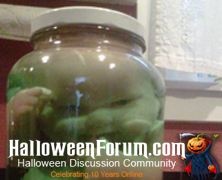
Baby in a Jar
posted by Tony
I love this prop. At least I think I do. Actually, I find it kind of unsettling, (I mean look at the picture below), but that might only be because the doll that Old Man Bakke over at HalloweenForum chose to use is the creepiest doll every produced. I mean, in his defense, if there was ever a doll that needed to go into a jar it’s the one he used…look at those eyes. Anyway, this is a simple prop that adds a lot of creep factor to any scene that you put it in. I’d be a little worried about putting it right on my oven rack, but as long as you monitor the heating you should be good to go. Items needed to complete this include: Mason jar Plastic doll...

Large Cauldron
posted by Tony
If you’ve ever needed to purchase a cauldron for a haunt you’ve probably been disappointed with your purchasing options. They’re tiny. I mean, so tiny that a baby witch would feel uncomfortable using them. So your best option is to craft your own cauldron. I’ve seen several really good tutorials on how to build your own cauldron, and Old Man Bakke has a pretty good one posted over at HalloweenForum. I must admit that when I first saw the cardboard, hot glue gun, and duct tape I was reluctant to continue, but by the time I reached the finished product images on page 7, I was sold. The size is what I would expect that a couple of old hags would use, and it looks completely realistic. What I like best about this tutorial is that it was a completely fluid tutorial. If you follow the posts you’ll see that during the creation of this tutorial a user posted a link to some photos from Dave The Dead’s aging technique tutorial that really helped make this into the finished product that it became. Most of the time tutorials don’t get better on the fly like this one did. Items needed to complete this prop include: Large rope handled bin (rope removed) Heavy duty cardboard Duct tape Hot glue gun Paper Mache Spar Varnish Round towel rings Oatmeal & sand / water & glue...
Hangman Prop
posted by Tony
Ulcerative has posted a great video of the perfect frame for a hangman prop. When the attached wiper motor is turned on the flailing effect is supreme, and even though it’s just a PVC frame in the tutorial, you can more than visualize the awesome effect you’ll get when you clothe the frame and light it for effect. If you don’t want to get into pneumatics, but still want a great visual, this is definitely one you’re going to want to try....
Skeletal Columns
posted by Tony
If you’re looking to make a creepy entrance to your haunt you may want to take a look at the Skeletal Sonotube Columns tutorial that Effie posted at HalloweenForum. These columns are really simple to make and would easily make an eerie entrance to a cemetery, dungeon, or mausoleum. All of the pieces of this puzzle are easily obtained and the best part is that Effie actually planned to use the empty sonotubes for storage at the end of the season! Items needed to create this include: Sonotube 10″ x 4′ (Sonotube comes in many diameters and heights, 4′ being the most easily obtainable at Home Depot, but you can get 6′, 8′ and 10′ heights as well) Century Novelty Plastic Skeleton Heavy pressboard Foam pipe insulation Spray...
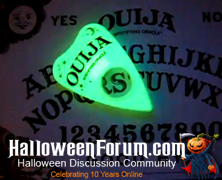
Animated Ouija Board
posted by Tony
Ok, I’ve seen a couple of animated Ouija boards on the net, but DaveintheGrave from the HalloweenForum has the most detailed tutorial on how to make this prop I’ve ever seen. It’s broken down into two parts, with Part 1 focusing on how to prep the box that will house the guts of the Ouija board prop, while Part 2 details the mechanics of the prop. DaveintheGrave utilizes a small vent motor for this prop, and breaks down the motor instructions into two additional tutorials for further clarity (Motor Part1, Motor Part2). There is a link to the video of this prop in action at the beginning of Part 1 of the tutorial, and as you will see, this prop is worth the time spent making it, it looks...

Paint Faux Wood Grain...
posted by Tony
Terra from HalloweenForum has posted a great video tutorial on how to achieve an incredibly realistic wood grain look that can easily be applied to your styrofoam projects. I’m blown away at how realistic it looks and how simple it is....

The Breathing Grave
posted by Tony
Madmax at HalloweenForum has a great tutorial on how to make a Breathing Grave prop that you’re really going to dig (ridiculous pun intended) . The effect is subtle, looks great, and when viewed at night with proper lighting, is sufficiently creepy. When you see just how easy this prop is to craft, and how inexpensive it is, you’ll want to put them in front of all your tombstones! Items needed to create this include: Vent Motor 11′ – 1×4 power supply 12VDC 300mA 1 Yard Burlap paint, 1 spray can or latex house paint 22″ threaded rod (1/4″) 6 nuts 6 lock washers 12 screws 2 Cams (1/2″ PVC with a cap)...
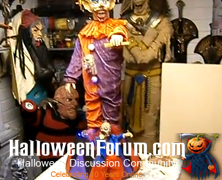
Circus Freak Puppeteer...
posted by Tony
Every now and then someone builds a prop that you look at and immediately wish you had the talent to pull off the same build. That’s exactly how I felt when I saw TwistedUK’s Circus Freak Puppeteer tutorial. It’s not that the frame and motors are overly intricate, but the clay work that went into the crafting of both clowns (and shoes) is what really tells me I’ve no chance of building something nearly as nice as his. Of course, if you can find some premade items that would work you could always eliminate the clay, but you might not get as good looking of a finished product. I’m filing this under Motorized Props, but I really feel like there should be a Prop Showcase category because this one definitely deserves more than just a cursory glance. Items needed to complete this include: Child Mannequin Hair dressing practice head Wiper motor Large piece of chip board 1’thick One pack of DAS clay 3/4′ plastic tubing Sea fishing line 3 blue LEDs 1 1/2′ length of wood 1 sheet of plywood More patience than I...
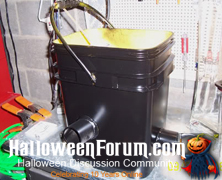
Homemade Vortex Fog Chiller...
posted by Tony
Serialc0d3 over at HalloweenForum.com has a great tutorial on how to build your own Vortex Fog Chiller for very little cash. Now, there are many containers you can use when building your own vortex fog chiller, but reusing a Tidy Cat Litter pail is the ultimate “green” project. Additionally, the finished product looks remarkably familiar. To complete this prop you’ll need the following: Tidy Cat Litter Pail Few ft of 2 in. PVC 2 in. PVC Elbow Few ft of 1/2 in. PVC pipe Some sort of metal mesh or chicken wire to hold ice Epoxy of your choice (I used Oatey Epoxy Putty) Krylon Fusion Paint (optional) Nozzle for Drain Hose (optional) Drain Hose (optional) Tools for cutting the materials And of course, you’ll need a fog...
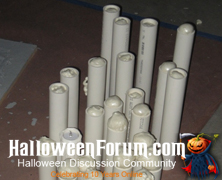
PVC Flicker Candles
posted by Tony
Jimmyzdc over at HalloweenForum has posted an awesome tutorial on how to make your own PVC candles. It’s super simple, and when you pop some battery powered tealight candles on top of them you’ll be free to create and put out as many candles as you want without having to worry about setting your haunt on fire. Items used to create these include: 1 1/2″ PVC Pipe – Full length 8-10 ft pipes Great Stuff Insulation LED Tea Lights Hot Glue Gun 1 1/2″ Forstner Drill Bit Rustoleum Spray...
Homemade Web Spinner
posted by Tony
Instant Monsters over at HalloweenForum has posted a great tutorial on how to make your own Web Spinner using some easily obtainable items and a drill. The cobwebs that this thing puts out look amazing and would make most spiders jealous. They’ll require some serious cleanup, but if you’re looking for a realistic web, look no further. ...
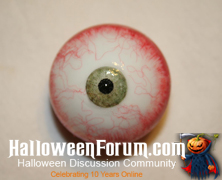
Easy Realistic Eyeballs...
posted by Tony
Fangoria over at HalloweeForum.com has a great tutorial on how to make easy, cheap and ultra realistic eyeballs. Trust me, this one I’ve succeeded in doing, and they turn out fantastic every time. You’ll need the following supplies: A package of ping pong balls Deep Red blood color gloss paint Yarn the same color as the paint A printout of iris from the web A tweezers A scissors A paintbrush Clear nail polish/Nail hardener – make sure whatever you use that it is glossy, gloss makes them pop!...

Hot Burning Coals Prop...
posted by Tony
Loach160 over at HalloweenForum.com has posted a great tutorial on how to make hot burning coals without the heat. This effect looks great with a witches cauldron above it and is super simple to create (I actually think I might be able to do this one). Items used to create this effect include: 1 string of 50 orange LED Christmas lights 1 can expanding spray foam 1 12 inch square piece of wood or plastic 1 can black spray paint masking tape assorted plastic bottle tops and/or bottoms box cutter or...