


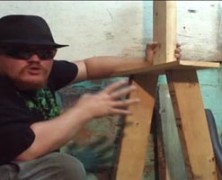
If you’re looking to add a little excitement to your haunt, or just want to give the trick or treaters a quick startle before sugaring them up for the season, then a rumble bridge might be just what you need. It’s a pretty simple project to build and the guys over at CreepyCreations have created a great video detailing how its done. How to Build A Rumble Bridge The completed Rumble Bridge: Items needed to complete this inlclude: (1) – 3/4″ sheet of plywood (4) – 2×2 wood, 36″ long (4) – 2×2 wood, 30″ long (1) – 2×2 wood, 48″ long (2) – 2×4 wood, 43″ long (4) – 2×4 wood, 25″ long (4) – 4×4 wood, 6 to 8″ long (2) – 4″ diameter rubber balls (1) – clamp (1) – bracket (1) – 2 oz fishing weight (8) – 7″ bolts with nuts & washer – 1/2″ diamter Assorted screws, nuts & bolts for weight Hot glue Metal strapping High speed motor...
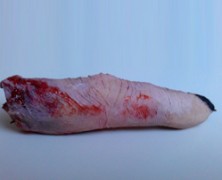
Severed Finger
posted by Tony
If you’re looking to serve Ladyfingers you’ll want to pair them with tea, pudding, or ice cream. If you’re looking to sever Lady fingers, on the other hand, you’ll probably want to take a look at the tutorial that Rachel from SplatterFactoryTV posted. She details a remarkably easy way to make a quick casting of your own finger using liquid latex and makeup. The great thing is, all of the details of your finger will be imprinted on your castings, giving it a remarkably realistic appearance. The process is so simple you’ll have no problem making enough for everybody to eat! Items needed to complete this include: Liquid latex Tissue paper Hair dryer Flesh tone makeup/foundation...
Motion Detector Hack
posted by Tony
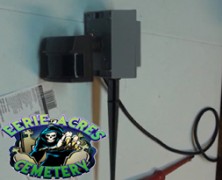
If you’ve ever wanted a motion sensor to trigger your Halloween props but didn’t feel like laying out the cash for an overpriced store bought unit then pay close attention. The reality is, they’re not that difficult to make if you’ve got a moderate amount of electrical skills and you’ll end up with a unit that is tailor made for your use. You’ll also end up saving yourself a lot of money because once you realize how easy it is, you’ll want to make more! I’m sure the folks at Eerie Acres Cemetery wouldn’t mind you sending some of that extra cash their way because they’ve posted a really descriptive tutorial on how to create a motion sensor that will more than get you up and running creating your own. Items needed to complete this include: Replacement motion sensor GFCI outlet 4 hole single gang outdoor outlet box (metal) Outdoor electrical outlet cover (metal) Clamps for gang box PC power cable Threaded ground stake Silicone...
Silicone Skull Mold
posted by Tony
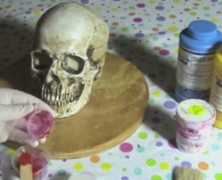
If you’re interested in making your own skulls, and I’m talking seriously making a lot of your own skulls, then you’re going to need a pretty serious mold to cast them in. You can use the Cheap Easy Skulls method provided by Dr. Kreepy, but if you’re interested in some serious skulls you’re going to want to checkout the tutorial that The Devil’s Workshop posted. Creating your mold is a pretty elaborate process but this two part tutorial will walk you through the process from start to finish. http://youtu.be/QetqLES6MXA...
Easy Brain in a Jar
posted by Tony
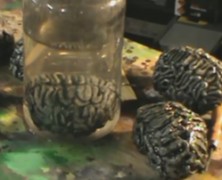
Allen Hopps has a brain the size of a baked potato. Ok, now that I’ve got your attention I should probably rephrase that. Allen’s got a great tutorial on how to easily make a brain in a jar that starts out roughly the size of a baked potato and requires far fewer ingredients than I would put on said potato. His method starts by balling up some aluminum foil and then adding some caulk to it to create the sulci and gyri (brain grooves). Once you drop it in a jar filled with water the size of the brain looks deceptively larger! Items needed to complete this include: 1 gallon jar Aluminum foil Gray silicone caulk Black paint White acrylic paint Polyurethane spray...
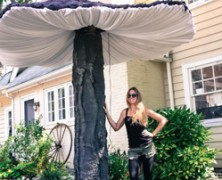
The Build of Giant Mushrooms...
posted by Tony
Ever hear the phrase “Go big or go home”? Well I’m pretty sure Rania Peet has, and her larger than life Halloween props sure live up to that standard. This time she’s set her sites on The Build of Giant Mushrooms, and her finished fungi could not have turned out any better! Her mushroom build is broken down into three core parts: the stem, the cap and the underside gills. Realistically, I could get the stem and the cap done, but I’d probably fail miserably on the gills. The top and bottom of the stem was made from 3/4″ plywood. She used (3) 2x4s in the center to create an approximately 18″ diameter stem. The 2×4’s are secured to the base using lag screws and washers for extreme strength and stability. For her build, Rania was lucky enough to have access to a wood cable spool which provided the perfect oversized round base. The stem was then wrapped with chicken wire. The build of the mushroom cap is pretty ingenious, it consists of a 1′ piece of 4×4 that is securely screwed to a sheet of plywood with lag screws. She then proceeded to bore four holes through the four by four and ran some rigid electrical conduit through it. Once in place the conduit was bent to provide the cap with a more “mushroom” shaped appearance. Some 3/4″ poly-flex tubing was screwed to the end of the rigid conduit to give the cap a finished, rounded edge. A layer of chicken wire was then added to the cap which was covered with a dense cheesecloth to hold the layers of spray foam. Think Rania bought a couple of cans of Great Stuff? Guess again, because this is where she takes this project up a...
LED Lunacy
posted by Tony
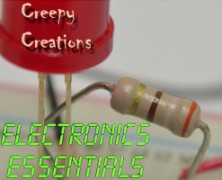
I’ve got a confession to make. I’m clueless when it comes to basic electrical circuitry. In fact, pretty much all of the concepts of electricity other than don’t stick your fingers in the outlets seem to be over my head (ok, well, don’t stick your fingers in the outlets while your standing in water, yeah, I got that one too). So when it came to buying the components to make my own Homemade LED Spotlights my inexperience with a few basic LED concepts was a definite confidence killer. The worst part is that up until this point every written tutorial I’ve seen on this has been a complete snoozer. Thankfully, CreepyCreations have posted a really simple to follow tutorial that outlines all of the essentials you’ll need to purchase the correct resistors to power your LED’s without fear of them blowing up on you. The tutorial is really well made and it’s really simple to follow....

Kitchen Accident
posted by Tony
If you’re looking for a gruesome looking makeup effect for your scare actors then CrazyHappy08 has a tutorial that may suit your needs. Its a super simple effect to achieve (assuming you’re reasonably adept at applying makeup) and the results look amazing. You’ll need glue, foundation, some makeup, and a bit of a depraved imagination. ...

How to Chop Someone in Half...
posted by Tony
Seeing a person cut in half can be a life altering event. The kind of event that makes you want to try to recreate yourself, which is ok, provided you see the person cut in half at a haunt and not in some back alley in the wee hours of the night. And that’s pretty much how I’ve felt ever since I was 10 years old and got to see this done at the March of Dimes Haunted House. It was a terrifying and exhilarating thing for a kid to see, and while it may seem a bit campy by today’s standards, it’s still one of my fondest haunt memories. I’ve seen several tutorials that tackle this prop, but I really like the video tutorial that HauntingHooligan has created. The tutorial is fairly general, but will give you everything you need to get started creating this effect. http://youtu.be/Baqe4MBphUg Items needed to complete this include: 16′ – 1 x 3″ lumber (approximate) 2′ x 6′ sheet of 1/4″ plywood (approximate) Wire Styrofoam Cloth to cover platform Great stuff Newspaper Old pants Old shirt...

Faux Moss Application...
posted by Tony
A rolling stone gathers no moss, but a tombstone (and my patio) gathers plenty. So if you want a realistic looking tombstone you’re going to need to find a way to add some realistic moss that will stick to it. Troy from Halloween Hellmouth has a great method that produces a great looking moss for any prop utilizing a mixture of pre-dried moss and paint. You can buy dried moss at most craft stores, but if you have access to moss you can dry it out for a couple of days and use it. You’ll start by puréeing the dried moss in a blender and then you’re going to start mixing your paint until you get your desired color. Once you’ve got the correct color mix you’re ready to start spreading it onto your prop. Use your fingers to spread it and don’t worry if you’re a bit sloppy because moss doesn’t exactly grow straight. After you’ve spread the moss mixture onto your prop you’re going to want to wait for a good three days for the entire mixture to set, which sounds like an inordinate amount of time to wait for something to dry, but trust me, it’s worth it. The end result looks amazing. Troy adds even more detail by tea staining his moss application, but even before doing this his method is a success. Items needed to create this include: Bag of moss (or actual dried moss) Paintbrush Mixing stick Mixing bowl Spray bottle filled with water Drip pan (for water to drip in to) Acrylic paint...
Tombstone Lettering
posted by Tony
Nothing spoils a good tombstone more than poor lettering carved into it. No matter how realistic your tombstone looks, all eyes will eventually focus on the text, and if you want it to look really good, you’ll want to check out the video tutorial that Eerie Acres Cemetery put together on effective tombstone lettering. It covers some very simple but essential techniques for creating really good looking tombstone text....
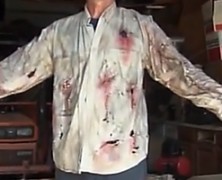
Making Zombie Clothes...
posted by Tony
If a zombie can take the time to dig its way out of its grave, the least you can do is make sure he’s got some appropriate looking clothes, right? And if you’ve taken the time to build a Full Sized Zombie Prop, or just plan on becoming the zombie yourself, you should probably pay equal attention to the clothing since it’s a major part of your zombie’s appearance. If you want truly realistic looking zombie clothing you’re going to want to give Robertb7864’s video a look. This twenty minute trek through zombie clothes modification features a full five minutes dedicated to Robertb7864 taking a belt sander to a shirt. The end result is pretty great looking, though, and is way more authentic looking than you’d achieve by tearing or cutting the cloth yourself....
Full Size Zombie
posted by Tony
If you’re looking to build a full size zombie that you can leave outside you’re going to need something that is a little more solid, and once again, Dr. Kreepy has just the tutorial you’re looking for. The lower body is framed using 2 x 4’s for legs attached to a 1 x 6 waist while the spine, shoulders, and arms are crafted out of PVC. After the frame is in place you’ll need to bulk out the torso and the legs. You can certainly wrap the legs and body with foam and duct tape it tight, or you can use the Dr. Kreepy method and use balled up newspaper or plastic. When mounting it you can use a plywood base and screw the legs to it, otherwise you can grab a pair of old boots and throw in some quick drying cement. You’ll need to add your favorite mask and a pair of prop hands if they’ll be visible. Items needed to complete this include: 2 – 2×4 approximately 35″ 1 – 1 x 6 appoximately 17″ 1 – 20″ 2 x 4 6 pieces 3/4 PVC 4 – 3/4″90 degree PVC 3/8″ or thicker 2′ x 2′ plywood Old clothes Skull or mask Duct Tape Newspaper or foam Screws ...
Rockin’ Granny
posted by Tony
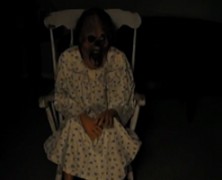
There’s something completely unsettling about a decrepit looking old lady slowly rocking back and forth in her chair. If you know a decrepit looking old lady then you’re half way there, but if you don’t, you can always follow ScareFX’s tutorial and make your own Rockin’ Granny prop. What you’re building in this tutorial is a self contained rocking mechanism that you’ll build your Granny on top of. The frame is built of 2×6 material with the wiper motor mounted vertically. A piece of aluminum flat bar connects the wiper motor to a piece of 2×6 that is connected to the base via a 4″ hinge which will allow it to rock back and forth when the motor spins. The upper part of the Granny is built on the 2×6 that is hinged by connecting some 1″ PVC to the 2×6 and then creating some shoulders with the 90 degree elbows and adding some sections of pool noodles over the PVC for the upper arms. You’ll need to add some prop hands if they’ll be visible. The lower body is connected to the base and consists of a PVC T connection which connects some 1″ PVC to two 90 degree elbows and forms the legs. Again, you’ll need to add some prop legs if they’ll be visible. Once your mechanism and skeleton is complete, the entire device is connected to the rocking chair with clamps to prevent it from flying forward once it gets rocking. After you’ve got everything clamped down it’s time to put the Styrofoam head on it and you’ll probably want to put a mask on it as well. Oh, and don’t forget to put some clothes on Granny! Items needed to complete this include: Rocking Chair Wiper motor 4′ of 2×6 board 4×4 post cap & brackets (or...

Sparking Fence
posted by Tony
Want to create an impressive looking spark effect for your haunt that’s absolutely harmless? Bradsboobarn has a video tutorial on how you can achieve this effect and it’s easier than you think. If you take one thing away from this video, it should be that in order to achieve this effect safely, you’ll need to utilize a car battery charger, and not just a car battery. Using a regular car battery in place of the battery charger could potentially cause the battery to heat up and explode. Items needed to complete this include: Chain link fence Jumper cables Car battery charger Long metal object...
Foam Masonry
posted by Tony
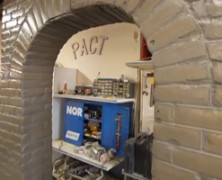
If you’re in need of some stone or brick panels for your haunt, you’re definitely going to want to check out the tutorial that HIY Productions created. This tutorial takes you through the process of creating brick panels out of styrofoam from start to finish. The tips provided in this tutorial are invaluable if you’re planning on creating any sort of stone or brick for your haunt. The finished product looks amazingly real....
The Broom Flyer Witch...
posted by Tony
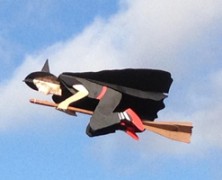
If you have some serious crafting skills and a ton of ambition, you too can create a Flying Witch prop just like the one that Otto Dieffenbach created. Or you could just watch the video of Otto’s prop and marvel at his creation. Seriously, this prop is one of the coolest builds I’ve ever seen, it turned out amazing, but the third sentence of the tutorial pretty much rules me out from ever attempting it: “This is a difficult build and should not be attempted by a newcomer to the hobby. There is a lot of wood work involved. You may want to find a friend with superior build skills if you are a newcomer.” I’m not even sure I could find a friend with enough moxy to try to build this, but if you can find one, the full tutorial is posted over at the RCgroups.com website. Items needed to complete this include: Frame Broom Flyer cutouts in 6 mm Depron (available from Hoosier Cutout Service) Two 0.196″ OD x 0.125″ ID x 40″ Carbon Fiber square tubes (Midwest Products) One 0.125″ OD x 0.060″ ID x 40″ Carbon Fiber tube (Midwest Products) One .034″ x .121″ x 40″ Carbon Fiber strip (Midwest Products) 1/8 inch plywood sheet 1 ft x 2 ft ¼ inch plywood sheet 6 x 12 inches 8 Sheet metal screws 8 x ½ E-Flite Sea Fury retract landing gear (Optional) Master Air Screw 3 blade 10 x 7 propeller Two packages of Dubro micro pushrods #852 One bag of 15 Dubro Hinges #117 Two 1 7/8 inch wheels (Parkzone T-28 or F4u) Clear Gorilla Glue Foam safe CA and activator 5 minute epoxy 30 minute epoxy Paint Electronics: At least a 3 channel full range receiver Three...
Scaremation Halloween Displays...
posted by Tony
If you’re a fan of projected Halloween displays there’s a good chance that Scaremation has an animation in their catalog that will appeal to you. These inexpensive animations can easily be rear projected onto a plain white bedsheet and incorporated into your haunt, or used just as a cool effect for the trick or treaters. Setup is a snap and the digital files are loopable for hassle free operation. http://youtu.be/hIwiEFnKLO4 Scare-1: Rough Night, 4 minutes (Loopable) – Price:$45 http://youtu.be/B21czGK1FmQ Scare-2: Mansion Parlour 1, 4 minutes (Loopable) – Price:$20 (anniversary pricing) http://youtu.be/6F6H0A9Gsxc Scare-3: Window Slammer, 1/2 minute – Price:$10 http://youtu.be/P2Bg4JH4MJg Scare-4: Skeleton Zombies!, 3 minutes (Loopable) – Price:$35 http://youtu.be/9NUBpZBuiZI Scare-5: Spider Lab, 3 minutes (Loopable) – Price:$45 http://youtu.be/l-dqFwef3AQ Scare-6: Underworld, 4 minutes (Loopable) – Price:$45 http://youtu.be/DsI5qkc9gdw Scare-7: Spectre, 55 seconds (Loopable) – Price:$20 http://youtu.be/1u-TqHsLQcI Scare-8: Zombie Slammer, 1 minute (Loopable) – Price:$25 Scare-9: Mansion Parlour 2, 8 1/2 minutes (Loopable) – Price:$45 http://youtu.be/jUEr3cLoc1U Scare-10: Gorewall, 3 minutes (Loopable) –...

Making LED Spotlights...
posted by Tony
I love mini LED spotlights, and they truly don’t cost that much to buy, but if you’re anything like me (is uber-frugal better than saying cheap?), it’s hard to justify paying for something that’s pretty simple to make. There are tons of tutorials online to guide you through the process of making your own LED spotlights, but none of the tutorials I’ve read have so clearly articulated the process as the video tutorial posted below. And with that being said, it should come as no surprise that it was created by Allen Hopps of Stiltbeast Studios. ...
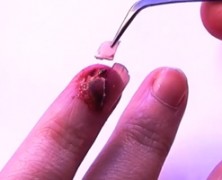
I Ripped Up My Nail!
posted by Tony
I’ve never considered wearing artificial nails, and I’ve never actually had a reason to want to. Those are things I used to say prior to coming across this video tutorial from KlairedelysArt. The fact of the matter is that if you’re taking the time to do you own makeup, you’re probably already doing your hands as well, but if your willing to take the time to do your nails, the results can be truly gruesome. I must admit, the beginning of this video is hard to stomach, but well worth it....
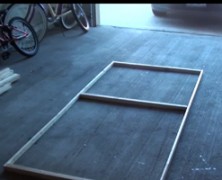
Haunted House Wall Panels...
posted by Tony
Whether your haunt is in a warehouse somewhere, or just in your garage, you’re eventually going to need to build some wall panels for it. Luckily, there’s nothing tricky about framing walls, especially if you follow Hawthorne Manor Haunted House’s tutorial on building wall panels. These panels are made of 1×2 furring strips with 2×2 cross bracing, and black sheets. Once you’ve got your panels built you can configure and connect them however you want using some three-hole flat brackets. They’re easy to build, go up easily, and (if you’ve got the room) store easily in your attic....
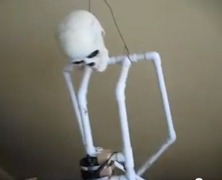
Hangman Prop
posted by Tony
Ulcerative has posted a great video of the perfect frame for a hangman prop. When the attached wiper motor is turned on the flailing effect is supreme, and even though it’s just a PVC frame in the tutorial, you can more than visualize the awesome effect you’ll get when you clothe the frame and light it for effect. If you don’t want to get into pneumatics, but still want a great visual, this is definitely one you’re going to want to try....
Dr Kreepy’s FCG...
posted by Tony
For the longest time I struggled with how to build a simple Flying Crank Ghost. The guide at Phantasmechanics.com (R.I.P.) seemed ridiculously complicated to my simple mind. Then I found Dr. Kreepy’s YouTube videos and everything clicked. My FCG might have even flown had the party I was building it for not been cancelled, but that’s another story. ...