


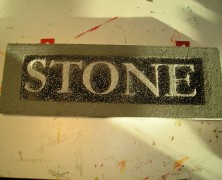
Acetone will eat away at your styrofoam, and while that’s not exactly what I would call a newsflash here, but Creativeman uses it to great advantage in his instructable on how to use this to create really good looking granite lettering. This is a great way to create a sandblasted stone sign for use on cemetery columns, or to add depth to your tombstone, and it requires only the most rudimentary of skills. The process is simple. Cut your pre-printed letters out with an exacto knife, glue them to your styrofoam, and then spray paint the styrofoam. It’s literally easier than breathing, but it adds a great level of detail to your lettering or sign. Items needed to complete this include: Styrofoam Printout of your letters (each letter cut) Elmer’s glue Spray paint containing...
Rockin’ Granny
posted by Tony
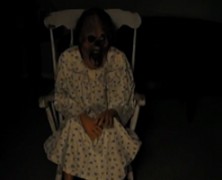
There’s something completely unsettling about a decrepit looking old lady slowly rocking back and forth in her chair. If you know a decrepit looking old lady then you’re half way there, but if you don’t, you can always follow ScareFX’s tutorial and make your own Rockin’ Granny prop. What you’re building in this tutorial is a self contained rocking mechanism that you’ll build your Granny on top of. The frame is built of 2×6 material with the wiper motor mounted vertically. A piece of aluminum flat bar connects the wiper motor to a piece of 2×6 that is connected to the base via a 4″ hinge which will allow it to rock back and forth when the motor spins. The upper part of the Granny is built on the 2×6 that is hinged by connecting some 1″ PVC to the 2×6 and then creating some shoulders with the 90 degree elbows and adding some sections of pool noodles over the PVC for the upper arms. You’ll need to add some prop hands if they’ll be visible. The lower body is connected to the base and consists of a PVC T connection which connects some 1″ PVC to two 90 degree elbows and forms the legs. Again, you’ll need to add some prop legs if they’ll be visible. Once your mechanism and skeleton is complete, the entire device is connected to the rocking chair with clamps to prevent it from flying forward once it gets rocking. After you’ve got everything clamped down it’s time to put the Styrofoam head on it and you’ll probably want to put a mask on it as well. Oh, and don’t forget to put some clothes on Granny! Items needed to complete this include: Rocking Chair Wiper motor 4′ of 2×6 board 4×4 post cap & brackets (or...

Don’t Blink
posted by Tony
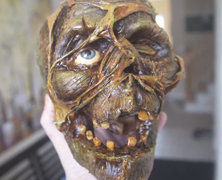
I’ve never really watched Dr. Who, but I’m sure glad that MacabreRob over at HalloweenForum has because the “Blink” episode of the British television series gave him the inspiration to build two life-sized angel statues for his haunt. To say that the statues are constructed out of paper mache and expanding foam insulation really underscores the amount of work that went into these. Several coats of paper mache were carefully coated onto a mannequin and then cut and removed in sections. After they were carefully pieced back together, 1″ wood boards were inserted to add some support and it was filled with expanding foam insulation. The wings were created using a similar technique with the form created using styrofoam and then coated with paper mache. MacabreRob went even so far as to cast his daughters face in alginate to provide for the face on Angelica, the passive angel. Once the bodies were complete he dressed them in robes made from bed sheets and thoroughly coated them in monster mud. Both angels turned out amazing and it’s really cool to see a family working together on a Halloween project. It’s definitely an intricate build, but if you can pull it off you’ll have the best looking cemetery in the neighborhood. ...
Foam Masonry
posted by Tony
If you’re in need of some stone or brick panels for your haunt, you’re definitely going to want to check out the tutorial that HIY Productions created. This tutorial takes you through the process of creating brick panels out of styrofoam from start to finish. The tips provided in this tutorial are invaluable if you’re planning on creating any sort of stone or brick for your haunt. The finished product looks amazingly real....
Foam Barrels
posted by Tony
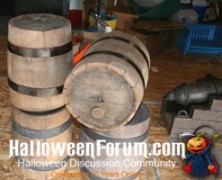
Ok, since September 19th was International Talk Like a Pirate Day, (and I was completely unaware of this fact), I thought I’d post the tutorial that fravak from HalloweenForum penned on how to make foam barrels. The barrels are crafted using styrofoam blocks, the kind that are used to stack small flatbed trailers, and while these may be hard to come by, even if you don’t need barrels and have access to these, they are gold, take them. Since the foam blocks start out square, fravak utilized the lid from a 5-gallon bucket to outline the round shape you’ll need. From there the corners were cut off using a hot wire cutter and the entire block was sanded down using a drywall rasp to round it out. Once this is complete the detailing of the barrel will actually begin. A soldering iron will be needed to carve out the individual pieces of wood on all sides of the barrel. Once this is complete you can add some finer detail by adding graining to all the wood planks with the soldering iron. Fravak utilized paper mache for the straps around the barrels and a piece of blue foam for the plug. Once all of these steps are complete it’s time to paint it up. The base is a browish color while the top he top is covered with a black wash that fravak rubbed all over the barrel to make the color more uneven. The end result is phenomenal, these barrels look completely realistic they don’t cost much, and they’re light as a feather. So next International Talk Like a Pirate Day, don’t forget to grab one of your barrels as you strut around town saying “Ahoy, me hearties, let’s see what crawled out of the bung hole.”, it’ll just make a lot more...
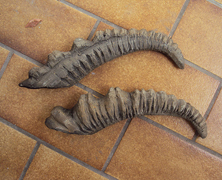
Ermelyn’s Horns...
posted by Tony
If you like creating your own creatures for your haunt you’ll eventually have the need to create some horns for them. You can probably buy some actual antlers, but if you’re planning on incorporating them into a mask or don’t want an overly heavy static prop, you may want to follow Ermelyn Hollerborn’s tutorial for making horns in 10 easy steps. The horns are made using multiple layers of styrofoam that’s shaved down to give it a more rounded appearance. From their it’s a matter of adding detail to it with a soldering iron, or heat gun. Ermelyn’s horns are then coated with Pattex adhesive and painted. They look fantastic and can be made as large as you like without weighing down your prop. Items needed to complete this include: Styrofoam Contact adhesive Acrylic paint Soldering iron / heat gun Google Translate (unless you read German) ...
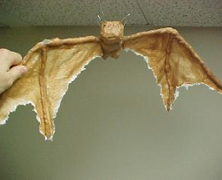
Bats Are Easy
posted by Tony
Every haunt needs some bats flying around, and if you’ve got some skills with a paint brush and some patience you can make as many as you want following Born2haunt’s method, because Bats Are Easy. These bats do seem pretty easy to make when you consider that they’re made using a styrofoam body with wire poking through it for the wing bones. The wire is then wrapped in cotton and paper towels are applied as skin. The entire bat is then generously coated with liquid latex and painted to suit. The great part about this prop build is that you can customize it to your heart’s content. Sure, it’s probably easier to go out and buy some bats, but they won’t look nearly as realistic as these will. Items needed to complete this include: Styrofoam Wire Cotton balls Liquid latex Paper Towels Acrylic paint Hot...
Zombie Build
posted by Tony
I’m truly amazed at some of the great looking props that people are able to build that cost next to nothing, and the creative ways they go about accomplishing it. Sytnathotep is one such prop builder with his 1/2 zombie build, which looks great and probably didn’t cost a whole lot. The spine of the zombie is crafted using three three foot sections of 12/2 electrical wire that are braided together to give it some extra rigidity. Since this is a 1/2 zombie it doesn’t have to support any real weight (no legs). The shoulders are 3/4″ pvc connected via a cross fit connection that slides over the spine while the collar bones are more 12/2 electrical wire, and the scapulas are styrofoam insulation. With a wire clothes hanger ribcage and hands made out of wire with plastic pen tube fingers this project is not exactly breaking the bank. Once the skull slides onto the electrical wire all that’s left to do is corpse and paint this bad boy! What I really like about Sytnathotep’s zombie is his corpsing technique. He used the melted plastic method as a base, but then stretched cheesecloth and spider web dipped in a 50/50 mixture of black latex house paint and elmers glue all over the zombie. It really does give the appearance of rotting flesh and is well worth the effort and the mess that it creates. Items needed to complete this include: 12′ – 12/2 electrical wire Skull 6 wire clothes hangers 1 pvc cross fit connector Scrap styrofoam 10 Plastic pen tubes Duct tape Plastic for corpsing Cheesecloth / Spider webbing Latex paint Elmers...
Rocking Tombstone
posted by Tony
A styrofoam tombstone is about the simplest prop you can make for your haunt assuming you don’t make it overly intricate, but sometimes even the simplest of props can take on a whole new life by adding a motor. Just ask Christoper, of Chris’ Crypt who has a really simple tutorial on how to turn your Styrofoam tombstone into a rocking tombstone. You’ll need to build a wooden base to hold the tombstone on one end (pivot point) and the motor on the opposite side. When you connect the cam to the tombstone the slow rotation of the motor will get your tombstone rocking back and forth. Items needed to complete this include: Styrofoam tombstone Motor Wood for base 1/2″ piece...

Spyderwood Coffin
posted by Tony
If you’re looking to build a coffin but don’t want an overly heavy prop then you might want to checkout Spyderwood’s styrofoam coffin tutorial. The frame of this coffin is made out of 1 x 2 lumber, which, even when covered with styrofoam won’t be as heavy as your typical toe pincher. You’re probably not going to want to get inside this coffin, but if you’re just planning on putting a skeleton or other prop inside, you might want to give this lightweight coffin a try. Items needed to complete this include: 2 sheets of pink insulation foam 8 – 1 x 2″ lumber staples hotglue paint decorations hinges finishing...

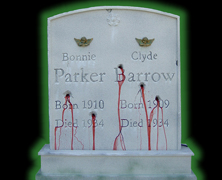
Killer Tombstones
posted by Tony
If you’ve ever wanted to make some really nice looking tombstones but didn’t think you had the skills to get the job done welcome to the club. Oh, and keep reading, because while making your own tombstones can range from being an easy project to an arduous task, once you have a few basic techniques down I can guarantee that you’ll be adding to your tombstone collection on an annual basis. DevonTT’s three part series on how to create some killer tombstones will definitely help to get you started. Items needed to create this include: 2″ Styrofoam Laserjet printout of your text Iron Dremel & Router bit Exterior Latex paint ...
The Making Skulls Series...
posted by Tony
What makes Canadian skulls better than American Skulls? Brad Goodspeed,of course! The skulls he produces in his Making Skulls series of videos are so good looking it’s hard to believe that they start off being a cheap styrofoam skull. These videos are an invaluable tool to anyone that wants to create gruesome looking skulls. There’s a ton of useful information packed into 40 minutes that every haunter needs to see. And don’t forget to check out the Making Glow In The Dark Teeth tutorial to make some teeth for your skulls! ...
Moving Tomb Lid
posted by Tony
If you took our advice and ordered your copy of the 2012 Home Haunter DVD Collection then you’re already familiar with Steve’s Haunted Yard and have probably already seen his above ground tomb with the moving lid. If you missed it, though, (and trust me, there’s a lot of cool stuff worth seeing in his cemetery), you can check out the tutorial he’s been kind enough to post on how it works. It’s a simple build and it looks great when it’s moving. The tomb itself looks to be made of 2″ styrofoam insulation and has a wiper motor mounted on the inside. You’ll need to rout out a small hole in the styrofoam for the glide to properly move the lid from side to side....
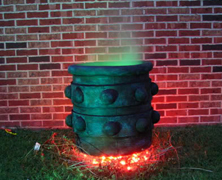
Making a Medieval Cauldron...
posted by Tony
Five years ago CreepChrisS took the medieval cauldron prop build as seen on Woody Carr’s ScareFX site and won the Mad Lab’s September 2007 contest with it! His prize? A foam tombstone of course, but in doing so he’s left us all a prize in a clear and concise tutorial on how to build this fine looking cauldron. Before you do anything you’ll want to find a spare 55 gallon plastic drum, which can be tricky, but if you don’t have access to one you can always find a water storage barrel at a hardware store that will fit the bill. You’ll need to start by cutting approximately 1/4 off the top. Next you’re going to spray paint the entire barrel with your black spray paint and then add the pool noodle, sill foam, and styrofoam balls. After painting the styrofoam pieces with the black acrylic paint you’ll need to drybrush the entire cauldron with the grey and brown acrylic paints to give it some character. If you really want to make it look good, you’ll go ahead and add some Hot Burning Coals underneath it. Items needed to complete this include: 55 gallon plastic drum Pool noodle Flat black spray paint Sill foam Styrofoam balls Black acrylic paint Grey acrylic paint Brown acrylic...
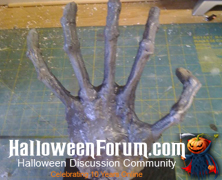
Cheap and easy Skeleton Hands...
posted by Tony
Since many of the prop builds featured on HauntersList involve PVC frames it’s probably not a bad idea to post another tutorial on how to create hands for those frames. LastHouse from HalloweenForum has a tutorial on how to make some gruesome looking skeletal hands that won’t take you too long and the cost is next to nothing. They’re made of styrofoam and wood dowels coated with a little hot glue and then painted. The hardest part about this tutorial is melting the styrofoam to give them a more natural boney look. Make sure to do this step in a well ventilated area as burning styrofoam can be highly toxic (it’s a good idea to wear a respirator). Items needed to complete this include: Styrofoam Hot Glue Wooden dowels Drylock Paint...
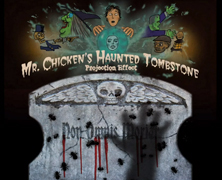
Mr. Chicken’s Haunted Tombstones...
posted by Tony
If you’re a fan of projection effects then you should definitely check out Mr. Chicken’s Haunted Tombstones. All you’ll need is the projector of your choice and a piece of styrofoam to carve your blank tombstone. Oh, and of course, you’ll need to purchase the video files for the Haunted Tombstone Projections. You can purchase either the short tombstone or the taller tombstone, or as a set to be projected side by side. The download includes four video files allowing for standard definition or high definition playback in either portrait or landscape orientations, all in .MP4 format. It’s a pretty easy effect to pull off, especially considering the tombstone that you carve for it will be custom sized to the projection, and at $25 apiece ($50 for the set), you can’t go wrong. ...

Clockwerk’s Ghost Girl...
posted by Tony
Clockwerk from HalloweenForum has built a really eerie, almost cartoonish looking Ghost Girl and has posted some great pictures and a brief tutorial on how it was constructed. This creepy little girl sits atop her tombstone with an ominous glow beckoning passers by to enter her cemetery. There’s nothing I don’t like about this prop. Heck, I think the tombstone alone looks great, but Clockwerk has really shown some artistic skill with this girl. It seems like a pretty easy prop to build, but the arms, legs, and head may take some skill to craft (ok, so maybe it’s not that easy). You’ll need to create and mount a PVC frame to the tombstone. The head is constructed out of a styrofoam craft ball with ping pong balls (with LED’s implanted) for eyeballs, while the legs and arms are created using a combination of paper mache and Crayola model magic. Items needed to complete this include: Tombstone Styrofoam craft ball Ping Pong balls LED lights Paper Mache Crayola Model Magic (4) – 90 degree 3/4″ pvc (2 or 3) – 3/4″ pvc T joints 4 feet – 3/4″...
Bleeding Tombstone
posted by Tony
Mourning Cemetery & Manor have a really good tutorial on how to build a bleeding tombstone. The trick to this one involves two plexiglass blood tanks, the main tank is mounted in the styrofoam base and a secondary tank is mounted above the bullet holes. A 1/2″ tube feeds the blood from the main tank to the secondary tank, while 1/4″ tubes drain the blood down into the bullet holes. This setup allows for the blood to slowly seep out of the holes rather than flowing out at an unnatural rate. Items needed to complete this include: 1/4″ Plexiglass tanks (width determined by tombstone) water pump (1) 1/2″ tubing (5) 1/4″ tubes Plexiglass squares Styrofoam...

Keeba’s Tombstones...
posted by Tony
If you’ve ever had a cemetery in your haunt or yard you already know the pain of having to purchase tombstones for it. The pain revolves around having to pay for a foam product that you could easily produce yourself. Moreover, yours will certainly look better because you can put as much detail as you desire into it, and personalize it to your hearts content. Personally, I can’t stand working with styrofoam, but for those that don’t have a problem with it, you’re going to want to take a look at Keeba’s Tombstones. Not only is Keeba’s tutorial nicely laid out from the start of the project to completion, but offers some really good examples of detailing techniques like dry and wet warping that you just don’t find in most tombstone tutorials. After undergoing some simple painting and aging, the finished products look fantastic. These will take a while to make, and you’re going to have to factor your time into these when deciding whether or not it’s worth your while, but you certainly don’t find tombstones this nice for sale. ...

Paint Faux Wood Grain...
posted by Tony
Terra from HalloweenForum has posted a great video tutorial on how to achieve an incredibly realistic wood grain look that can easily be applied to your styrofoam projects. I’m blown away at how realistic it looks and how simple it is....
Foam Boarded Windows
posted by Tony
Rchassel over at HalloweenForum.com has a good tutorial on how to use styrofoam boards to board-up your windows. They’re inexpensive, look great and are lightweight enough that they can be held in place over your windows using very thin straps! Items used to create this effect include: 1” thick extruded polystyrene foam insulatio Gorilla Glue Straps to anchor the board system into your windows Paint Behr Faux...