


I’ve always been a big fan of the scene in Snow White and the Seven Dwarves when Snow White is running through the forest and the entire evil forest is trying to grab her. I love that scene, and I’m pretty sure Mizerella from the 102 Wicked Things To Do blog is a fan as well. She’s constructed a tree that would definitely be worthy of residence in Snow White’s forest. The tree is created using two round concrete forms that can be split for easier storage along with a mixture of paper mache and celluclay. It doesn’t seem like an extraordinarily difficult project and the tree looks incredible. Items needed to complete this include: 2 Concrete building forms (sonotube) 1/4 sheet of plywood Newspaper Masking tape Paper mache Celluclay Coat hangers Branches (to spread on top)...

Spider Egg Sack
posted by Tony
WIth all the spider tutorials that we’ve been posting lately, isn’t it about time you see where they all come from? The answer, of course, is from Spider Egg sacs, and Voodoo Willy from Halloween Forum has a great tutorial on how to create them. These egg sacs are crafted using chicken wire wrapped in polyester batting to form the mass of the prop. The ping pong balls are then glued to the surface of the egg sac and the entire sac is painted. After its dried up the webbing is dipped in latex and stretched around the egg sac. They’re easy to produce and are a creepy finishing touch to any haunt that has a giant spider. Items needed to complete this include: Chicken wire Wire cutters Ping pong balls exacto blade Hot glue gun polyester batting (the thin kind) Spider webbing Liquid latex airbrush acrylic...

Spyderwood Coffin
posted by Tony
If you’re looking to build a coffin but don’t want an overly heavy prop then you might want to checkout Spyderwood’s styrofoam coffin tutorial. The frame of this coffin is made out of 1 x 2 lumber, which, even when covered with styrofoam won’t be as heavy as your typical toe pincher. You’re probably not going to want to get inside this coffin, but if you’re just planning on putting a skeleton or other prop inside, you might want to give this lightweight coffin a try. Items needed to complete this include: 2 sheets of pink insulation foam 8 – 1 x 2″ lumber staples hotglue paint decorations hinges finishing...
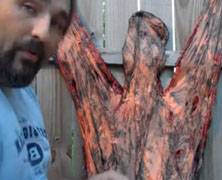
Stiltbeast Studios Human Pelt...
posted by Tony
Allen Hopps tutorial on how to make a human pelt is one of those tutorials that makes me scratch my head and ask myself “Why didn’t I think of that”. It’s such an easy idea and the finished product looks great, so if you’ve got need for a human pelt for your haunt then watch the video below because it could not be any easier....

Killer Tombstones
posted by Tony
If you’ve ever wanted to make some really nice looking tombstones but didn’t think you had the skills to get the job done welcome to the club. Oh, and keep reading, because while making your own tombstones can range from being an easy project to an arduous task, once you have a few basic techniques down I can guarantee that you’ll be adding to your tombstone collection on an annual basis. DevonTT’s three part series on how to create some killer tombstones will definitely help to get you started. Items needed to create this include: 2″ Styrofoam Laserjet printout of your text Iron Dremel & Router bit Exterior Latex paint ...

Kindred Moon Productions 2013 Additions...
posted by Tony
Kindred Moon Productions has added eight new DVD’s for 2013 to their Haunted Halloween Projection Series. At $34.99 each, these DVD’s can be projected onto a window, a wall, a screen, or even used on a video screen or television to create a picture effect. ...
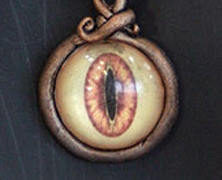
Jeepers Peepers!
posted by Tony
I’ve posted a couple of tutorials on how to make realistic eyes for your props, but the one that Sytnathotep posted over at HauntForum may be the easiest yet. This method only produces a half of an eye, but sometimes that’s more than enough. Before you get started on this you’re going to need to print and cut your iris to fit the circumference of your round palettes. Once you’re ready to start it’s just a matter of pouring some of the epoxy into the palette, making sure to leave a little room for another pour. Place your iris face down into the palette and push it slightly into the epoxy making sure that it’s completely covered, then add enough epoxy so it’s completely level with the top of your palette. That’s all there is to it! Once they’re dry, just pound them out of the palette and you’re good to go. Items needed to complete this include: Plastic paint palettes Smooth-On’s Epoxy Cast 690 Iris...
The Making Skulls Series...
posted by Tony
What makes Canadian skulls better than American Skulls? Brad Goodspeed,of course! The skulls he produces in his Making Skulls series of videos are so good looking it’s hard to believe that they start off being a cheap styrofoam skull. These videos are an invaluable tool to anyone that wants to create gruesome looking skulls. There’s a ton of useful information packed into 40 minutes that every haunter needs to see. And don’t forget to check out the Making Glow In The Dark Teeth tutorial to make some teeth for your skulls! ...
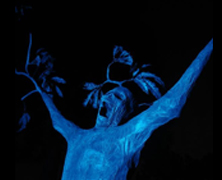
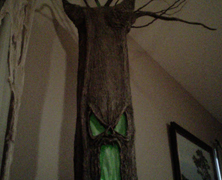
Wailing Tree
posted by Tony
When I was little the one thing that used to creep me out more than anything was walking through any kind of wooded area. I was certain the trees were alive and it would absolutely freak the heck out of me. I never truly felt like I was alone out there. Thank goodness I didn’t see the Wailing Tree that the Ghostess over at the Dead End created when I was a kid, because I’m pretty sure I wouldn’t have ever gone near a tree again. The frame of this tree is made of PVC while the body is a combination of chicken wire, paper mache, and a little bit of Great Stuff to seal the bottom. While not tremendously hard to create, you can tell that the Ghostess really put a lot of care into the creation of this prop. It’s an absolute thing of beauty, and I don’t think I’d be happy building just one, I want a whole forest of these things! Items needed to complete this include: 1 Bucky Skull PVC (variable depending on the size) Chicken wire Paper mache Great Stuff 14 gauge wire (for branches) Silk leaves DryLok masonry sealer Black / Brown / Gray Paint...
Moving Tomb Lid
posted by Tony
If you took our advice and ordered your copy of the 2012 Home Haunter DVD Collection then you’re already familiar with Steve’s Haunted Yard and have probably already seen his above ground tomb with the moving lid. If you missed it, though, (and trust me, there’s a lot of cool stuff worth seeing in his cemetery), you can check out the tutorial he’s been kind enough to post on how it works. It’s a simple build and it looks great when it’s moving. The tomb itself looks to be made of 2″ styrofoam insulation and has a wiper motor mounted on the inside. You’ll need to rout out a small hole in the styrofoam for the glide to properly move the lid from side to side....
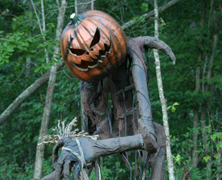
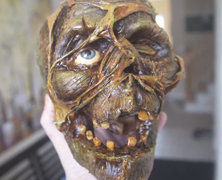
The Making of Grim
posted by Tony
In 2008 the Grim Hollow Haunt created an incredible looking prop simply named Grim. This sinister looking creation stands approximately 5 feet tall and represents everything I fear is walking through the woods at night. I cannot imagine a better prop to welcome guests to a haunt than Grim, and thankfully, Grim, host of the Grim Hollow Haunt has left a short tutorial on the steps needed to create this amazing monstrosity. This creation rests on a 1 x 2″ wood skeleton that is covered in chicken wire and paper mache. The hands and feet are simply wire coat hangers with duct tape wrapped around them. Grim did some additional distressing of the creature via rope vines and cheesecloth, while a foam Funkin head was carved and given an ominous paint job. Items needed to complete this include: 1 x 2″ lumber 1 x 3″ lumber Chicken wire Wire coat hangers Paper mache Duct tape Rope (as needed) Flat black paint Cheesecloth Foam Funkin...
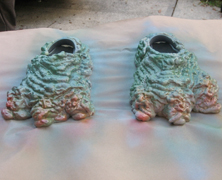
Make Monster and Alien Feet...
posted by Tony
Dave Simon is a good dad. I don’t actually know Dave, but any father that makes his three year old daughter a pair of pink and purple monster feet is my kind of dad. His tutorial on how to Make Monster & Alien Feet is not only easy and inexpensive, but the feet actually look fantastic. And since they’re made using Crocs as a base, you know they’re really comfortable too! Items needed to complete this include: Old or new foam shoes Great Stuff minimal expanding foam Disposable gloves Newspaper Spray...
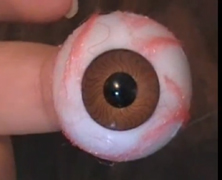
Easy Bloodshot Eyeballs...
posted by Tony
This easy to do eyeball tutorial makes it’s way to us from HauntItYourself Productions. You’ll need to get some half eyeballs off of Ebay (by searching for half eyeballs of course), some clear nail polish and red yarn for veins. From there, it’s just a matter of painting some nail polish on the eyeball and spreading some of the fine threads of yarn on the eyeball. The effect is quite realistic and you’re going to spend less than 5 minutes and about 5 dollars on this project....

Making Glow In The Dark Teeth...
posted by Tony
If you’ve taken the time to follow Dr. Kreepy’s tutorial on making Cheap Easy Skulls, you’ve no doubt ended up with a boatload of superb looking skulls. The only thing that could possibly make those skulls look better is a little variety. And what can help give a skull some variety better than some realistic looking teeth. Well the Devil’s Workshop has a tutorial on how to make glow in the dark teeth that will really help. It’s a reallysimple process involving a mixture of translucent white and glow in the dark baking clay....
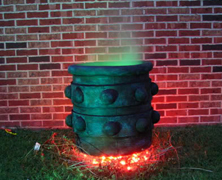
Making a Medieval Cauldron...
posted by Tony
Five years ago CreepChrisS took the medieval cauldron prop build as seen on Woody Carr’s ScareFX site and won the Mad Lab’s September 2007 contest with it! His prize? A foam tombstone of course, but in doing so he’s left us all a prize in a clear and concise tutorial on how to build this fine looking cauldron. Before you do anything you’ll want to find a spare 55 gallon plastic drum, which can be tricky, but if you don’t have access to one you can always find a water storage barrel at a hardware store that will fit the bill. You’ll need to start by cutting approximately 1/4 off the top. Next you’re going to spray paint the entire barrel with your black spray paint and then add the pool noodle, sill foam, and styrofoam balls. After painting the styrofoam pieces with the black acrylic paint you’ll need to drybrush the entire cauldron with the grey and brown acrylic paints to give it some character. If you really want to make it look good, you’ll go ahead and add some Hot Burning Coals underneath it. Items needed to complete this include: 55 gallon plastic drum Pool noodle Flat black spray paint Sill foam Styrofoam balls Black acrylic paint Grey acrylic paint Brown acrylic...
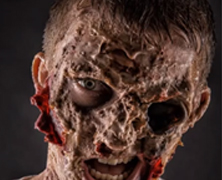
Zombie Mask Tutorial
posted by Tony
Ich fürchte, zombies, aber ich habe nichts dagegen, wie einer aussieht. Every now and then a tutorial comes along that is so good it leapfrogs it’s way to the front of the Haunters List line. Such is the case with this great video tutorial from Stefan Schäfer Photography. In this video you’ll learn how to turn a little bit of gelatin, glycerol, and water into an incredible zombie paste that will help in the zombification of any haunt. Sure, you’ll need some makeup and a little bit of blood, but the base coat is everything here, and this tutorial gives you everything you need to get started....
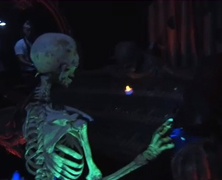
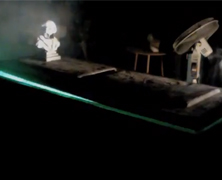
Nimble Fingered Skeletal Organist...
posted by Tony
I wasn’t sure if I wanted to post a link to the Nimble Fingered Skeletal Organist tutorial that the guys over at Night Frights posted since it’s part prop and part actor control. It doesn’t really fit nicely into any of categories we’ve established at HauntersList, but the fact of the matter is, this effect looks too good to pass up. The effect is achieved by having your actor (seated below the organ) wearing a pair of skeletal gloves that are attached to your Bucky. This reverse marionette action allows for a much more realistic looking organist than you could ever get using a motor or pneumatics. By the way, I’m categorizing this under Costumes/Masks, so be sure to leave a comment if you think I’m dead wrong on this. Items needed to complete this include: Bucky Skeleton Skeletal gloves (the kind with the raised plastic bones on them work best) Black Light Glow-In-The-Dark Spray Paint Masking Tape Zip Ties Black fabric (3 yards should be plenty) plus some tacks, staples or duct tape to secure it 1-inch Threaded Floor Flange 1″ x 3/4″ Reducing Male Adapter 2 feet of 3/4” PVC Pipe Black Spray Paint Black long-sleeved shirt (for your operator to wear during...
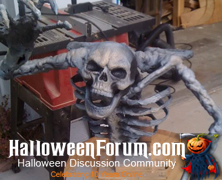
PVC Skeletons
posted by Tony
Not all grave grabbers need to be motorized, and if you’re interested in building an inexpensive one that still looks good then checkout LastHouse’s tutorial over at HalloweenForum. It’s a pretty easy project that allows for plenty of artistic freedom, but you will need a little bit of skill to cut the PVC for the rib cage, and of course you’ll need a blowtorch to get the PVC hot enough to bend. Once the ribcage is done, though, you’re all set to pose and bring your skeleton to life. The nice thing about this prop is that while it may look like a complete disaster while you’re framing it, once you’ve coated it with the Great Stuff and painted it up, it’ll take on a life of its own. And don’t forget to reference LastHouse’s tutorial on skeletal hands to add to your skeleton. Items needed to complete this include: Two 3/4 ” pieces of PVC 3 PVC T’s Some scrap 2 x 4 Hot glue ( LOTS) Liquid Nails Great Stuff Some Scrap foam Duct tape Drylock paint Model Magic clay...