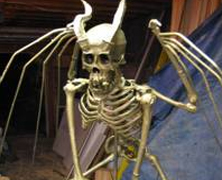
I’m not sure who to credit this tutorial with but I suspect it goes to Jeff Davis. Regardless, the Demon Skeleton tutorial from the Davis Graveyard site sure looks incredible. I don’t think I could make this look as good as Jeff did, but it really makes me want to buy a budget Bart and give it a shot because the finished product is really cool looking. I can just imagine how it would look at night lit up! The first line of the tutorial sums it up, though, “This is NOT an easy project”. Shop These Materials on Amazon Realistic Replica Human Skull Statue 6.5" 5.4ft Full Size Halloween Foam Skeleton Affiliate Disclosure: HauntersList.com is a participant in the Amazon Services LLC Associates Program. As an Amazon Associate we earn from qualifying purchases at no extra cost to...

The Bleeding Portrait...
posted by SkeleTony
“Calm? Calm? Do murder and calm go together? Calm and murder? Murder?” -Luther Heggs In 1966 Don Knotts posed that question, and fans of the Ghost and Mr. Chicken have been laughing at his classic portrayal of Luther Heggs, intrepid reporter ever since. If you’re at all familiar with the film you’ll recall the classic scene where Luther comes across the portrait of old Mrs. Simmons that he had just seen intact five minutes earlier has been pierced with a pruning shears and is dripping blood, the exact way she was murdered 20 years prior. Luther’s conniption fit upon seeing this is pure comedic gold, and he drops like a leaf, out cold. I’ve always wanted a house like the old Simmons Mansion, and with Chris’ tutorial of the Bleeding Portrait, I’ll be one step closer. It looks to be a little bit of a tricky build, but would definitely be a crowd pleaser in any haunt. Items used to create this include: Picture frame Portrait (one that you can cut up) Small water pump Flexible tubing Tray for blood Blood Varnish ...
Super Sticky Cobwebs
posted by SkeleTony
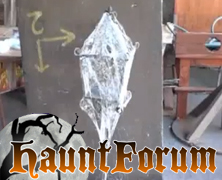
If you’ve ever used the stretchable spider webs that everyone sells you know that they sometimes don’t stay stretched quite as nicely as you’d like them to. Well the tutorial below from the Dapper Cadaver might be just the solution you’re looking for. I originally found this video in a post on HauntForum, and I strongly urge you to read the posts associated with it. The Dapper Cadaver uses 3M 90 spray adhesive to get the webbing super tacky, which results in a highly flammable finished product. The group over at HauntForum have weighed in on some suggestions to combat the flammability, but do use extra caution if you are going to attempt this. Despite the fact that this is a pretty permanent and highly flammable solution, I have to admit, it does provide some quality looking cobwebs....
Circus Freak Puppeteer...
posted by SkeleTony
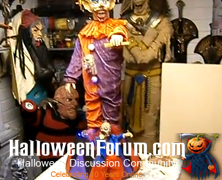
Every now and then someone builds a prop that you look at and immediately wish you had the talent to pull off the same build. That’s exactly how I felt when I saw TwistedUK’s Circus Freak Puppeteer tutorial. It’s not that the frame and motors are overly intricate, but the clay work that went into the crafting of both clowns (and shoes) is what really tells me I’ve no chance of building something nearly as nice as his. Of course, if you can find some premade items that would work you could always eliminate the clay, but you might not get as good looking of a finished product. I’m filing this under Motorized Props, but I really feel like there should be a Prop Showcase category because this one definitely deserves more than just a cursory glance. Items needed to complete this include: Child Mannequin Hair dressing practice head Wiper motor Large piece of chip board 1’thick One pack of DAS clay 3/4′ plastic tubing Sea fishing line 3 blue LEDs 1 1/2′ length of wood 1 sheet of plywood More patience than I...

Wisconsin Zombie Mud Run...
posted by SkeleTony
Think you’ve got what it takes to survive a 5k zombie infested obstacle course? You know, we’re all going to have to answer this call eventually, but for now, we’ll just consider the Wisconsin Zombie Mud Run proactive training. Held at the Waukesha County Expo Center Grounds on May 18th, 2013 the goal of this event is to successfully navigate the 5k course and the 13 obstacles of Pandemic, all while avoiding the zombie horde that is unleashed upon you. Pandemic consists of the following obstacles: The Dark Abyss Labyrinth Bedlam The Beast The Dirty Name Green HELL Havoc Unstable Torment Chaos Crawl Tough Nut Carnage Slide For Your Life Those that don’t feel comfortable running alongside the living can choose to participate as one of the Zombie horde. There are two types of Zombies, Chaser Zombies, who start 5 minutes after the humans, and Roaming Zombies who will be assigned a specific location and will prey upon the runners that enter the zone. All race entries include: A Wisconsin Zombie Mud Run t-shirt Racing bib complete with number A survival medal One free beverage (soda/beer) Admittance to the Survivors Party! 1st 1,000 runners registered will receive a FREE ticket to Morgan Manor Haunted House (valued at $15) located at the Waukesha Expo Center in October, 2013 Runner Registration Fees: $75 if registered by May 12, 2013 $85 if registered after May 13, 2013 Register Now A portion of all registration fees from the Wisconsin Zombie Mud Run are donated to the This Time Tomorrow Foundation, providing financial support to individual families and organizations focused on cancer research, education or advocacy. Their goal is to help those affected today reach the tomorrow they deserve. The Wisconsin Zombie Mud Run...

Chromonite Inkblot Masks...
posted by SkeleTony
If you were lucky enough to attend Transworld’s 2013 Halloween and Attractions show in St. Louis last month you are no doubt familiar with Chromonite, producers of the Rorschach Inkblot Morphing Mask. Made using thermochromic paint the pattern actually changes shape as your breath heats the spandex up. The ink used is 100% non toxic and the effect is quite breath taking!...

Spectral Illusions
posted by SkeleTony
Spectral Illusions offers some really great looking digital downloads that would look great in any haunt. These great videos can be used with a flat panel monitor and a frame for a picture effect, or with a scrim or reflective surface for a great Pepper’s Ghost effect. The videos loop seamlessly so you don’t have to worry about gaps in playback. With four resolutions available for download at an affordable price of between $20-$25 each, you cannot go wrong with these effects. ...
Homemade Vortex Fog Chiller...
posted by SkeleTony
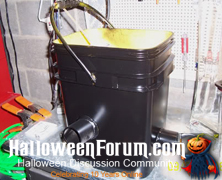
Serialc0d3 over at HalloweenForum.com has a great tutorial on how to build your own Vortex Fog Chiller for very little cash. Now, there are many containers you can use when building your own vortex fog chiller, but reusing a Tidy Cat Litter pail is the ultimate “green” project. Additionally, the finished product looks remarkably familiar. To complete this prop you’ll need the following: Tidy Cat Litter Pail Few ft of 2 in. PVC 2 in. PVC Elbow Few ft of 1/2 in. PVC pipe Some sort of metal mesh or chicken wire to hold ice Epoxy of your choice (I used Oatey Epoxy Putty) Krylon Fusion Paint (optional) Nozzle for Drain Hose (optional) Drain Hose (optional) Tools for cutting the materials And of course, you’ll need a fog machine. Shop These Materials on Amazon 400W Fog Machine with Wireless & Wired Remote FogWorx Extreme High Density Fog Juice Gallon Copper Coil Refrigeration Tubing 1/8" OD x 6.5ft (fog chiller) Affiliate Disclosure: HauntersList.com is a participant in the Amazon Services LLC Associates Program. As an Amazon Associate we earn from qualifying purchases at no extra cost to...

Kickstart a Home Haunt?...
posted by SkeleTony
Interested in donating to help a fellow home haunter get their 2013 haunt off the ground? The owners of The Dread Keep in Hillsboro, Oregon sure hope you do, in fact, they’ve launched an Indiegogo funding campaign just in case you do. Their haunt is free for the local residents to attend and anyone that contributes at least $10 to their campaign will receive something as a thank you, ranging from a personalized thank you card, some hand painted Halloween decor stones, or some hand decorated votive candle holders depending on how much you’ve pledged. I’m not sure if I’m fully on board with using an Indiegogo campaign to fund personal events, but that’s irrelevant, because this group has already received commitments in the amount of $135 as of this posting. I will say that it is a rather entrepreneurial move on their part to try to get their funding this way, and again, their haunt is free to the public. This is a flexible funding campaign, which means that if they do not reach their goal of $800, they will still receive any funds pledged to their campaign by Tuesday May 21st, 2013 at 11:59pm (PT)....

National Haunter’s Convention 2013...
posted by SkeleTony
The 2013 National Haunters Convention will be held May 3rd through the 5th at the Greater Philadelphia Expo Center at Oaks, Pennsylvania. Featuring a tradeshow with over 65 vendors, haunt seminars, haunt tours, not to mention the Miss Halloween Beauty Pageant and a Saturday evening costume ball. There are 12 premium seminars that will cost additional to attend, with topics including: FX-Makeup on a budget $10.00 Applying Silicone Appliances $10.00 Want to be a stilt walker? $25.00 Haunted Faux painting with Jenniferx $50.00 And that’s only scratching the surface as there are an additional 13 seminars that are free of charge. Some really cool news about this event is that the S & C Scare Factory will be operating a haunt right on the showroom floor. These former home haunters will put their talent on display for convention visitors as they make the transition to the professional haunt level. There are many ticket options available (including one that includes a case of Great Stuff) and seminars can be added a la...
Foam Boarded Windows
posted by SkeleTony
Rchassel over at HalloweenForum.com has a good tutorial on how to use styrofoam boards to board-up your windows. They’re inexpensive, look great and are lightweight enough that they can be held in place over your windows using very thin straps! Items used to create this effect include: 1” thick extruded polystyrene foam insulatio Gorilla Glue Straps to anchor the board system into your windows Paint Behr Faux Glaze Shop These Materials on Amazon XPS Foam Board 1" Thick Craft Sheets 4-Pack 4-in-1 Hot Wire Foam Cutter Kit 15W Loctite Power Grab Foam-Safe Construction Adhesive Affiliate Disclosure: HauntersList.com is a participant in the Amazon Services LLC Associates Program. As an Amazon Associate we earn from qualifying purchases at no extra cost to...
Simple Pneumatic Ground Breaker...
posted by SkeleTony
I gotta admit, when I first watched Casa Fear’s tutorial on how to build a simple pneumatic ground breaker at HauntForum, I didn’t think the finished product was going to be worth the effort. The frame of this prop doesn’t exactly inspire confidence that it’s going to stay in one piece, let alone be creepy looking. Boy was I wrong. And that’s what’s so great about this prop. It’s simple to build, won’t break the bank, and really results in a great prop. The quick jerking of the cylinders creates a nice startling effect that you just don’t get from a standard ground breaker. So if you’ve got your head wrapped around the pneumatics, the rest of this prop should be smooth sailing for you. Items needed for this prop include: 6′ of 2×4 2 pneumatic cylinders 2 foot brackets 2 rod clevis 2 clevis mounting brackets 2 – 4 way solenoid valves 1 prop controller 4 – 3″ hinges (wrist/elbow) 2 – 2.8″ hinges (shoulders) 12 carriage bolts (attaching cylinders) 10 flat phillips bolts (hinges) 2 hex bolts (shoulders) Locking nuts/washers for all bolts Plywood for base ...
Grave Grabber Tutorial...
posted by SkeleTony
If you’ve ever wanted to build your very own grave grabber but didn’t think you had the skill to get it done right, take a look at this tutorial posted by Kevin Kennedy on the Haunt101 website. This prop is simple to create and looks awesome in any graveyard environment. Unfortunately, some of the links in the tutorial are dead, but they’re relatively insignificant to the tutorial and the mechanism should be enough to inspire your creativity. Items needed to build this include: 9’ of 1” x 1/8” aluminium flat stock 36” wooden dowl 8 – 8/32” x 5/8” machine screws 24 #8 SAE washers (you could use nylon washers) 8 – 8/32” nuts with nylon threads a low speed high torque motor 1 spooky head 1 pair of spooky hands along w/ coat hanger and spray foam Some of the assorted lumber every haunter has lying in the back of their...

Monsters in May!
posted by SkeleTony
After 10 years of scaring the heck out of folks in Stoughton, Wisconsin, the Haunted Barn will be closing it’s doors after this year’s haunt season. Not ones to go out quietly, though, they’re going to be throwing a “sneak peak haunt” dubbed the Monsters in May that promises to “blast you with a little of 2012 and thrill you with a peek into 2013!” This event will run Friday May 17th and Saturday May 18th from 7:00pm until 11:00pm with special 10th anniversary admission pricing of $10.00 per person. And don’t worry, they’re going to be saving some of their best surprises for the October haunt! Haunt: The Haunted Barn 755 Hwy 51 Stoughton, WI 53589 Dates: May 17 – 18th, 2013 Hours: 7:00pm – 11:00pm Admission: $10.00 Tickets: CLICK HERE TO GET TICKETS 755 U.S. Hwy 51Stoughton, WI...

Movable PVC Joints
posted by SkeleTony
Discozombie over at HalloweenForum.com has come up with a great way to give your PVC creations moveable joints. This technique is so simple to do, but really gives your creations an added level of realism. Items needed to create this include: PVC Heat gun clamp sander or grinder drill Bolts Locking Nuts Washers Shop These Materials on Amazon 1" Schedule 40 PVC Pipe 6-Pack Ratcheting PVC Pipe Cutter (up to 1-1/4") 1" PVC Furniture Fittings Assortment 12-Pack Oatey PVC Clear Cement + Primer Handy Pack Affiliate Disclosure: HauntersList.com is a participant in the Amazon Services LLC Associates Program. As an Amazon Associate we earn from qualifying purchases at no extra cost to...

Darklight Precision DMX...
posted by SkeleTony
Darklight manufactures the world’s smallest LED spotlights. At least that’s what their website says, and while I’ve never measured to verify this claim, they do offer a wide assortment of micro LED spotlights and floodlights that are very tiny. The Precision DMX, on the other hand, I have no doubt is the smallest LED DMX controllable fixture, because I’ve never seen anything quite like it before. This tiny little unit packs quite a punch offering RGB color changing and color mixing as well as flicker, strobe, blink, and fade-in/fade-out. It’s important to note that you will need a Darkbox Programmer to configure the Precision DMX’s address from the default of 1, or to store settings for standalone use. Simply put, with the Darkbox you can set the output settings, they’re stored in the Precision DMX’s EEPROM, and then you can unplug the Darkbox and the Precision DMX can simply be powered on and will output the stored settings. The recommended power supply for the Precision DMX is the PowerPak 5000, which is a 12 volt/5 amp power supply that can handle up to 16 Precision DMX fixtures at full power. Both the Darkbox Programmer and the PowerPak 5000 are sold separately....

Micca Speck
posted by SkeleTony
Every now and then you come across something that is too good to sit on and you’ve got to share it with as many people as possible. That’s exactly how I feel about this cool piece of tech that Bigant from HalloweenForum posted about. If you’re looking for an inexpensive media playback device for your props that’s capable of auto playback/looping and has an incredibly small form factor, then look no further, the Micca Speck is everything you’re looking for. Its capable of outputting 1080p video and supports MKV, AVI, MOV, M2TS, MPG, and MPEG file formats (just to name a few). Just plug your USB hard drive or SD card in and select the video or image you want to output. It comes with an IR remote control, a USB cable, and a 3.5mm to RCA cable for video output (you’ll have to provide an HDMI cable if you need to output via HDMI). The best part, it’s only $39.95 at Amazon, and anybody that’s ever looked into media streaming devices for their props knows what a great deal that is....

Tarpit Monster
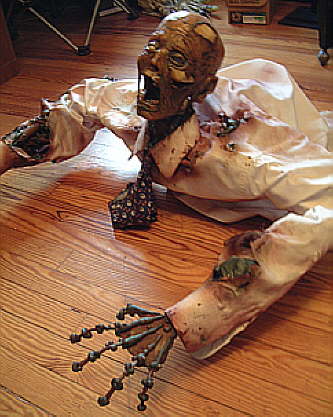
posted by SkeleTony
Created by Jeff, aka Noah Fentz, of thecreepyhousenextdoor.com this tar pit monster tutorial could prove to be a very difficult and noxious project, but it sure is a cool idea. All you need are a “duct taped” body cast, a styrofoam head and some roof tar. If you’ve never used roof tar, a word of warning, it’s very sticky and is not easily if ever removed (also see the disclaimer on the bottom that was pulled from Noah’s tutorial for extra emphasis). *DISCLAIMER- Flashing cement is flammable and highly combustible . All tar props are for outdoor use...