
Submit your original Halloween prop tutorials, haunt listings, home haunts, events, and products to HauntersList.com. Share your work with the haunting community!
Weather Resistant Tree Stump...
posted by SkeleTony
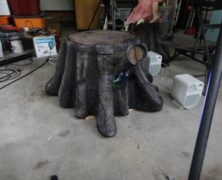
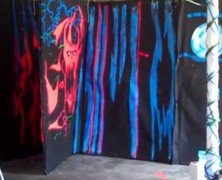
Difficulty: Intermediate | Time: 6–10 hours | Cost: $40–$80 Every outdoor haunt that uses video projection eventually runs into the same problem — where do you hide the projector? This clever solution, originally shared by Rabbit101 on the Halloween Forum, builds a hollow fake tree stump from sonotube, plywood, and blue foam that conceals a projector, DVD player, and FM transmitter inside. Two very rainy Seattle seasons have proven it weather-resistant without any damage to the electronics. Audience members watched the Singing Pumpkins display for extended periods and still couldn’t figure out where the projector was — even after being told it was in the stump. Materials Material Notes Sonotube (concrete form tube) Two pieces totaling about 2/3 of a tube each; size to fit your electronics 3/4″ plywood For the base (organic root shape) and interior support circles Blue foam insulation board Cut into pieces and glued to the outside of the sonotube to build up bark shape Insulfoam spray (Great Stuff) Fills bare spots and gaps in the foam exterior 2″ PVC tube Runs through the bottom for power and audio cables 10″ exhaust fan (110V) Essential for cooling — projector overheats without it Wire coat hanger & propane torch Used together to burn realistic tree rings into the lid Hacksaw blade For carving and shaping the foam into bark texture Spray paint: black, brown, green, grey Black dissolves foam slightly for texture; layered with browns and a dry white wash Jigsaw & staple gun Cutting the base and attaching the sonotube sections Step-by-Step Instructions Step 1 — Cut the Plywood Base and Support Circles Start by cutting the plywood base in a random, organic root pattern — not a circle. Use a jigsaw to cut bumps and lobes that suggest natural...
Ghoul In A Wall
posted by SkeleTony
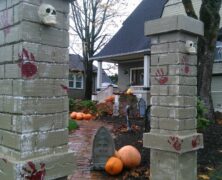
Difficulty: Beginner | Build Time: 1 weekend | Estimated Cost: $15–$30 A ghoul pressing through a crumbling brick wall is one of the most effective cemetery displays you can build for almost no money. This prop uses a styrofoam base, hand-carved foam bricks, joint compound mortar, and a Bucky skull and hand to create the illusion of a specter forcing its way through solid masonry. It reads at distance and holds up indoors or out — and the total material cost is well under $30. Materials & Tools MaterialQty / Notes 1/2" styrofoam insulation boardOne 2×4 ft sheet for the base 1" or 2" styrofoam scrapsFor cutting individual bricks All-purpose joint compoundFor mortar in the brick gaps Bucky skeleton skullStandard full-size skeleton skull Bucky skeleton hand & armOne arm reaching forward Black poster boardBacking behind the skull for contrast String of LED lightsOrange or purple; battery-operated preferred Foam-safe construction adhesiveLiquid nails for foam or hot glue Flat black spray paintBase coat — use foam-safe formula Grey and brown craft paintDry brushing and wash coats Serrated knife or bread knifeCutting and texturing foam Wire brush or stiff-bristle brushRoughening foam brick faces Step-by-Step Instructions Step 1: Cut the Foam Base Start with a 1/2" styrofoam sheet cut to the desired finished size of your wall prop — a good starting size is 18" wide x 24" tall, which is large enough to look impressive but small enough to store flat. This base layer is the structural foundation everything else glues to. Mark your dimensions with a marker and cut with a sharp serrated knife using long, smooth strokes — sawing with short strokes tears the foam instead of slicing it cleanly. Measure and cut your foam base to the finished prop dimensions — a long serrated...

The Pumpkin King
posted by SkeleTony
“TK421, Why aren’t you at your post?” “Because I’m in the garage building the Pumpkin King” Oh what a different film that would have been. I’m pretty sure the Empire would have been pretty impressed with the Pumpkin King that TK421 built. Check out the full tutorial over on HalloweenForum. The skeleton of this prop is composed of PVC. TK421 rolled up plastic bags and hot glued them to the PVC to create the vines. A milk jug was cut in half to act as the rib cage, and a heat gun was used over the entire frame to corpse the prop. After two coats of black paint, an incredible carved pumpkin head topped it all off. 🛒 Supplies Used in This Build These are the materials TK421 used to build the Pumpkin King. Affiliate links help support HauntersList at no extra cost to you. PVC Pipe (1″ diameter)Used for the full body skeleton and armature 🛒 Find on Amazon PVC Fittings & ConnectorsElbows and T-joints for the frame 🛒 Find on Amazon Hot Glue Gun & Glue SticksFor attaching plastic bag vines to the PVC frame 🛒 Find on Amazon Heat GunUsed to corpse the plastic bag skin over the entire frame 🛒 Find on Amazon Flat Black Spray PaintTwo coats over the entire prop before adding the pumpkin head 🛒 Find on Amazon Large Foam Pumpkin HeadThe finishing touch — carve and paint to match your vision 🛒 Find on Amazon 💀 View Full Tutorial on HalloweenForum.com → Full credit for this build goes to TK421 on HalloweenForum.com. HauntersList.com is a link aggregator — we summarize and link to the original creator’s work. Affiliate Disclosure: Some links above are Amazon affiliate links. If you purchase through them we may earn a small...
All Wrapped Up
posted by SkeleTony
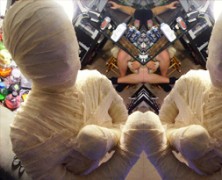
I’ve wanted to post a tutorial for a full-sized mummy for a while and haven’t been able to find one that I thought turned out a really good looking classic mummy. It’s ironic that when I did find one it came from the Crafty Mommy and Me website, which is probably not where I would have started looking in the first place, but I’m really glad I found it. This prop started with Crafty Mommy wrapping her waist and legs in trash bags and having someone start wrapping duct tape around her starting at the waist down. Once she was wrapped all the way down to her feet she was cut out of the duct tape wrapping by cutting a straight line down the back. The same technique should be used to wrap the torso as well,only when cutting your model out you’ll have to cut the back as well as both arms. The lower half was then connected to the upper half and they were taped together. When taping the head you can choose to wrap your model’s head, or if anxiety is an issue, wrap a styrofoam head and then attach it to the body. Once the mummy form was complete, Crafty Mommy coated the form with some white spray paint before wrapping the entire form with a layer of tea stained gauze. The final wrapping consists of tea stained cheese cloth. This last layer is the most important since it will be the most visible layer, so make sure you cover your mummy well. This prop can be a tricky and labor intensive project, but the mummy you will produce will be well worth the time and effort. Items needed to complete this include: Trash bags 3 Rolls duct tape White spray...
SFX – Deep Scars...
posted by SkeleTony
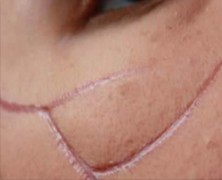
Scars are a easy way to change someone’s appearance without investing a ton of time and effort, and this tutorial from beautysbadhabit shows just how easy it can be. The main ingredient is rigid collodion, which wrinkles the skin as it dries. ...
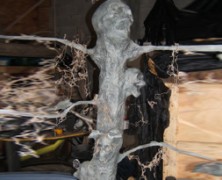
The Petrified Tree
posted by SkeleTony
The Haunted Yard in Ontario, Canada is host to Draven Cemetery, which is apparently so terrifying that it is actually scaring the trees! Well, at least one that we know of. The Petrified Tree is the brainchild of Trevor Baldwin, owner and caretaker of Draven Cemetery, and it’s a great looking prop that’s fairly simple to complete. The prop is composed of a post with a pool noodle wrapped around it to add some bulk to it. Some wire from coat hangers is used to make the branches of the tree. Once you have the general shape of a tree the skulls can be added to the tree. In the tutorial, three mini plastic skulls and one full sized plastic skull were used, but that can obviously be determined by the size of your tree. Trevor actually cut the jaws off the skulls before attaching them to the tree so that once attached the jaws could be added in more of a screaming position. With the skulls in place a few plastic leaves were added to the branches before a coat of paper mache was added to the entire tree. Once the paper mache was completed a coat of mossy green paint was dry brushed on followed by a coat of black paint to highlight the texture and shadows. The final step for this project was to add some fake moss around the tree. It’s a pretty simple project but it looks fantastic and is sure to be a head turner. Items needed to complete this include: A post Pool noodle 3 small pastic skulls 1 life sized plastic skull Coat hanger wire Plastic leaves White glue Spray bottle Paper towel Fake moss Paint Shop These Materials on Amazon Instant Paper Mache...
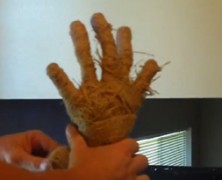
Hands For A Halloween Scarecrow...
posted by SkeleTony
If you’re a fan of American literature then you probably know that the thing the scarecrow wanted the most from the Wizard of Oz was a brain. And that’s a great thing for fictional scarecrows to strive for, but when it comes to non-fictional scarecrows, more often than not they’re in need of more utilitarian things, such as hands. So if your scarecrow is in need of hands then let James Mitchell be your Wizard with his tutorial on making Hands for a Halloween Scarecrow. Actually, whether or not you have need for hands for a scarecrow, this tutorial is worth watching because the bailing wire framework that it is based on is a great method for any pair of hands. It allows for a rigid skeleton that is still completely flexible for posing. Items needed to complete this include: Bailing wire Foam padding Compressed air hose Burlap ...

Spectral Illusions 2014 Additions...
posted by SkeleTony
Spectral Illusions are the creators of some spectacular visual effects for the haunt industry and they’ve just expanded their already impressive library with four new effects for the 2014 season. Each of these new visual effects ring up at $20 and are instantly downloadable in both high definition (1920×1080) and standard definition (720×480) formats as QuickTime movies. ...

Giant Orb Spiderweb
posted by SkeleTony
If you’ve taken the time to build a giant spider for your yard you’re probably going to want to follow it up by building a web for it. There are many ways to accomplish this including cheesecloth, yarn, and even rope. None of these methods, however, look as realistic as the Giant Orb Spiderweb that dariusobells from the HalloweenForum posted. His method involves driving nails into the trees that mirror each other and then wrapping and hot gluing fishing line to the nails in a diagonal pattern. Every time the fishing line intersects in the center it gets wrapped and hot glued as well. He details the pattern that he follows when driving the nails into the trees as well as the path he follows securing the fishing line to the nails as well. I had to read it several times until it clicked in my head, and I don’t think I would be doing dariusobells justice by relaying the pattern he utilizes because his tutorial details it precisely (and probably more accurately than I would). Once the interior support structure of the web is completed the fun really begins. Starting near the center you’ll start weaving your fishing line around the interior supports, wrapping around each intersection. Dariusobells glued his at every other intersection. Continue weaving until you’ve made your way around the entire interior support and you should now have what looks like a Giant Orb Spiderweb. Once complete, you can add some additional hot glue to the lines in between the already glued intersections to add the appearance of dew drops. This is a tricky project and is a fairly lengthy process, but if you can get the pattern down and have a little patience the results are spectacular....
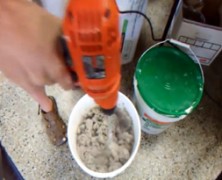
Paper Mache Clay
posted by SkeleTony
Those of you that work with paper mache regularly may find this a real snoozer, but if you’re looking to get started with paper mache clay, or are just looking for a good recipe for paper mache paste you need to watch this video. There are a ton of recipes for making your own paper mache compounds available online, but when a prolific paper mache artist like Scott A Stoll of Stolloween Studio provides one, you’d be well advised to follow it. His tutorial makes a large quantity of paste and clay but it’s a simple recipe that will keep for a few days without refrigeration. The paper mache clay that this produces is spreadable, will hold it’s shape and allows you the ability to smooth it out and add fine details to your creations. Items needed to complete this include: Paper Mache Paste 6 cups flour 1 cup liquid starch 1 cup white glue For Paper Mache Clay 6 cups Paper Mache Paste (recipe above) 1 cup of drywall joint compound Cellulose fiber insulation added until mix is firm Shop These Materials on Amazon Instant Paper Mache Powder Mix 3.3 lbs Assorted 12" Latex Balloons 120-Pack Affiliate Disclosure: HauntersList.com is a participant in the Amazon Services LLC Associates Program. As an Amazon Associate we earn from qualifying purchases at no extra cost to...
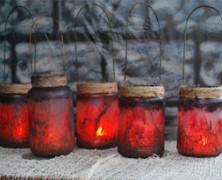
Homemade Witches Lanterns...
posted by SkeleTony
If you’re looking for something a little different than the same old PVC candles to illuminate your haunt you may want to try these Witches Lantern Jars. S.K. Austin of The Haunting Grounds has a tutorial to make them and its a really simple process. They don’t cost much to make and they give off a really creepy glow. Items needed to complete this include: Mason jar Freaky Fabric / Creepy Cloth Jute twine Jute wire Paint Hot glue Shop These Materials on Amazon RGB LED Strip Lights 16.4ft with 44-Key Remote Waterproof Outdoor Flameless Flickering LED Candles Set of 2 RGBW Color Changing Outdoor Landscape Spot Uplights 6-Pack Affiliate Disclosure: HauntersList.com is a participant in the Amazon Services LLC Associates Program. As an Amazon Associate we earn from qualifying purchases at no extra cost to...
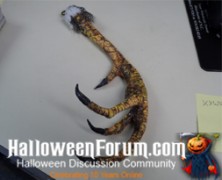
Clay Voodoo Chicken Foot...
posted by SkeleTony
If you’ve ever wondered why chicken feet are so prevalent in the Voodoo community it’s because they’re used as a charm for a powerful form of protection. They can be used to protect individuals as well as their personal belongings from negative energies that want to possess them. It doesn’t end there, though, because in some parts of the South, the chicken foot can be used to place a curse on someone as well, with the most powerful of the chicken feet said to be the ones that come from black feathered chickens. So if you’re planning on a section of your haunt being remotely tied to Voodoo you’d better have a good chicken foot handy. In case you don’t have one, Pumpkin5 from the HalloweenForum has a brief tutorial on how to make a Clay Voodoo Chicken Foot and it’s really simple. You’ll need to cut a wire coat hanger and piece together the wire into the shape of the talons of the chicken’s foot. Cover the wire coat hanger with some sculpey clay and add some detail to the clay so that it looks more like the crackled texture of a chicken’s foot. When painting it, it appears that Pumpkin5 used a base coat of yellow with some flesh tones mixed throughout and then followed it up by dry brushing some black so that the cracks would be nicely darkened. It looks great and will probably last longer than an actual chicken’s foot, however, there is no guarantee that it will indeed protect and or curse anyone. Items needed to complete this include: Wire coat hanger Sculpey modeling clay Paint Feathers ...
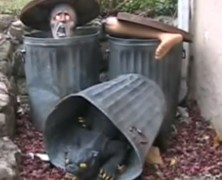
Creep In A Can
posted by SkeleTony
The Creep in a Can is a great prop based on Jeff Baird’s original Leering Skeleton prop. It’s easy to build and the fact that it’s housed in a trash can means you don’t have to worry about building something to hide the mechanism. This video walk through of the prop that Noah Fentz, that creepyguynextdoor, built should give you more than enough of a view of the mechanics to get it done. Shop These Materials on Amazon 12V Wiper Motor 2.5" Shaft 110 Degree (prop building) PWM DC Motor Speed Controller 9-70V 35A 45Kg High-Torque Waterproof Digital Servo Motor Affiliate Disclosure: HauntersList.com is a participant in the Amazon Services LLC Associates Program. As an Amazon Associate we earn from qualifying purchases at no extra cost to...
Building Haunt Wall Panels...
posted by SkeleTony
If you’re interested in building some wall panels for your haunt you’re going to want to check in with Terra from the HalloweenForum before you begin. The tutorial for building haunt wall panels that she added to Scaryladyvideos offers an easy and effective design for framing and then covering the panel with landscape fabric. They’re pretty easy to make, and the use of velcro strips for securing the fabric is the perfect solution. Items needed to complete this include: 32 feet – 1 x 2 furring strips (6) Screws DeWitt Weed Barrier Pro 6300 Velcro strips Staples...

Pneumatics DIY Video Series...
posted by SkeleTony
If you’re looking to start using pneumatics for your props or just want to see what’s needed to make the transition, Automation Direct has a four part tutorial series that will help get you started. Each video is pretty basic, covering little more than the essentials to make a prop work with compressed air, but it should be enough to get your feet wet. They’ll also gladly sell you all the parts you need to make your pneumatic prop a reality. Be sure to click on the playlist button to access all 4 videos Shop These Materials on Amazon 1/4" NPT Solenoid Valve DC12V 5-Way Double-Acting Pneumatic Air Cylinder 40mm x 100mm 1/4" OD Push-to-Connect Pneumatic Fittings Kit 40-Piece Affiliate Disclosure: HauntersList.com is a participant in the Amazon Services LLC Associates Program. As an Amazon Associate we earn from qualifying purchases at no extra cost to...

Embossed Leather Books...
posted by SkeleTony
If the Devil is in the details then you’d better make sure you get the details right. And if you’re looking to add a little detail to any haunt an easy way to add some subtle depth is to make some creepy Embossed Leather Books. Lindsey of the Better After blog has a technique that makes really authentic looking Embossed Leather Books and it’s a quick and simple process. You’ll start by hot glueing whatever you want to appear on your books. Once everything is dry take some damp paper towels and mod podge them to the books. This will give them a leathery appearance when dry. Once everything was dry Lindsey added a base coat of black paint to her books and then applied some gold rub-n-buff and copper metallic paint to bring out the details of the embossed items. The process is painless and turns old boring books into incredible looking old tomes. Items needed to complete this include: Old books Items to glue to the cover Paper towels Mod podge Black paint Metallic paint Gold rub-n-buff paint...

The Chelsea Smile
posted by SkeleTony
The Chelsea Smile is an absolutely barbaric way to permanently disfigure and possibly kill someone. I cannot imagine in my worst nightmare doing this to another human being, but then again, that’s what nightmares are for. And rest assured, if you’re interested in giving people nightmares, you’re going to want to incorporate this tutorial that goldiestarling posted on the Chesea Smile. It’s not overly complicated and looks completely gruesome. ...