


Everybody loves PVC candles. They’re easy to make and offer some nice ambient lighting without having to fear burning your house down. They’re also incredibly realistic looking, with the one exception being that they are not as translucent as an actual candle when lit. That’s precisely what led Sipesh at the HalloweenForum to come up with a Slightly Different Take on the PVC Candle, utilizing clear plastic fluorescent light bulb protectors instead of PVC. They’re available at Home Depot and come in four foot lengths. The process is the same as when making PVC candles. You’ll start by cutting you tube to the desired length and then dripping some hot glue along the outside edge of the tube so that it runs down the side. Once covered with glue you’ll need to give it a coat of spray paint. Lighter colors will achieve the translucent effect better than dark but don’t let that stop you from experimenting. After the spray paint has dried you’ll need to build a base for your tea light. Sipesh recommends putting a piece of styrofoam in there as a base, but I suspect you could spray a small amount of great stuff in the tube so that it rises to the desired height you want the tea ligh at as well. That’s all there is to it, but the end result looks great, these really glow nicely. Items needed to complete this include: Clear plastic tubes Hot glue Spray paint Styrofoam base Tea...
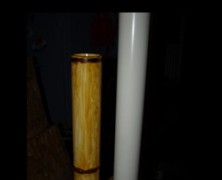
Faux Bamboo
posted by Tony
Bamboo, while often being mistaken for wood, is actually an incredibly strong grass. It’s got an ultimate tensile strength of 265 MPa (Megapascals), which is pretty incredible when you consider that cast iron only carries with it an ultimate strength of 200 MPa (spider silk has an incredible 1200 MPa, fyi). This is no doubt the reason that a single 8 foot bamboo cage could contain 5 stranded castaways so well. PVC on the other hand only carries an ultimate strength of 52 MPa, but since it is considerably cheaper and easier to get than bamboo you might want to consider using petejc’s tutorial to make some Faux Bamboo if you have the need to build a cage. You’ll start by using some acetone to clean all of the writing off of the PVC. Once the PVC has been cleaned you’ll want to cut some notches with a razor blade around the pipe for the bamboo nodes. Petejc recommends going around the pipe a couple of times to get the notch deeper for a better effect. Once the nodes are notched in you’re going to need to grab a blow torch and heat your PVC up a bit. This will not only give it a slight discoloration, but will also allow you to compress the pipe a little bit to give the nodes an actual raised appearance. Once the nodes are complete it’s time to sand and stain the PVC. Petejc went with an amber shellac instead of stain on his bamboo. Sanding the pipe adds some texture to the pipe allowing the shellac to adhere to. The shellac when applied with a rag gives a great uneven finish that looks amazingly like real bamboo. Items needed to complete this include: PVC Blow torch...
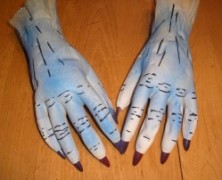
Easy Monster Hands
posted by Tony
Ok, remember when you were getting ready to use the Frankenstein Plans to build your very own Frankenstein and it said you’d have to supply your own set of hands? Well unless you were able to run out to your local Halloween store and buy a pair of hands you were out of luck. And a Frankenstein without hands isn’t very scary now is it? Making your own hands isn’t that difficult though, and the crew over at Screaming Scarecrow Studios have created a simple tutorial on how to make really great looking monster hands using latex gloves, witches fingers, and some expanding foam. You’ll start by turning the glove inside out and cutting a small slit in the tips of the fingers of your rubber glove. Once you’ve got your witches fingers securely inserted into each of the fingers you’ll need to get a 12″ piece of 1/2″ pvc pipe for an arm bone. You’ll need to drill a hole in both the bottom and top of your pipe approximately an inch from the bottom. Once you’ve got your holes drilled you’re going to thread some wire through the hole in the pipe to secure the hand to the bone. You’ll also need to secure the wire through the witch’s fingers which is what will keep the hand secured to the bone once its filled with foam. Once you’ve got your hand securely wired to the arm bone you’re ready to add some foam. You can hang the hand by threading another wire through the hole you drilled in the top of the pvc. It may take a while for the foam to fully cure (2 to 3 days), but once they’ve hardened you can remove the glove from around the hands. You’ll need...

Cheap Rusty Chain
posted by Tony
I must admit that when I first glanced at the tutorial that Lake of the Dead penned over at the HalloweenForum for Cheap Rusty Chain I was a bit underwhelmed. The opening photos of the PVC used to create the chain left me skeptical that the finished product would deliver. Luckily I didn’t stop reading because the finished chain looks amazing and it’s incredibly easy to create. You’ll need to start by cutting all of the links for your full chain. Next, using a PVC pipe cutter you’re going to cut a slit in 1/3 of your links to easily attach the rest of the links. Once you’ve got all your links threaded you can paint the chain using a rust colored paint. Rust-Oleum’s multicolored texture sprays are perfect for this. Items needed to complete this include: 3/4 PVC pipe Rust colored...

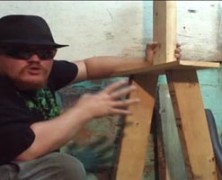
Monster Mud Reaper
posted by Tony
Nothing looks better than a well crafted Monster Mud Reaper standing guard over your cemetery. As he welcomes recently departed souls to their final resting grounds, this dark and foreboding spirit will cause all eyes to focus their attention to him if for no other reason than to make sure he isn’t actually alive. And the best part is, he’s pretty easy to build if you follow the tutorial that Jimmyzdc wrote up at HalloweenForum. The frame of your reaper will be created by securing a steel flange to a 2 x 2′ piece of MDF board and then threading a 4” steel pipe to the flange. You’ll connect the PVC that will create your reaper’s spine to the 4″ steel pipe and then connect your 4 way PVC cross fitting to the top so you can add your arms. Once the PVC frame is complete you’ll wrap some chicken wire around the skeleton for the reaper’s body and then measure out your burlap and drape it on the chicken wire to verify you have the correct size and shape for the reaper you want. Once you have the reaper shaped to your liking you’ll peel your burlap off and dip it in your monster mud until its completely submerged in the mud. Once coated, remove it from the mud and squeeze off the excess mud as you pull. Re-drape it on your frame and continue until you’ve got all of your burlap reassembled on the reaper. Once coated in monster mud, make sure you use a some Drylock masonry sealer to weather proof your reaper otherwise you may have a mess on your hands if it rains. Items needed to complete this include: (2) 90 degree PVC elbows (3) 45 degree PVC elbows (1) 4-Way PVC...
Full Size Zombie
posted by Tony
If you’re looking to build a full size zombie that you can leave outside you’re going to need something that is a little more solid, and once again, Dr. Kreepy has just the tutorial you’re looking for. The lower body is framed using 2 x 4’s for legs attached to a 1 x 6 waist while the spine, shoulders, and arms are crafted out of PVC. After the frame is in place you’ll need to bulk out the torso and the legs. You can certainly wrap the legs and body with foam and duct tape it tight, or you can use the Dr. Kreepy method and use balled up newspaper or plastic. When mounting it you can use a plywood base and screw the legs to it, otherwise you can grab a pair of old boots and throw in some quick drying cement. You’ll need to add your favorite mask and a pair of prop hands if they’ll be visible. Items needed to complete this include: 2 – 2×4 approximately 35″ 1 – 1 x 6 appoximately 17″ 1 – 20″ 2 x 4 6 pieces 3/4 PVC 4 – 3/4″90 degree PVC 3/8″ or thicker 2′ x 2′ plywood Old clothes Skull or mask Duct Tape Newspaper or foam Screws ...
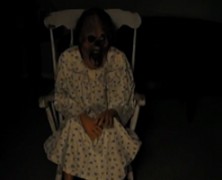
Rockin’ Granny
posted by Tony
There’s something completely unsettling about a decrepit looking old lady slowly rocking back and forth in her chair. If you know a decrepit looking old lady then you’re half way there, but if you don’t, you can always follow ScareFX’s tutorial and make your own Rockin’ Granny prop. What you’re building in this tutorial is a self contained rocking mechanism that you’ll build your Granny on top of. The frame is built of 2×6 material with the wiper motor mounted vertically. A piece of aluminum flat bar connects the wiper motor to a piece of 2×6 that is connected to the base via a 4″ hinge which will allow it to rock back and forth when the motor spins. The upper part of the Granny is built on the 2×6 that is hinged by connecting some 1″ PVC to the 2×6 and then creating some shoulders with the 90 degree elbows and adding some sections of pool noodles over the PVC for the upper arms. You’ll need to add some prop hands if they’ll be visible. The lower body is connected to the base and consists of a PVC T connection which connects some 1″ PVC to two 90 degree elbows and forms the legs. Again, you’ll need to add some prop legs if they’ll be visible. Once your mechanism and skeleton is complete, the entire device is connected to the rocking chair with clamps to prevent it from flying forward once it gets rocking. After you’ve got everything clamped down it’s time to put the Styrofoam head on it and you’ll probably want to put a mask on it as well. Oh, and don’t forget to put some clothes on Granny! Items needed to complete this include: Rocking Chair Wiper motor 4′ of 2×6 board 4×4 post cap & brackets (or...
Spider Hill Prop Works Swaying Zombie...
posted by Tony
Spider Hill Prop Works has posted a great video detailing the framework for their Swaying Zombie prop. This silent film is meant to be more of a companion to the full Swaying Zombie Tutorial they put together which details the build. The parts list included details everything you’ll need to get this up and running and contains many of the pvc fittings and articulating joints that they sell. The frame consists of a plywood base with two pvc legs attached that connect to another plywood base that forms the waist. The wiper motor is mounted on the waist plywood and a swivel assembly is created out of pvc that connects the upper body of the zombie to the drive arm of the wiper motor. This will eventually create the swaying motion for your zombie. It’s a pretty intricate build that will require a delicate hand when setting up. The tutorial is well laid out with great images and descriptions to give you everything you need to get your zombie swaying short of a hula hoop and some extra brains. Items needed to complete this include: 10.5 feet of schedule 40 1 inch PVC pipe 4 feet of schedule 40 ½ inch PVC pipe (6) UMB-1 Universal Mounting Bases (2) ST-1 1 inch PVC slip-T fittings (1) Schedule 40 1 inch PVC cross fitting (1) Schedule 40 1 inch PVC T fitting (2) Schedule 40 1 inch PVC 45 elbows (1) Schedule 40 1 inch to ½ inch PVC reducer 12 Volt wiper motor with 5 volt power supply wiper motor bracket (hauntedparts.com) Approx. 25 #10 x 5/8” self drilling screws (1) ¼” x 20 x 3 ½” hex bolt (4) ¼” x 20 x 1 inch hex bolts (1) ¼” x 20...
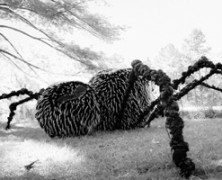
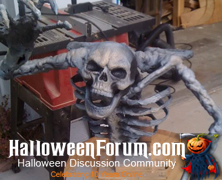
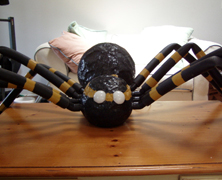
The Build of a Giant Spider...
posted by Tony
It seems like we can’t go more than a few weeks without a good spider tutorial here at Haunter’s List, but Rania Peet’s latest prop tutorial, The Build of a Giant Spider is way better than “good”. This is one oversized arachnid that could not possibly have turned out any better. In her tutorial you’ll start off making your head and body out of tension wire covered with chicken wire. The tension wire comes round but is completely bendable to get whatever shape you see fit to make, it doesn’t necessarily have to be round. The base is a rounded sheet of plywood that holds securely in place the 8 pieces of pvc that will form your legs. Once the base is complete and painted, the body of your spider can be connected to it via a piece of metal flat bar. The legs consist of three sections of 1″ pvc, a 5′ section that comes off the 45 degree fittings at the base, then connects to a 3′ section at the middle of the leg, and finishes with a 2′ section at the end. Once the legs are attached Rania wrapped the pvc with some burlap and proceeded to spray Great Stuff in the gap. The Great Stuff pushes the burlap and expands through the tiny gaps creating an amazingly creepy appearance that look both bulbous and hairy (just as I suspect spider legs would look like if you enlarged them to 17 feet in diameter). Once complete they legs were coated with flat black spray paint. The body is covered with several yards of two tone long pile fur that were applied in sections. The fur can be costly, but you cannot beat the appearance it gives the spider, it’s creepy unto...
Mr. Gravedigger
posted by Tony
I’ve wanted to build every prop I’ve come across lately, but none as much as I want to build this one. The Gravedigger that Mizerella at 102 Wicked Things To Do created for her cemetery is amazing looking and doesn’t seem that difficult to pull off (said the guy that’s never created an entire person out of paper mache). The head of this fellow will take the most care and attention to detail when creating. It’s made using a foam skull that’s a blend of paper mache, mache pulp, and Creative paper clay. The features of his face including the nose, ears, tongue, teeth and eye brows will need to be built up with the Creative paper clay which is where some basic sculpting abilities will come in handy. Once you’ve got the head done you’re almost done. The rest of the prop is a pvc frame that’s been heated and bent to give him a warped stance. The pvc frame is then covered in chicken wire and paper mached numerous times. The arms and legs incorporated pool noodles to build them up before coating them in paper mache. The final piece of the puzzle when creating this fellow were the hands, which were a mixture of wire, cut straws and many layers of paper mache and mache pulp. Once all of the pieces of the puzzle are complete it’s just a matter of dressing this guy up in your favorite old clothes and finding a final resting spot for him. Mizerella’s gravedigger looks incredible and I’m a little skeptical on whether I can make one that looks as nice, but I will definitely be giving this guy a...
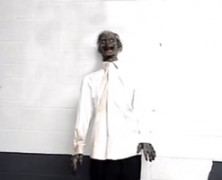
Zombie Build
posted by Tony
I’m truly amazed at some of the great looking props that people are able to build that cost next to nothing, and the creative ways they go about accomplishing it. Sytnathotep is one such prop builder with his 1/2 zombie build, which looks great and probably didn’t cost a whole lot. The spine of the zombie is crafted using three three foot sections of 12/2 electrical wire that are braided together to give it some extra rigidity. Since this is a 1/2 zombie it doesn’t have to support any real weight (no legs). The shoulders are 3/4″ pvc connected via a cross fit connection that slides over the spine while the collar bones are more 12/2 electrical wire, and the scapulas are styrofoam insulation. With a wire clothes hanger ribcage and hands made out of wire with plastic pen tube fingers this project is not exactly breaking the bank. Once the skull slides onto the electrical wire all that’s left to do is corpse and paint this bad boy! What I really like about Sytnathotep’s zombie is his corpsing technique. He used the melted plastic method as a base, but then stretched cheesecloth and spider web dipped in a 50/50 mixture of black latex house paint and elmers glue all over the zombie. It really does give the appearance of rotting flesh and is well worth the effort and the mess that it creates. Items needed to complete this include: 12′ – 12/2 electrical wire Skull 6 wire clothes hangers 1 pvc cross fit connector Scrap styrofoam 10 Plastic pen tubes Duct tape Plastic for corpsing Cheesecloth / Spider webbing Latex paint Elmers...

The Unborn
posted by Tony
The Crawlspace Haunter has created one of the coolest and creepiest looking props that I’ve laid my eyes on. It’s based on a creature from the film The Unborn. It turned out great and its the kind of prop that is guaranteed to give people nightmares. Its made with a pvc frame that’s laid out as if you were building an animals skeleton. The pvc that makes up the backbone was heated up to give it a bit of a curve. The rest is a mixture of cardboard, tissue, and paper mache to give it some body. Items needed to complete this include: 1/2″ or 3/4″ PVC (amount to be determined by your build size) 4 – 90 degree pvc 4 – 45 degree pvc 1 – cross connector pvc fitting 1 – pvc T fitting Skull Cardboard Tissue Paper mache Foam pipe insulation Wire I’m honestly not sure which photo creeps me out more, the night shot, or the daytime...
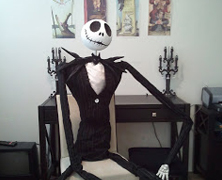
Full Size Jack Skellington Build...
posted by Tony
If you’re a fan of Tim Burton’s Nightmare Before Christmas, and quite frankly, who isn’t, then you’re going to love the tutorial that KAM3152 penned for her blog DIY Nightmare Before Christmas Halloween Props. The prop seems pretty simple to build, although I’m not sure I could successfully clothe a full size Jack Skellington quite as well as KAM3152 did. Jack’s body is built using 1/2″ PVC frame while his head is crafted out of a foam floral ball. The arms are a pair of prop skeleton arms from a party supply store, but if you don’t feel like purchasing hands for this build you can create your own Clay Skeletal Hands. This prop ultimately comes down to the clothing, and if you can give Jack a proper looking suit, you’re going to have a great looking prop on your hands. Items needed to complete this include but are not limited to: 18′ – 1/2″ PVC (approximately) 1 PVC T joint 1 PVC Cross Joint 2 – 45 degree or 90 degree PVC joints for shoulders/elbows Skeletal Hands Round floral ball Material for...

Wailing Tree
posted by Tony
When I was little the one thing that used to creep me out more than anything was walking through any kind of wooded area. I was certain the trees were alive and it would absolutely freak the heck out of me. I never truly felt like I was alone out there. Thank goodness I didn’t see the Wailing Tree that the Ghostess over at the Dead End created when I was a kid, because I’m pretty sure I wouldn’t have ever gone near a tree again. The frame of this tree is made of PVC while the body is a combination of chicken wire, paper mache, and a little bit of Great Stuff to seal the bottom. While not tremendously hard to create, you can tell that the Ghostess really put a lot of care into the creation of this prop. It’s an absolute thing of beauty, and I don’t think I’d be happy building just one, I want a whole forest of these things! Items needed to complete this include: 1 Bucky Skull PVC (variable depending on the size) Chicken wire Paper mache Great Stuff 14 gauge wire (for branches) Silk leaves DryLok masonry sealer Black / Brown / Gray Paint...
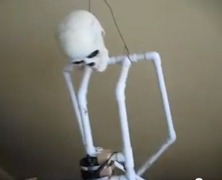
PVC Skeletons
posted by Tony
Not all grave grabbers need to be motorized, and if you’re interested in building an inexpensive one that still looks good then checkout LastHouse’s tutorial over at HalloweenForum. It’s a pretty easy project that allows for plenty of artistic freedom, but you will need a little bit of skill to cut the PVC for the rib cage, and of course you’ll need a blowtorch to get the PVC hot enough to bend. Once the ribcage is done, though, you’re all set to pose and bring your skeleton to life. The nice thing about this prop is that while it may look like a complete disaster while you’re framing it, once you’ve coated it with the Great Stuff and painted it up, it’ll take on a life of its own. And don’t forget to reference LastHouse’s tutorial on skeletal hands to add to your skeleton. Items needed to complete this include: Two 3/4 ” pieces of PVC 3 PVC T’s Some scrap 2 x 4 Hot glue ( LOTS) Liquid Nails Great Stuff Some Scrap foam Duct tape Drylock paint Model Magic clay...
Spider & Spider Victim Plans...
posted by Tony
Every home deserves an over sized spider hanging around on the roof, and if you can blow up a balloon you might just be able to create your own. Dano from Dano’s Spider House has a tutorial on how to create some really good looking paper mache spiders that are worthy of any haunt. The good news is they’re easy to create and you can make them as large as you want since all of the parts used are sizable based on your needs. It”ll help if you’ve got some experience creating with paper mache, but even if you don’t you should still be able to create these awesome arachnids. Dano’s even got a great single bodied option using PVC legs that’s worth trying as well! Items needed to complete this include: Balloons Water Flour PVC connectors Foam pipe insulation Indoor/Outdoor lights Plastic semi-transparent ball Black tempera paint Waterproof sealer Coffee grounds for texture...
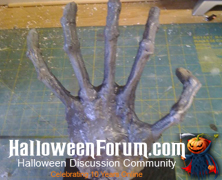
Cheap and easy Skeleton Hands...
posted by Tony
Since many of the prop builds featured on HauntersList involve PVC frames it’s probably not a bad idea to post another tutorial on how to create hands for those frames. LastHouse from HalloweenForum has a tutorial on how to make some gruesome looking skeletal hands that won’t take you too long and the cost is next to nothing. They’re made of styrofoam and wood dowels coated with a little hot glue and then painted. The hardest part about this tutorial is melting the styrofoam to give them a more natural boney look. Make sure to do this step in a well ventilated area as burning styrofoam can be highly toxic (it’s a good idea to wear a respirator). Items needed to complete this include: Styrofoam Hot Glue Wooden dowels Drylock Paint...
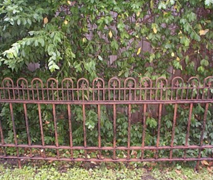
Simple Fancy Fence
posted by Tony
If you want a really good looking fence for your cemetery but don’t want to go through the heavy detail of the Faux Wrought Iron Fence tutorial, then have no fear, you can get a great effect for just pennies on the dollar if you follow this tutorial from the old abandoned Haunter’s Hangout. The fence is made of 1/2″ PVC and 1×2″ lumber, but you crown the top of it with the fancy garden fence that is available at WalMart, or most home improvement stores. After antiquing the fence a bit it looks fantastic, and the time you’ve saved in not adding the detail from the Faux Wrought Iron Fence tutorial can be better spent on other endeavors. Items needed to complete this include, but should be measured per section: 1×2″ Lumber 1/2″ PVC Decorative garden fence Black spray paint Brown craft paint Sponge...
Ankle Tickler Tutorial...
posted by Tony
If you’re interested in creating your very own ankle tickler then take a look at Operatingnurse’s tutorial. She’s given us everything we need to know to create this unsettling effect for our own haunts. I will openly admit that this effect drives me absolutely nuts, I can’t stand it….but I can guarantee you that I will not hesitate to build my own in an effort to pay it forward! Items needed to complete this include: 4′ – 1/2″ PVC (2) – 1/2″ PVC end caps 2 Way Solenoid Valve Push Quick Male Connector Super Strong Quick Setting Epoxy Soft tubing and connectors – about 14″ Flat black spray...
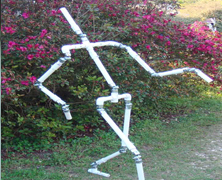
The Bride of Articulation...
posted by Tony
If you’re building any type of body form PVC is ultimately going to be the best framing option. Wood is good, but PVC is worry free (I want credit for that phrase if it catches on). Anyway, if you like the Movable PVC Joints tutorial then you’re really going to like this one. The Bride of Articulation tutorial that Beelce over at HauntForum has provided us is an incredible example of how to create the skeleton for any form you’re creating. You can literally create any pose that you want, and then cover it in any fashion you see fit. This is not a difficult tutorial, and allows for incredibly detailed forms. Items needed to complete this include (but will need to be calculated per joint): 1″ PVC (for the bones) 1″ PVC coupling Post caps for each joint Flat washers Lock washers Bolts Lock nuts Drywall / Deck screws ...
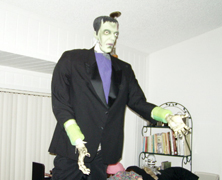
Frankenstein Plans
posted by Tony
Dano’s Spider House has what is probably the easiest set of plans I’ve ever seen to make an 8′ Frankenstein prop. The design doesn’t account for much flexibility after you create it because the PVC frame is not jointed, but if you need a prop that doesn’t require any movement, you’re all set. And if you’ve got the chops to deviate from these plans, you can add whatever flexibility you may need to your design. You’ll need to create a PVC frame, have plenty of bubble wrap, a set of hands, and a mask, but that’s pretty much it. This thing is easy to build and offers a life sized prop at barely any cost! ...
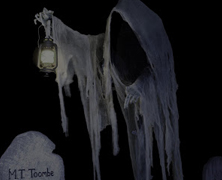
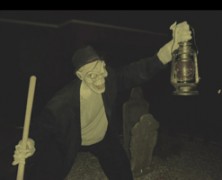
Grim Hollow’s Cloaked Ghost...
posted by Tony
There’s a great tutorial on how to make a Cloaked Ghost over at Grim Hollow that is well worth your time to check out. This eerie prop was inspired by Pumpkinrot’s Cloaked Ghost and is pretty easy to build for something so awesome looking. It looks great both day and night and is sure to be an attention grabber at your haunt. Items needed to create this include: 5′ – 1-1/2″ pvc pipe 10′ – 1 x 2 wood Chicken Wire Burlap Monster Mud Glue Sticks Cheesecloth Lantern Plywood (for base)...
Hangman Prop
posted by Tony
Ulcerative has posted a great video of the perfect frame for a hangman prop. When the attached wiper motor is turned on the flailing effect is supreme, and even though it’s just a PVC frame in the tutorial, you can more than visualize the awesome effect you’ll get when you clothe the frame and light it for effect. If you don’t want to get into pneumatics, but still want a great visual, this is definitely one you’re going to want to try....

Movable PVC Joints
posted by Tony
Discozombie over at HalloweenForum.com has come up with a great way to give your PVC creations moveable joints. This technique is so simple to do, but really gives your creations an added level of realism. Items needed to create this include: PVC Heat gun clamp sander or grinder drill Bolts Locking Nuts...

PVC Flicker Candles
posted by Tony
Jimmyzdc over at HalloweenForum has posted an awesome tutorial on how to make your own PVC candles. It’s super simple, and when you pop some battery powered tealight candles on top of them you’ll be free to create and put out as many candles as you want without having to worry about setting your haunt on fire. Items used to create these include: 1 1/2″ PVC Pipe – Full length 8-10 ft pipes Great Stuff Insulation LED Tea Lights Hot Glue Gun 1 1/2″ Forstner Drill Bit Rustoleum Spray...