


If you’re looking for a creative alternative to the paper mache skull then feast your eyes on the tutorial for Burlap Skulls that OctART posted over at the HalloweenForum. It’s pretty much the same process as making a paper mache skull (although considerably less messy) and the finished burlap skull looks amazingly creepy with a tea light inside. You’ll need to start by wrapping your skull with aluminum foil and then cut your burlap into strips. Grab your hot glue gun and start to apply the burlap over the foil covering as much of the skull as necessary. You’ll want to make sure that you don’t use too much glue in the back so you’ll be able to pull it off the skull. Also, if you’re planning on using a tea light, make sure you’re only applying one layer of burlap where your light will shine through. You’ll have to remove the foil from those areas as well. Once all the burlap is in place and dried you can remove it from the skull and spray it will some of your sealant. Items needed to complete this include: Skull Aluminum foil Burlap Hot glue Spray sealant Tea lights...
Spirit Panel
posted by Tony
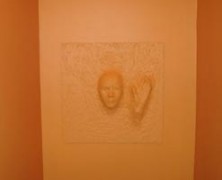
If you want to add a bit of subtle detail to your haunt walls, Violetkitty has an instructable for a Spirit Panel that could very easily be used. The tutorial is based on an original idea titled Ghosts in the Bookcase Halloween Project, and it’s a simple way to add some depth to any flat surface. In a nutshell you’re going to glue or screw down the item you want protruding from the wall. You’ll then start to cover the protruding items with your paper mache mixture so that it completely covers them and appears to be stretching the wall. After you’ve got the items coated you’ll need to let them dry a bit and then cover the entire surface with the paper mache mixture. Once completely coated you can sand it down a bit and paint it. The great thing about this idea is that you can use plastic masks, skulls, prop hands, pretty much whatever you want to appear to be coming through the walls. It’s not a tricky project, and it can add a nice wrinkle to an otherwise plain wall. Items needed to complete this include: Plywood (or the flat surface of your choice) Plastic Mask Manicure plastic hand Gorilla glue Celluclay paper- mache Sandpaper Latex...

Don’t Blink
posted by Tony
I’ve never really watched Dr. Who, but I’m sure glad that MacabreRob over at HalloweenForum has because the “Blink” episode of the British television series gave him the inspiration to build two life-sized angel statues for his haunt. To say that the statues are constructed out of paper mache and expanding foam insulation really underscores the amount of work that went into these. Several coats of paper mache were carefully coated onto a mannequin and then cut and removed in sections. After they were carefully pieced back together, 1″ wood boards were inserted to add some support and it was filled with expanding foam insulation. The wings were created using a similar technique with the form created using styrofoam and then coated with paper mache. MacabreRob went even so far as to cast his daughters face in alginate to provide for the face on Angelica, the passive angel. Once the bodies were complete he dressed them in robes made from bed sheets and thoroughly coated them in monster mud. Both angels turned out amazing and it’s really cool to see a family working together on a Halloween project. It’s definitely an intricate build, but if you can pull it off you’ll have the best looking cemetery in the neighborhood. ...
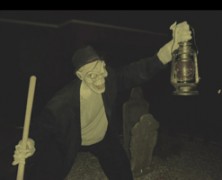
Mr. Gravedigger
posted by Tony
I’ve wanted to build every prop I’ve come across lately, but none as much as I want to build this one. The Gravedigger that Mizerella at 102 Wicked Things To Do created for her cemetery is amazing looking and doesn’t seem that difficult to pull off (said the guy that’s never created an entire person out of paper mache). The head of this fellow will take the most care and attention to detail when creating. It’s made using a foam skull that’s a blend of paper mache, mache pulp, and Creative paper clay. The features of his face including the nose, ears, tongue, teeth and eye brows will need to be built up with the Creative paper clay which is where some basic sculpting abilities will come in handy. Once you’ve got the head done you’re almost done. The rest of the prop is a pvc frame that’s been heated and bent to give him a warped stance. The pvc frame is then covered in chicken wire and paper mached numerous times. The arms and legs incorporated pool noodles to build them up before coating them in paper mache. The final piece of the puzzle when creating this fellow were the hands, which were a mixture of wire, cut straws and many layers of paper mache and mache pulp. Once all of the pieces of the puzzle are complete it’s just a matter of dressing this guy up in your favorite old clothes and finding a final resting spot for him. Mizerella’s gravedigger looks incredible and I’m a little skeptical on whether I can make one that looks as nice, but I will definitely be giving this guy a...
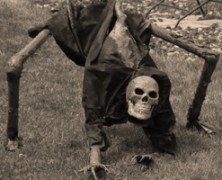
The Unborn
posted by Tony
The Crawlspace Haunter has created one of the coolest and creepiest looking props that I’ve laid my eyes on. It’s based on a creature from the film The Unborn. It turned out great and its the kind of prop that is guaranteed to give people nightmares. Its made with a pvc frame that’s laid out as if you were building an animals skeleton. The pvc that makes up the backbone was heated up to give it a bit of a curve. The rest is a mixture of cardboard, tissue, and paper mache to give it some body. Items needed to complete this include: 1/2″ or 3/4″ PVC (amount to be determined by your build size) 4 – 90 degree pvc 4 – 45 degree pvc 1 – cross connector pvc fitting 1 – pvc T fitting Skull Cardboard Tissue Paper mache Foam pipe insulation Wire I’m honestly not sure which photo creeps me out more, the night shot, or the daytime...
Kingwood Asylum Scarecrows...
posted by Tony
When the guys over at the Kingwood Asylum set out to build some scarecrows they had two real objectives in mind. The first was to make something wickedly evil looking, while the second was not to spend a lot of money completing objective number one. I would say their objectives were met with success. These scarecrows are amazing looking, and judging from their parts list, didn’t cost too much per unit. As creepy as it looks in the photos below, just imagine how amazing they’ll look at night with a little bit of creative lighting. Items needed to complete this include: Elmers Wood Glue (1 large bucket) 10 metal coat hangers 2 rolls masking tape 1 marker Oodles of newspaper 2 pieces of pvc pipe 1 metal rod to go in the pvc pipe Wig Spray...
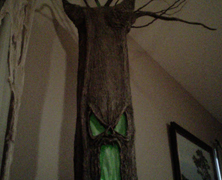
Haunted Tree
posted by Tony
I’ve always been a big fan of the scene in Snow White and the Seven Dwarves when Snow White is running through the forest and the entire evil forest is trying to grab her. I love that scene, and I’m pretty sure Mizerella from the 102 Wicked Things To Do blog is a fan as well. She’s constructed a tree that would definitely be worthy of residence in Snow White’s forest. The tree is created using two round concrete forms that can be split for easier storage along with a mixture of paper mache and celluclay. It doesn’t seem like an extraordinarily difficult project and the tree looks incredible. Items needed to complete this include: 2 Concrete building forms (sonotube) 1/4 sheet of plywood Newspaper Masking tape Paper mache Celluclay Coat hangers Branches (to spread on top)...
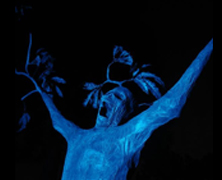
Wailing Tree
posted by Tony
When I was little the one thing that used to creep me out more than anything was walking through any kind of wooded area. I was certain the trees were alive and it would absolutely freak the heck out of me. I never truly felt like I was alone out there. Thank goodness I didn’t see the Wailing Tree that the Ghostess over at the Dead End created when I was a kid, because I’m pretty sure I wouldn’t have ever gone near a tree again. The frame of this tree is made of PVC while the body is a combination of chicken wire, paper mache, and a little bit of Great Stuff to seal the bottom. While not tremendously hard to create, you can tell that the Ghostess really put a lot of care into the creation of this prop. It’s an absolute thing of beauty, and I don’t think I’d be happy building just one, I want a whole forest of these things! Items needed to complete this include: 1 Bucky Skull PVC (variable depending on the size) Chicken wire Paper mache Great Stuff 14 gauge wire (for branches) Silk leaves DryLok masonry sealer Black / Brown / Gray Paint...
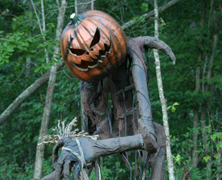
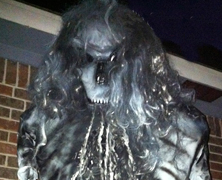
The Making of Grim
posted by Tony
In 2008 the Grim Hollow Haunt created an incredible looking prop simply named Grim. This sinister looking creation stands approximately 5 feet tall and represents everything I fear is walking through the woods at night. I cannot imagine a better prop to welcome guests to a haunt than Grim, and thankfully, Grim, host of the Grim Hollow Haunt has left a short tutorial on the steps needed to create this amazing monstrosity. This creation rests on a 1 x 2″ wood skeleton that is covered in chicken wire and paper mache. The hands and feet are simply wire coat hangers with duct tape wrapped around them. Grim did some additional distressing of the creature via rope vines and cheesecloth, while a foam Funkin head was carved and given an ominous paint job. Items needed to complete this include: 1 x 2″ lumber 1 x 3″ lumber Chicken wire Wire coat hangers Paper mache Duct tape Rope (as needed) Flat black paint Cheesecloth Foam Funkin...
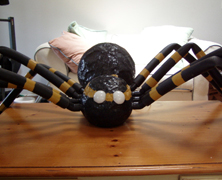
Spider & Spider Victim Plans...
posted by Tony
Every home deserves an over sized spider hanging around on the roof, and if you can blow up a balloon you might just be able to create your own. Dano from Dano’s Spider House has a tutorial on how to create some really good looking paper mache spiders that are worthy of any haunt. The good news is they’re easy to create and you can make them as large as you want since all of the parts used are sizable based on your needs. It”ll help if you’ve got some experience creating with paper mache, but even if you don’t you should still be able to create these awesome arachnids. Dano’s even got a great single bodied option using PVC legs that’s worth trying as well! Items needed to complete this include: Balloons Water Flour PVC connectors Foam pipe insulation Indoor/Outdoor lights Plastic semi-transparent ball Black tempera paint Waterproof sealer Coffee grounds for texture...

Clockwerk’s Ghost Girl...
posted by Tony
Clockwerk from HalloweenForum has built a really eerie, almost cartoonish looking Ghost Girl and has posted some great pictures and a brief tutorial on how it was constructed. This creepy little girl sits atop her tombstone with an ominous glow beckoning passers by to enter her cemetery. There’s nothing I don’t like about this prop. Heck, I think the tombstone alone looks great, but Clockwerk has really shown some artistic skill with this girl. It seems like a pretty easy prop to build, but the arms, legs, and head may take some skill to craft (ok, so maybe it’s not that easy). You’ll need to create and mount a PVC frame to the tombstone. The head is constructed out of a styrofoam craft ball with ping pong balls (with LED’s implanted) for eyeballs, while the legs and arms are created using a combination of paper mache and Crayola model magic. Items needed to complete this include: Tombstone Styrofoam craft ball Ping Pong balls LED lights Paper Mache Crayola Model Magic (4) – 90 degree 3/4″ pvc (2 or 3) – 3/4″ pvc T joints 4 feet – 3/4″...