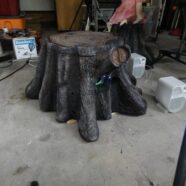


Weather Resistant Tree Stump
Every outdoor haunt that uses video projection eventually runs into the same problem — where do you hide the projector? This clever solution, originally shared by Rabbit101 on the Halloween Forum, builds a hollow fake tree stump from sonotube, plywood, and blue foam that conceals a projector, DVD player, and FM transmitter inside. Two very rainy Seattle seasons have proven it weather-resistant without any damage to the electronics. Audience members watched the Singing Pumpkins display for extended periods and still couldn’t figure out where the projector was — even after being told it was in the stump.

Materials
| Material | Notes |
|---|---|
| Sonotube (concrete form tube) | Two pieces totaling about 2/3 of a tube each; size to fit your electronics |
| 3/4″ plywood | For the base (organic root shape) and interior support circles |
| Blue foam insulation board | Cut into pieces and glued to the outside of the sonotube to build up bark shape |
| Insulfoam spray (Great Stuff) | Fills bare spots and gaps in the foam exterior |
| 2″ PVC tube | Runs through the bottom for power and audio cables |
| 10″ exhaust fan (110V) | Essential for cooling — projector overheats without it |
| Wire coat hanger & propane torch | Used together to burn realistic tree rings into the lid |
| Hacksaw blade | For carving and shaping the foam into bark texture |
| Spray paint: black, brown, green, grey | Black dissolves foam slightly for texture; layered with browns and a dry white wash |
| Jigsaw & staple gun | Cutting the base and attaching the sonotube sections |
Step-by-Step Instructions
Step 1 — Cut the Plywood Base and Support Circles
Start by cutting the plywood base in a random, organic root pattern — not a circle. Use a jigsaw to cut bumps and lobes that suggest natural root flare spreading from the base of the stump. This is one of the most important details for realism. Also cut several circles from plywood slightly smaller than your sonotube diameter — these will be used as interior support rings to keep the shell rigid. The trick is to make the inside larger than your biggest piece of electronics. Rabbit101’s only regret was not making it bigger, so plan generously.
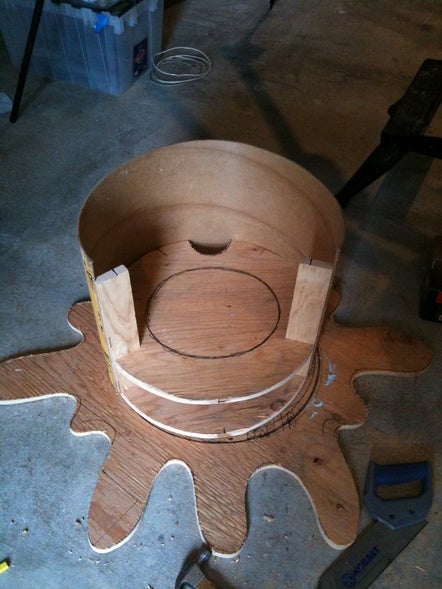
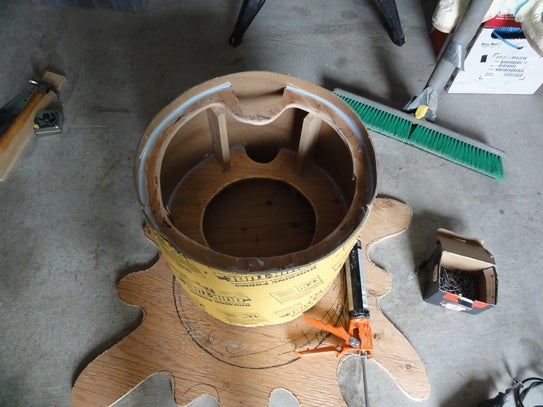
Step 2 — Attach the Sonotube Sections
Cut your sonotube and stretch it (slit it open) to wrap around the plywood base. Because the available tube at the local Lowes was one size, two sections of about 2/3 of a tube each were used — one nailed on first, the second overlapping it. If you can find a larger diameter tube you may be able to use a single piece, but two sections work just as well once the foam exterior covers the seam. Nail and staple both sections securely to the plywood base and interior support circles.
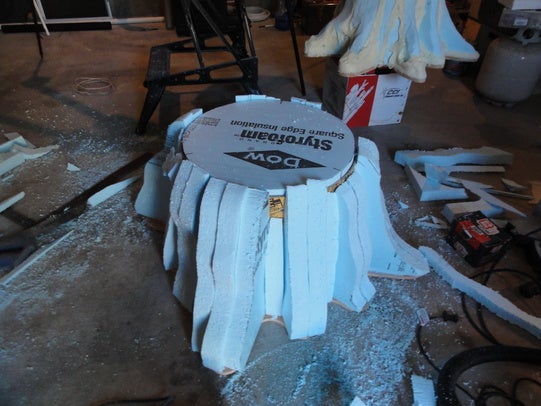
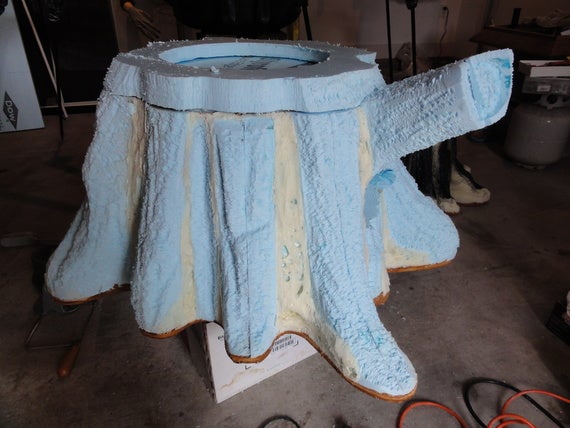
Step 3 — Build Up the Exterior with Blue Foam
Cut pieces of blue foam insulation board and glue them to the outside of the sonotube. Overlapping is fine — in fact it helps build an irregular, organic shape. Don’t worry about bare spots between pieces; those get filled in the next step with spray foam. The goal at this stage is to build up enough mass so you can carve convincing root shapes and bark ridges into the foam. Work your way around the full circumference and down onto the plywood base to blend the stump into the ground.
Step 4 — Shape the Bark Texture
Once the foam is in place and any bare spots are filled with Insulfoam spray, shape the stump using a hacksaw blade as a rasp. Drag the serrated edge down the foam in vertical strokes to carve bark grain. Carve deeper channels for the spaces between roots and shallower lines for bark ridges along the trunk. A grinder or wire brush on a drill also works for more aggressive shaping. For the lid, heat a wire coat hanger with a propane torch and press it in concentric circles across the surface to burn in realistic tree rings.
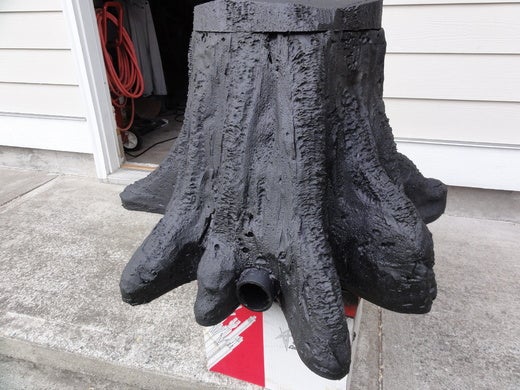
Step 5 — Install Cable Routing and Paint
Before painting, install a 2″ PVC tube through the bottom of the stump to route your power cord and audio cables cleanly in and out. This keeps the exterior tidy — no cables running along the ground from a visible hole. For painting, start with black spray paint — it slightly dissolves the foam surface and adds texture while creating deep shadow in the bark grooves. Follow with brown, then green and grey lightly applied. Finish with a dry white wash to bring out the high points and give the bark a weathered, mossy appearance.
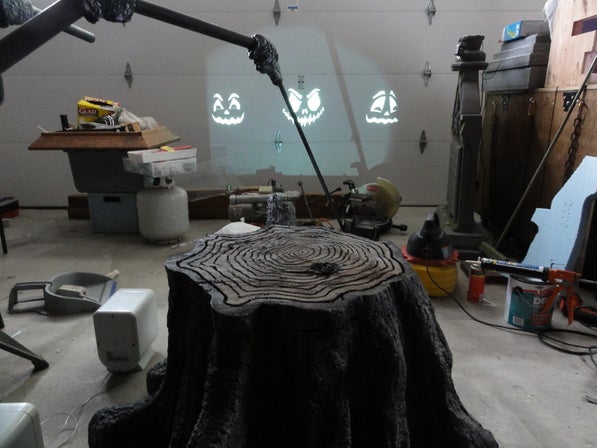
Step 6 — Set Up Electronics and Deploy
Place your projector, DVD player, and FM transmitter inside on a raised platform approximately 4 inches off the floor to allow airflow beneath them. Mount a 10″ exhaust fan in the base — without active ventilation the projector will overheat. Shape the lens opening in the sonotube wall to match your projector’s beam angle — it may need a little extra carving to accommodate the projection. Aim the projector at your target, run your cables through the 2″ bottom tube, and put the lid on. The stump is ready to deploy. In the display below, the projector, DVD player, and FM transmitter are all hidden inside — and the singing pumpkins video runs perfectly.
Tips and Tricks
- Size up — Rabbit101’s only regret was not making the inside larger. Be generous with your dimensions.
- Black paint dissolves foam — use this to your advantage to add texture, but apply it in quick passes so you don’t eat through too much material.
- Add a power strip inside — run one extension cord in from the base and connect everything internally for a clean setup.
- Build a second stump — a companion stump can house an Arduino controller, speakers, or a second projector. Two stumps look natural together in a yard display.
- Plant a prop on top — place a zombie baby, a crow, or a small seated figure on the lid to add further interest and distract from the electronics inside.
- Seal with flat exterior clear coat — keeps the foam weather-resistant through multiple rainy seasons without peeling.
Shop These Materials
- 10″ 110V Exhaust Fan
- Great Stuff Expanding Foam
- Blue Foam Insulation Board
- Flat Exterior Clear Coat Spray
- Propane Torch
- Exterior Spray Paint Set
- 2″ PVC Pipe
Affiliate Disclosure: Some links in this post are Amazon affiliate links — if you purchase through them we may earn a small commission at no extra cost to you. Thank you for supporting HauntersList!
Original tutorial by Rabbit101 — Halloween Forum