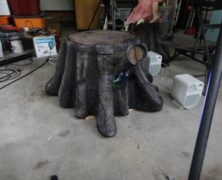
Difficulty: Intermediate | Time: 6–10 hours | Cost: $40–$80 Every outdoor haunt that uses video projection eventually runs into the same problem — where do you hide the projector? This clever solution, originally shared by Rabbit101 on the Halloween Forum, builds a hollow fake tree stump from sonotube, plywood, and blue foam that conceals a projector, DVD player, and FM transmitter inside. Two very rainy Seattle seasons have proven it weather-resistant without any damage to the electronics. Audience members watched the Singing Pumpkins display for extended periods and still couldn’t figure out where the projector was — even after being told it was in the stump. Materials Material Notes Sonotube (concrete form tube) Two pieces totaling about 2/3 of a tube each; size to fit your electronics 3/4″ plywood For the base (organic root shape) and interior support circles Blue foam insulation board Cut into pieces and glued to the outside of the sonotube to build up bark shape Insulfoam spray (Great Stuff) Fills bare spots and gaps in the foam exterior 2″ PVC tube Runs through the bottom for power and audio cables 10″ exhaust fan (110V) Essential for cooling — projector overheats without it Wire coat hanger & propane torch Used together to burn realistic tree rings into the lid Hacksaw blade For carving and shaping the foam into bark texture Spray paint: black, brown, green, grey Black dissolves foam slightly for texture; layered with browns and a dry white wash Jigsaw & staple gun Cutting the base and attaching the sonotube sections Step-by-Step Instructions Step 1 — Cut the Plywood Base and Support Circles Start by cutting the plywood base in a random, organic root pattern — not a circle. Use a jigsaw to cut bumps and lobes that suggest natural...
Foam Masonry
posted by SkeleTony
If you’re in need of some stone or brick panels for your haunt, you’re definitely going to want to check out the tutorial that HIY Productions created. This tutorial takes you through the process of creating brick panels out of styrofoam from start to finish. The tips provided in this tutorial are invaluable if you’re planning on creating any sort of stone or brick for your haunt. The finished product looks amazingly real. http://youtu.be/frq7fZ8SZ8s Shop These Materials on Amazon XPS Foam Board 1" Thick Craft Sheets 4-Pack 4-in-1 Hot Wire Foam Cutter Kit 15W Loctite Power Grab Foam-Safe Construction Adhesive Affiliate Disclosure: HauntersList.com is a participant in the Amazon Services LLC Associates Program. As an Amazon Associate we earn from qualifying purchases at no extra cost to...

Mr. Gravedigger
posted by SkeleTony
I’ve wanted to build every prop I’ve come across lately, but none as much as I want to build this one. The Gravedigger that Mizerella at 102 Wicked Things To Do created for her cemetery is amazing looking and doesn’t seem that difficult to pull off (said the guy that’s never created an entire person out of paper mache). The head of this fellow will take the most care and attention to detail when creating. It’s made using a foam skull that’s a blend of paper mache, mache pulp, and Creative paper clay. The features of his face including the nose, ears, tongue, teeth and eye brows will need to be built up with the Creative paper clay which is where some basic sculpting abilities will come in handy. Once you’ve got the head done you’re almost done. The rest of the prop is a pvc frame that’s been heated and bent to give him a warped stance. The pvc frame is then covered in chicken wire and paper mached numerous times. The arms and legs incorporated pool noodles to build them up before coating them in paper mache. The final piece of the puzzle when creating this fellow were the hands, which were a mixture of wire, cut straws and many layers of paper mache and mache pulp. Once all of the pieces of the puzzle are complete it’s just a matter of dressing this guy up in your favorite old clothes and finding a final resting spot for him. Mizerella’s gravedigger looks incredible and I’m a little skeptical on whether I can make one that looks as nice, but I will definitely be giving this guy a shot. Shop These Materials on Amazon 5-Pack Foam RIP Tombstone Blanks for Carving...

Cheap Easy Skulls
posted by SkeleTony
In the immortal words of Dr. Kreepy, “A home haunt without skulls is like a cake without icing…” And to the great benefit of us all, Dr. Kreepy has given us the icing (in video form) in his tutorial on how to make your own skulls using Great Stuff expanding foam. There are a few variables that can affect your success in making your own skulls using this tutorial, but even your failures will result in useable skulls. A few of mine resulted in really thin sliver sections of the skull that seem more like broken fragments that had been bashed in. They looked great just laying in front of my tombstones. For the price per skull, you cannot go wrong in doing this tutorial, just don’t make too much of a mess. Items needed to create this include: Hollow plastic skull Great Stuff expanding foam Vaseline Duct Tape Latex Gloves http://www.youtube.com/watch?v=edhDTaLMpng Shop These Materials on Amazon Great Stuff Gaps & Cracks Expanding Foam 12oz Professional Spray Foam Applicator Gun (2-Pack) XPS Foam Board 1" Thick Craft Sheets 4-Pack 4-in-1 Hot Wire Foam Cutter Kit 15W Loctite Power Grab Foam-Safe Construction Adhesive Realistic Replica Human Skull Statue 6.5" 5.4ft Full Size Halloween Foam Skeleton Affiliate Disclosure: HauntersList.com is a participant in the Amazon Services LLC Associates Program. As an Amazon Associate we earn from qualifying purchases at no extra cost to...