
Difficulty: Beginner | Build Time: 1 weekend | Estimated Cost: $15–$30 A ghoul pressing through a crumbling brick wall is one of the most effective cemetery displays you can build for almost no money. This prop uses a styrofoam base, hand-carved foam bricks, joint compound mortar, and a Bucky skull and hand to create the illusion of a specter forcing its way through solid masonry. It reads at distance and holds up indoors or out — and the total material cost is well under $30. Materials & Tools MaterialQty / Notes 1/2" styrofoam insulation boardOne 2×4 ft sheet for the base 1" or 2" styrofoam scrapsFor cutting individual bricks All-purpose joint compoundFor mortar in the brick gaps Bucky skeleton skullStandard full-size skeleton skull Bucky skeleton hand & armOne arm reaching forward Black poster boardBacking behind the skull for contrast String of LED lightsOrange or purple; battery-operated preferred Foam-safe construction adhesiveLiquid nails for foam or hot glue Flat black spray paintBase coat — use foam-safe formula Grey and brown craft paintDry brushing and wash coats Serrated knife or bread knifeCutting and texturing foam Wire brush or stiff-bristle brushRoughening foam brick faces Step-by-Step Instructions Step 1: Cut the Foam Base Start with a 1/2" styrofoam sheet cut to the desired finished size of your wall prop — a good starting size is 18" wide x 24" tall, which is large enough to look impressive but small enough to store flat. This base layer is the structural foundation everything else glues to. Mark your dimensions with a marker and cut with a sharp serrated knife using long, smooth strokes — sawing with short strokes tears the foam instead of slicing it cleanly. Measure and cut your foam base to the finished prop dimensions — a long serrated...

Installing a Servo in a Bucky Skull...
posted by SkeleTony
There’s nothing more satisfying than creating your own talking skull. I would have no way of knowing this since I opted to purchase one for fear that I would horribly botch the installation, but I honestly suspect there’s nothing more satisfying than creating your own. With that in mind, Scary Terry has a great tutorial on Installing a Servo in a Bucky Skull. You’ll start by building a mounting bracket for your servo out of aluminum and then you’ll mount the servo bracket in the Bucky skull (ok, there’s a little more to it, but trust me, you’re going to need to check out Scary Terry’s Tutorial). You’re going to break the jaw of your skull next and reconnect it utilizing the zip ties as the new pivot point of the jaw. You’ll next drill a hole in the skull and connect the servo to the jaw using a piece of the music wire. That’s all there is to it, more or less, but you’ll still need an audio circuit to drive the servo. Luckily, Scary Terry has an audio circuit solution as well! Items needed to complete this include: Bucky Skull Servo (HiTec HS-425BB – See details at ServoCity) (2) 3/4″ long 1″x1″x1/16″ angle aluminum 0.039″ Music wire, aka piano wire (1) 1/2″ #6 screw, nut, washer Servo mounting hardware (#4/ 40 screws and nuts) (2) 4″ Zip ties Shop These Materials on Amazon Realistic Replica Human Skull Statue 6.5" 5.4ft Full Size Halloween Foam Skeleton Affiliate Disclosure: HauntersList.com is a participant in the Amazon Services LLC Associates Program. As an Amazon Associate we earn from qualifying purchases at no extra cost to...
Nimble Fingered Skeletal Organist...
posted by SkeleTony
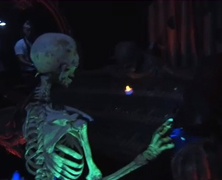
I wasn’t sure if I wanted to post a link to the Nimble Fingered Skeletal Organist tutorial that the guys over at Night Frights posted since it’s part prop and part actor control. It doesn’t really fit nicely into any of categories we’ve established at HauntersList, but the fact of the matter is, this effect looks too good to pass up. The effect is achieved by having your actor (seated below the organ) wearing a pair of skeletal gloves that are attached to your Bucky. This reverse marionette action allows for a much more realistic looking organist than you could ever get using a motor or pneumatics. By the way, I’m categorizing this under Costumes/Masks, so be sure to leave a comment if you think I’m dead wrong on this. Items needed to complete this include: Bucky Skeleton Skeletal gloves (the kind with the raised plastic bones on them work best) Black Light Glow-In-The-Dark Spray Paint Masking Tape Zip Ties Black fabric (3 yards should be plenty) plus some tacks, staples or duct tape to secure it 1-inch Threaded Floor Flange 1″ x 3/4″ Reducing Male Adapter 2 feet of 3/4” PVC Pipe Black Spray Paint Black long-sleeved shirt (for your operator to wear during...
How to Make a Corpse
posted by SkeleTony
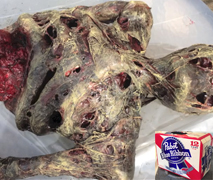
Some people have great tutorials on how to corpsify a Bucky, and that’s truly fantastic. Others, like Mr. X & Dr. V, the brains behind MonstarCraft Productions, have tutorials on how to actually build a skeleton and then further tutorialize how to corpsify the Hell out of it. Chris, aka Mr. X sent this tutorial to HauntersList via our Facebook page, and I cannot thank him enough. The production value of the video alone is worth the time spent watching it, but the product that they’ve created in this video is nothing short of spectacular. The best part is that you get a gruesome looking prop for far less money than you would spend buying a prop as good looking as this! http://youtu.be/4RYXGxU0JxQ Shop These Materials on Amazon Realistic Replica Human Skull Statue 6.5" 5.4ft Full Size Halloween Foam Skeleton Creature Liquid Latex 16oz Clear Special Effects Cheesecloth Unbleached (for draping and corpsing) Polyester Fiberfill Stuffing 30 LB Bag Affiliate Disclosure: HauntersList.com is a participant in the Amazon Services LLC Associates Program. As an Amazon Associate we earn from qualifying purchases at no extra cost to...
PerfessorEvil’s Mini-Spider Bucky...
posted by SkeleTony
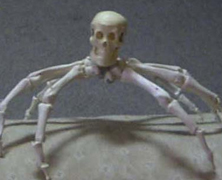
The late PerfessorEvil left us with a great tutorial on how to craft a truly creepy mini-spider. These gems are crafted using a pair of Bucky hands (thumbs removed) and a Tiny Tim skull. I’m not sure how many spare pairs of Bucky hands you’ve got laying around, but I know I can’t get enough of this prop. Items needed to complete this include: 2 Bucky hands (thumbs removed) Tiny Tim skull Wire Hot glue Shop These Materials on Amazon Realistic Replica Human Skull Statue 6.5" 5.4ft Full Size Halloween Foam Skeleton 300 Sq Ft Stretch Spider Web with 20 Fake Spiders Giant 295" Fake Spider + Triangular Web Black Braided Fishing Line (for rigging props) Affiliate Disclosure: HauntersList.com is a participant in the Amazon Services LLC Associates Program. As an Amazon Associate we earn from qualifying purchases at no extra cost to...
Corpsing a Skeleton
posted by SkeleTony
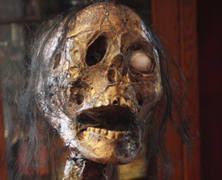
Ok, so you’ve picked up a nice Bucky skeleton and you’re done admiring it in all it’s boney glory, but what next? Well, if you don’t mind taking that pristine looking skeleton and making it look a little bit more goreified then you might want to take a look at this excellent corpsing tutorial from My Ghoul Friday. I’ve seen a lot of corpsing tutorials on the web, many of which utilize the same techniques that My Ghoul Friday uses, but none are laid out quite as nicely as hers is. And let’s be honest, that is one awesome looking skeleton. The tutorial is divided into two parts, with Part 1 detailing the plastic wrapping and the staining, while Part 2 details the finer dry bushing and hairing of the corpse. Items needed to create this include: Skeleton Wood Stain Paint Brush Rag Heavy Duty/Protective Latex Gloves Heat Gun Thin, clear plastic tarp paints Spray Glue hot glue gun white glue or “Sculpt or Coat” styrofoam ball acrylic paint wig scissors epoxy Shop These Materials on Amazon Realistic Replica Human Skull Statue 6.5" 5.4ft Full Size Halloween Foam Skeleton Creature Liquid Latex 16oz Clear Special Effects Cheesecloth Unbleached (for draping and corpsing) Polyester Fiberfill Stuffing 30 LB Bag Affiliate Disclosure: HauntersList.com is a participant in the Amazon Services LLC Associates Program. As an Amazon Associate we earn from qualifying purchases at no extra cost to...