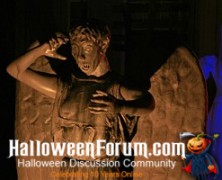
I’ve never really watched Dr. Who, but I’m sure glad that MacabreRob over at HalloweenForum has because the “Blink” episode of the British television series gave him the inspiration to build two life-sized angel statues for his haunt. To say that the statues are constructed out of paper mache and expanding foam insulation really underscores the amount of work that went into these. Several coats of paper mache were carefully coated onto a mannequin and then cut and removed in sections. After they were carefully pieced back together, 1″ wood boards were inserted to add some support and it was filled with expanding foam insulation. The wings were created using a similar technique with the form created using styrofoam and then coated with paper mache. MacabreRob went even so far as to cast his daughters face in alginate to provide for the face on Angelica, the passive angel. Once the bodies were complete he dressed them in robes made from bed sheets and thoroughly coated them in monster mud. Both angels turned out amazing and it’s really cool to see a family working together on a Halloween project. It’s definitely an intricate build, but if you can pull it off you’ll have the best looking cemetery in the neighborhood. Shop These Materials on Amazon Great Stuff Gaps & Cracks Expanding Foam 12oz Professional Spray Foam Applicator Gun (2-Pack) Instant Paper Mache Powder Mix 3.3 lbs Assorted 12" Latex Balloons 120-Pack XPS Foam Board 1" Thick Craft Sheets 4-Pack 4-in-1 Hot Wire Foam Cutter Kit 15W Loctite Power Grab Foam-Safe Construction Adhesive Affiliate Disclosure: HauntersList.com is a participant in the Amazon Services LLC Associates Program. As an Amazon Associate we earn from qualifying purchases at no extra cost to...
Rotisserie Motor Torture Rack...
posted by SkeleTony
If you’re a fan of The Wheel of Death prop but don’t want to create something quite as heavy duty then the Rotisserie Motor Torture Rack that Toktorill constructed may be just what you’re looking for. This torture rack relies on an inexpensive lazy susan and a 110v rotisserie motor to spin a cardboard wheel. The cardboard was covered with a woodgrain patterned self-adhesive contact paper, which looks remarkably realistic. It’s a fairly simple prop to create and looks fantastic, just make sure it doesn’t get wet. Items needed to complete this include: 110v Rotisserie motor Lazy susan Cardboard Assortment of 1×2 & 1×4 wood Woodgrain patterned contact paper Victim for wheel Shop These Materials on Amazon 12V Wiper Motor 2.5" Shaft 110 Degree (prop building) PWM DC Motor Speed Controller 9-70V 35A 45Kg High-Torque Waterproof Digital Servo Motor Affiliate Disclosure: HauntersList.com is a participant in the Amazon Services LLC Associates Program. As an Amazon Associate we earn from qualifying purchases at no extra cost to...
Halloween Graves
posted by SkeleTony
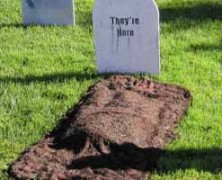
You’ve built your fence, carved your tombstones, and even built a grave grabber to put in your cemetery. Job well done, but if you want to add a touch of that “freshly buried” look to your cemetery you do have a couple of options. You could dig down about 2 inches into your yard removing the top layer of nicely manicured green grass and mix up your dirt until it’s nicely mounded, or you could follow the tutorial provided by Adrian McCarthy on creating Halloween Graves. His method utilizes a beach towel, some chicken wire, and some potting soil. No need for a shovel or grass seed when you’re done! Items needed to complete this include: an old beach towel brown fabric dye spray glue potting soil or mulch chicken wire or newspapers several 3-inch nails (optional) tombstone (optional) skeletal hands and feet (optional) Shop These Materials on Amazon 5-Pack Foam RIP Tombstone Blanks for Carving Decorative Cemetery Fence Sections Rust-Oleum Flat Black Spray Paint 12oz Affiliate Disclosure: HauntersList.com is a participant in the Amazon Services LLC Associates Program. As an Amazon Associate we earn from qualifying purchases at no extra cost to...

The Haunt 2013
posted by SkeleTony
There is nothing more scenic than the streets of downtown Cedarburg, Wisconsin on a brisk Autumn afternoon. And when night falls, scenic turns to gruesome as The Haunt opens its doors at the Ozaukee County Fairgrounds. This haunted attraction is celebrating its seventh year of fear in 2013, and they’re waiting for you… This haunt is run entirely by the volunteer efforts of members of the Ozaukee County 4-H Program, who pride themselves on providing a high scare attraction every year. All proceeds from this haunt go directly to support the 4-H...

The Hill Has Eyes 2013...
posted by SkeleTony
When truckloads of hazardous waste were dumped into this abandoned quarry in Franklin, Wisconsin, nobody had any concern for the residents of the nearby mobile home community. The mutations that followed have riddled this 130 acre site with mutants hungry for human flesh. The Hill Has Eyes offers two Haunted Trails and a ride on a run down chair lift which rewards its survivors with a trip through their 3D Zombie Maze. After you’ve toured all of the attractions you can kick back in the beer tent and enjoy some music with a few of the undead or relax at the bonfire. After the side effects began to develop, the mutated hillbillies were shunned by the public and forced to grow their population amongst themselves. Taking refuge in the nature that once surrounded their small mobile home community, they built homes and shelters using materials found in the landfill. Mutated inhabitants, confined to the landfill, hunger for fresh human flesh. In Hunger Hollow, the captured are brutally butchered, eaten and given a satanic burial that harvests their souls into the walking dead. Try to escape Zombie warfare by hopping a ride on The Ski Hill’s Scare Lift, ascending you into the horror of the hill. Nothing can prepare you for the terror that awaits you as you board a rickety chair lift, once the cause of horrific accident, which took the lives of 43 skiers back in January of 1973. The lift is now operated by these Zombies and continues to act as a death trap for those brave enough to take a ride. What waits for those who survive the Scare Lift is The Hill Has Eyes newest attraction – Wisconsin’s very first 3D attraction — The...
Foam Masonry
posted by SkeleTony
If you’re in need of some stone or brick panels for your haunt, you’re definitely going to want to check out the tutorial that HIY Productions created. This tutorial takes you through the process of creating brick panels out of styrofoam from start to finish. The tips provided in this tutorial are invaluable if you’re planning on creating any sort of stone or brick for your haunt. The finished product looks amazingly real. http://youtu.be/frq7fZ8SZ8s Shop These Materials on Amazon XPS Foam Board 1" Thick Craft Sheets 4-Pack 4-in-1 Hot Wire Foam Cutter Kit 15W Loctite Power Grab Foam-Safe Construction Adhesive Affiliate Disclosure: HauntersList.com is a participant in the Amazon Services LLC Associates Program. As an Amazon Associate we earn from qualifying purchases at no extra cost to...
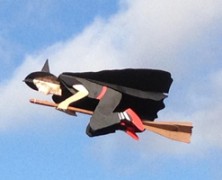
The Broom Flyer Witch...
posted by SkeleTony
If you have some serious crafting skills and a ton of ambition, you too can create a Flying Witch prop just like the one that Otto Dieffenbach created. Or you could just watch the video of Otto’s prop and marvel at his creation. Seriously, this prop is one of the coolest builds I’ve ever seen, it turned out amazing, but the third sentence of the tutorial pretty much rules me out from ever attempting it: “This is a difficult build and should not be attempted by a newcomer to the hobby. There is a lot of wood work involved. You may want to find a friend with superior build skills if you are a newcomer.” I’m not even sure I could find a friend with enough moxy to try to build this, but if you can find one, the full tutorial is posted over at the RCgroups.com website. Items needed to complete this include: Frame Broom Flyer cutouts in 6 mm Depron (available from Hoosier Cutout Service) Two 0.196″ OD x 0.125″ ID x 40″ Carbon Fiber square tubes (Midwest Products) One 0.125″ OD x 0.060″ ID x 40″ Carbon Fiber tube (Midwest Products) One .034″ x .121″ x 40″ Carbon Fiber strip (Midwest Products) 1/8 inch plywood sheet 1 ft x 2 ft ¼ inch plywood sheet 6 x 12 inches 8 Sheet metal screws 8 x ½ E-Flite Sea Fury retract landing gear (Optional) Master Air Screw 3 blade 10 x 7 propeller Two packages of Dubro micro pushrods #852 One bag of 15 Dubro Hinges #117 Two 1 7/8 inch wheels (Parkzone T-28 or F4u) Clear Gorilla Glue Foam safe CA and activator 5 minute epoxy 30 minute epoxy Paint Electronics: At least a 3 channel full range receiver Three...
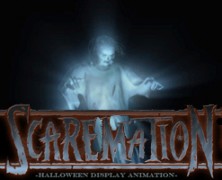
Scaremation Halloween Displays...
posted by SkeleTony
If you’re a fan of projected Halloween displays there’s a good chance that Scaremation has an animation in their catalog that will appeal to you. These inexpensive animations can easily be rear projected onto a plain white bedsheet and incorporated into your haunt, or used just as a cool effect for the trick or treaters. Setup is a snap and the digital files are loopable for hassle free operation. Scare-1: Rough Night, 4 minutes (Loopable) – Price:$45 Scare-2: Mansion Parlour 1, 4 minutes (Loopable) – Price:$20 (anniversary pricing) Scare-3: Window Slammer, 1/2 minute – Price:$10 Scare-4: Skeleton Zombies!, 3 minutes (Loopable) – Price:$35 Scare-5: Spider Lab, 3 minutes (Loopable) – Price:$45 Scare-6: Underworld, 4 minutes (Loopable) – Price:$45 Scare-7: Spectre, 55 seconds (Loopable) – Price:$20 Scare-8: Zombie Slammer, 1 minute (Loopable) – Price:$25 Scare-9: Mansion Parlour 2, 8 1/2 minutes (Loopable) – Price:$45 Scare-10: Gorewall, 3 minutes (Loopable) –...

Making LED Spotlights...
posted by SkeleTony
I love mini LED spotlights, and they truly don’t cost that much to buy, but if you’re anything like me (is uber-frugal better than saying cheap?), it’s hard to justify paying for something that’s pretty simple to make. There are tons of tutorials online to guide you through the process of making your own LED spotlights, but none of the tutorials I’ve read have so clearly articulated the process as the video tutorial posted below. And with that being said, it should come as no surprise that it was created by Allen Hopps of Stiltbeast Studios. ...
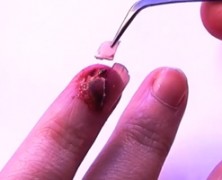
I Ripped Up My Nail!
posted by SkeleTony
I’ve never considered wearing artificial nails, and I’ve never actually had a reason to want to. Those are things I used to say prior to coming across this video tutorial from KlairedelysArt. The fact of the matter is that if you’re taking the time to do you own makeup, you’re probably already doing your hands as well, but if your willing to take the time to do your nails, the results can be truly gruesome. I must admit, the beginning of this video is hard to stomach, but well worth it....

Creepywoods Haunted Forest 2013...
posted by SkeleTony
Now in it’s sixth year, Creepywoods Haunted Forest in Kingsville, Maryland offers one of the most complex haunted trails in America with the most detailed set designs of any haunted trail ever created! Located on the Jones Family Farm, this haunted attraction was voted one of the top 13 Haunted Trails of 2013 by Hauntworld. This once peaceful forest now breathes life to evil, unleashing gigantic creatures, a terrifying pack of blood thirsty werewolves, ghostly spirits attacking from above, and even the trees themselves forbid all who enter to escape with their lives. If you thought going into the dark of the forest at night was frightening before, temp your fate and summon your courage, as the creatures of Creepywoods Haunted Forest awaits your arrival. There is parking at Jones Family Farm. The price for parking is a donation per car. Creepywoods Haunted Forest is an intense Haunted Attraction. Those with very small children or who are too afraid to enter the woods can enjoy the Jones Family...

The Haunted Hall of Horrors 2013...
posted by SkeleTony
The Fort Bragg Leo Youth Club is getting ready to spread some more fear this year with the Haunted Hall of Horrors Death Asylum 3D! This haunted attraction located in Fort Bragg, California is the Leo’s annual fundraiser with proceeds going towards anti-bullying school programs and vocational scholarships. This haunt is geared towards older teens and adults and is not recommended for young children. Children under 10 most certainly must be accompanied by an adult....
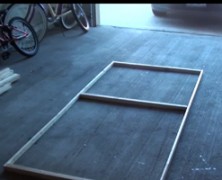
Haunted House Wall Panels...
posted by SkeleTony
Whether your haunt is in a warehouse somewhere, or just in your garage, you’re eventually going to need to build some wall panels for it. Luckily, there’s nothing tricky about framing walls, especially if you follow Hawthorne Manor Haunted House’s tutorial on building wall panels. These panels are made of 1×2 furring strips with 2×2 cross bracing, and black sheets. Once you’ve got your panels built you can configure and connect them however you want using some three-hole flat brackets. They’re easy to build, go up easily, and (if you’ve got the room) store easily in your attic....
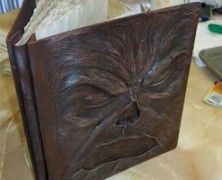
Necronomicon Tutorial...
posted by SkeleTony
Writing the Necronomicon may take you a lifetime, but creating the cover for this ancient tome isn’t that difficult if you follow the tutorial from Zombie Nations. You’ll start by pulling the paper off of a photo album until you’re down to the cardboard. Create your basic shapes for the back cover using some Super Sculpey sculpting compound and then continue to cover the entire page. Once you’ve got the entire page covered you can use a little turpentine and an artists brush to smooth out the Sculpey. Once the turpentine dries you can add some wrinkles and other finer details. Once dried, put it in the oven at 250 degrees for about 30 minutes and once its fully baked, coat it with some black primer. The front of the Necronomicon created in this tutorial pretty much follows the same procedure as the back cover. You’ll use your Super Sculpey to create the face and then continue to cover the entire cover with Sculpey. You’ll need to smooth it out using turpentine, then cook it and prime it. Once you’ve got both side fully primed with the black paint you’re going to apply a base coat of brown to both covers. Once complete, you’ll be brushing some thinned down dark brown acrylic paint to it. This will settle into the cracks of the book and you’ll finish it off by drybrushing a lighter brown over the entire book. The eyes can be painted using whatever color scheme you see fit to use. When completed lightly spray the entire book with some Spray Matte Fixative. The book that was created in this tutorial turned out amazing, I wouldn’t mind having a copy of the one pictured above. Rest assured, though, that...
Spider Hill Prop Works Swaying Zombie...
posted by SkeleTony
Spider Hill Prop Works has posted a great video detailing the framework for their Swaying Zombie prop. This silent film is meant to be more of a companion to the full Swaying Zombie Tutorial they put together which details the build. The parts list included details everything you’ll need to get this up and running and contains many of the pvc fittings and articulating joints that they sell. The frame consists of a plywood base with two pvc legs attached that connect to another plywood base that forms the waist. The wiper motor is mounted on the waist plywood and a swivel assembly is created out of pvc that connects the upper body of the zombie to the drive arm of the wiper motor. This will eventually create the swaying motion for your zombie. It’s a pretty intricate build that will require a delicate hand when setting up. The tutorial is well laid out with great images and descriptions to give you everything you need to get your zombie swaying short of a hula hoop and some extra brains. Items needed to complete this include: 10.5 feet of schedule 40 1 inch PVC pipe 4 feet of schedule 40 ½ inch PVC pipe (6) UMB-1 Universal Mounting Bases (2) ST-1 1 inch PVC slip-T fittings (1) Schedule 40 1 inch PVC cross fitting (1) Schedule 40 1 inch PVC T fitting (2) Schedule 40 1 inch PVC 45 elbows (1) Schedule 40 1 inch to ½ inch PVC reducer 12 Volt wiper motor with 5 volt power supply wiper motor bracket (hauntedparts.com) Approx. 25 #10 x 5/8” self drilling screws (1) ¼” x 20 x 3 ½” hex bolt (4) ¼” x 20 x 1 inch hex bolts (1) ¼” x 20...
Two Way Mirror
posted by SkeleTony
There’s nothing scarier than a good two way mirror prop, except of course paying for the two way mirror, which can be downright terrifying. Thankfully, Gila Privacy Film can help you turn a piece of glass into a fully functional two way mirror for at least an eighth of what you would drop for a manufactured two-way mirror. It’s available at Home Depot and other home improvement stores and comes in 3′ x 15′ rolls (you’ll want to pickup some of the Gila Window Film Application Solution and a squeegie as well). HalloweenAlliance has put together a nice video tutorial on the entire process, which is overall a pretty simple project. You will definitely want two people for this because peeling the privacy film apart can be a tricky solo proposition. Getting the bubbles out can be frustrating, but it’s not impossible and if you’re persistent enough you can create a flawless looking two way mirror. Items needed to complete this include: Piece of glass Frame Gila Privacy Film Gila Window Film application solution...
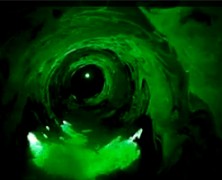
Simple Laser Vortex Construction...
posted by SkeleTony
I’ve always wanted to post a link to a tutorial on how to build a laser vortex but I’ve not been able to find one that wasn’t either too detailed to the point of confusion, or lacking in detail, which is equally confusing. Luckily, UrDaddyO31 posted a short video detailing the design of the laser vortex he used for his prop. It’s not so much a tutorial, but it does lay out the design he used which was originally created by kimcfadd who has them for sale on HalloweenForum. This ultra-simplistic design incorporates a mirror mounted on a cpu fan. The cpu fan and the laser are mounted to blocks of wood and as the cpu fan spins the mirror projects the circular laser effect which will become your laser vortex when you add a little fog. ** Warning: Lasers can cause serious and/or permanent eye damage. Never look directly at a laser or point it directly in someone’s eyes. Consult Safety Recommendations for Laser Pointers for more information. Shop These Materials on Amazon 400W Fog Machine with Wireless & Wired Remote FogWorx Extreme High Density Fog Juice Gallon Copper Coil Refrigeration Tubing 1/8" OD x 6.5ft (fog chiller) Affiliate Disclosure: HauntersList.com is a participant in the Amazon Services LLC Associates Program. As an Amazon Associate we earn from qualifying purchases at no extra cost to...

CarnEvil Chicago 2013...
posted by SkeleTony
Chicago’s newest haunted attraction, CarnEvil promises to put your sanity to the test this year. This haunted attraction is located on the grounds of the 10,000 seat Sears Centre Arena in Hoffman Estates, Illinois and offers visitors five terrifying haunted houses and mazes. You’ll enter a gruesome world of disfigured clowns, nightmare-inducing circus freaks, blood-thirsty carnies and butchered corpses. Peek behind the curtain of this traveling carnival of death and decay, and you’ll see how the other half live. Keep quiet as you emerge from the sewers and make your way into the carny’s twisted world; sneaking into their rotting trailer and discovering the horrors that lie within. They won’t be gone for long, but you can’t leave until you discover the “secret” ingredient used in their processing plant, cleverly hidden behind their ramshackle home. The good news, it’s MADE IN AMERICA, but the bad news you’ll have to learn for yourself. Wander into this bustling factory, and watch as workers transform various parts into eerily lifelike dolls, almost too lifelike. But the smell of death is everywhere and after a quick trip down the rickety freight elevator, you discover the real factory floor. Slick with blood, this factory is full of satanic workmen, butchering and embalming the innocent as part of a hellish assembly line. Beyond the lights and sounds of the carnival, lay the remnants of a long abandoned circus tent, where a detestable world of disfigured clowns waits for unwitting victims. Prepare for a long night as this chaotic maze is nearly impossible to escape; overflowing with nightmarish creatures at every turn. Explore the cemetery grounds; final resting place for CARNEVIL’s most recent victims and home to the Tomb of the Voodoo High Priestess. Enter...