


There’s something completely unsettling about a decrepit looking old lady slowly rocking back and forth in her chair. If you know a decrepit looking old lady then you’re half way there, but if you don’t, you can always follow ScareFX’s tutorial and make your own Rockin’ Granny prop. What you’re building in this tutorial is a self contained rocking mechanism that you’ll build your Granny on top of. The frame is built of 2×6 material with the wiper motor mounted vertically. A piece of aluminum flat bar connects the wiper motor to a piece of 2×6 that is connected to the base via a 4″ hinge which will allow it to rock back and forth when the motor spins. The upper part of the Granny is built on the 2×6 that is hinged by connecting some 1″ PVC to the 2×6 and then creating some shoulders with the 90 degree elbows and adding some sections of pool noodles over the PVC for the upper arms. You’ll need to add some prop hands if they’ll be visible. The lower body is connected to the base and consists of a PVC T connection which connects some 1″ PVC to two 90 degree elbows and forms the legs. Again, you’ll need to add some prop legs if they’ll be visible. Once your mechanism and skeleton is complete, the entire device is connected to the rocking chair with clamps to prevent it from flying forward once it gets rocking. After you’ve got everything clamped down it’s time to put the Styrofoam head on it and you’ll probably want to put a mask on it as well. Oh, and don’t forget to put some clothes on Granny! Items needed to complete this include: Rocking Chair Wiper motor 4′ of 2×6 board 4×4 post cap & brackets (or...

Rotisserie Motor Torture Rack...
posted by Tony
If you’re a fan of The Wheel of Death prop but don’t want to create something quite as heavy duty then the Rotisserie Motor Torture Rack that Toktorill constructed may be just what you’re looking for. This torture rack relies on an inexpensive lazy susan and a 110v rotisserie motor to spin a cardboard wheel. The cardboard was covered with a woodgrain patterned self-adhesive contact paper, which looks remarkably realistic. It’s a fairly simple prop to create and looks fantastic, just make sure it doesn’t get wet. Items needed to complete this include: 110v Rotisserie motor Lazy susan Cardboard Assortment of 1×2 & 1×4 wood Woodgrain patterned contact paper Victim for...

Spider Hill Prop Works Swaying Zombie...
posted by Tony
Spider Hill Prop Works has posted a great video detailing the framework for their Swaying Zombie prop. This silent film is meant to be more of a companion to the full Swaying Zombie Tutorial they put together which details the build. The parts list included details everything you’ll need to get this up and running and contains many of the pvc fittings and articulating joints that they sell. The frame consists of a plywood base with two pvc legs attached that connect to another plywood base that forms the waist. The wiper motor is mounted on the waist plywood and a swivel assembly is created out of pvc that connects the upper body of the zombie to the drive arm of the wiper motor. This will eventually create the swaying motion for your zombie. It’s a pretty intricate build that will require a delicate hand when setting up. The tutorial is well laid out with great images and descriptions to give you everything you need to get your zombie swaying short of a hula hoop and some extra brains. Items needed to complete this include: 10.5 feet of schedule 40 1 inch PVC pipe 4 feet of schedule 40 ½ inch PVC pipe (6) UMB-1 Universal Mounting Bases (2) ST-1 1 inch PVC slip-T fittings (1) Schedule 40 1 inch PVC cross fitting (1) Schedule 40 1 inch PVC T fitting (2) Schedule 40 1 inch PVC 45 elbows (1) Schedule 40 1 inch to ½ inch PVC reducer 12 Volt wiper motor with 5 volt power supply wiper motor bracket (hauntedparts.com) Approx. 25 #10 x 5/8” self drilling screws (1) ¼” x 20 x 3 ½” hex bolt (4) ¼” x 20 x 1 inch hex bolts (1) ¼” x 20...
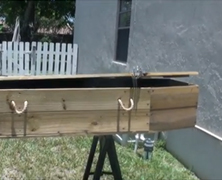
Animated Coffin
posted by Tony
If you’ve got a coffin that’s looking for a little something extra then consider adding a slow rotating wiper motor to it. Eerie Acres Cemetery has a video tutorial on how he built his and it turned out great. The wiper motor spins at the perfect speed so that it doesn’t look obnoxious and you don’t even notice the wooden wheel that’s lifting the coffin lid. This is a great effect, and there’s really not much needed to get it done. In fact, building the coffin takes more skill than animating it does....
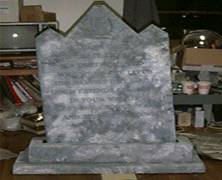
Rocking Tombstone
posted by Tony
A styrofoam tombstone is about the simplest prop you can make for your haunt assuming you don’t make it overly intricate, but sometimes even the simplest of props can take on a whole new life by adding a motor. Just ask Christoper, of Chris’ Crypt who has a really simple tutorial on how to turn your Styrofoam tombstone into a rocking tombstone. You’ll need to build a wooden base to hold the tombstone on one end (pivot point) and the motor on the opposite side. When you connect the cam to the tombstone the slow rotation of the motor will get your tombstone rocking back and forth. Items needed to complete this include: Styrofoam tombstone Motor Wood for base 1/2″ piece...
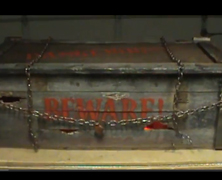
Cyclone Jack’s Monster In A Box...
posted by Tony
The monster in a box prop has been done a million times, and it seems like each one is done just a little bit differently than the last one. That’s ok, though, because they all operate using the same principle in which a spinning motor pushes a rod up forcing the top of the box to pop up and down creating the unsettling and startling effect. Add a couple of eerie lights inside the box and possibly some fog and you’ve got a winner, and that’s exactly what CycloneJackHH did when he made his monster in a box tutorial....

Vent Motor Headpopper...
posted by Tony
If you’ve ever wanted a headpopper prop in your haunt but didn’t think that a wiper/vent motor would create a good enough effect? Relax, Dave the Dead has a really good tutorial over at HauntForum on how to create your own headpopper. What I like best about this one is that as the head peeks over the tombstone it slowly rotates its way from side to side. This makes for a much creepier effect than just a popup / popdown. [iframe src=”http://vid105.photobucket.com/player.swf?file=http://vid105.photobucket.com/albums/m240/davethedead/headpopper%20prop/headpopperprop.flv&sr=1″ width=”425″ height=”350″] Items needed for this prop include: 16″ square of 1/2 inch plywood, cut in half (two 8″ X 16″ pieces) 20″ long 1″ X 4″ wood slat 1/8 X 1/2″ aluminum bar stock, cut into 5″ and 25″ lengths 3/8″ X 4-1/2 inch lag Screw Eye (2) 1/4-20 X 1.5″ Bolts (3) 1/4-20 Nuts (2) 1/4″ lock washers (1) 1/4-20 locking nut (2) 1 1/2″ wood screws Motor 12Vdc...
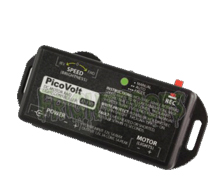
Pico Volt Prop Controller...
posted by Tony
As soon as I had finished my first motorized prop using a wiper motor I immediately started wondering how I could slow down the speed of my motor. Sure, the motor had a low speed and a high speed setting, and I could control the direction of rotation depending on how it was wired up, but I wanted to go beyond those settings. What if I wanted to bring my motor to an almost standstill speed? And what if I wanted to reverse the rotation mid sequence without having to change the wiring? OUT OF LUCK… Without a Pico Volt prop controller from FrightProps that is…. This thing is great, it allows you to change speed and rotation all from a simple speed dial, and record up to 60 seconds of a sequence, which will loop indefinitely. If you switch the rotation of the speed dial it will start to go in reverse, if you slow it down and hold steady, so will the routine. Perfection in a small form factor. Oh, and if you’re like me, you’ve already started wondering if you can control lights with this tiny piece of magic, and the answer, of course, is yes. You can use it to dim your LED lights, or program and repeat any lighting effect you want. If you need full control of your wiper motors, then by all means, pick this tiny device up, you will not be...