


There’s nothing more satisfying than creating your own talking skull. I would have no way of knowing this since I opted to purchase one for fear that I would horribly botch the installation, but I honestly suspect there’s nothing more satisfying than creating your own. With that in mind, Scary Terry has a great tutorial on Installing a Servo in a Bucky Skull. You’ll start by building a mounting bracket for your servo out of aluminum and then you’ll mount the servo bracket in the Bucky skull (ok, there’s a little more to it, but trust me, you’re going to need to check out Scary Terry’s Tutorial). You’re going to break the jaw of your skull next and reconnect it utilizing the zip ties as the new pivot point of the jaw. You’ll next drill a hole in the skull and connect the servo to the jaw using a piece of the music wire. That’s all there is to it, more or less, but you’ll still need an audio circuit to drive the servo. Luckily, Scary Terry has an audio circuit solution as well! Items needed to complete this include: Bucky Skull Servo (HiTec HS-425BB – See details at ServoCity) (2) 3/4″ long 1″x1″x1/16″ angle aluminum 0.039″ Music wire, aka piano wire (1) 1/2″ #6 screw, nut, washer Servo mounting hardware (#4/ 40 screws and nuts) (2) 4″ Zip ties...
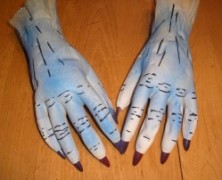
Easy Monster Hands
posted by Tony
Ok, remember when you were getting ready to use the Frankenstein Plans to build your very own Frankenstein and it said you’d have to supply your own set of hands? Well unless you were able to run out to your local Halloween store and buy a pair of hands you were out of luck. And a Frankenstein without hands isn’t very scary now is it? Making your own hands isn’t that difficult though, and the crew over at Screaming Scarecrow Studios have created a simple tutorial on how to make really great looking monster hands using latex gloves, witches fingers, and some expanding foam. You’ll start by turning the glove inside out and cutting a small slit in the tips of the fingers of your rubber glove. Once you’ve got your witches fingers securely inserted into each of the fingers you’ll need to get a 12″ piece of 1/2″ pvc pipe for an arm bone. You’ll need to drill a hole in both the bottom and top of your pipe approximately an inch from the bottom. Once you’ve got your holes drilled you’re going to thread some wire through the hole in the pipe to secure the hand to the bone. You’ll also need to secure the wire through the witch’s fingers which is what will keep the hand secured to the bone once its filled with foam. Once you’ve got your hand securely wired to the arm bone you’re ready to add some foam. You can hang the hand by threading another wire through the hole you drilled in the top of the pvc. It may take a while for the foam to fully cure (2 to 3 days), but once they’ve hardened you can remove the glove from around the hands. You’ll need...
Motion Detector Hack
posted by Tony
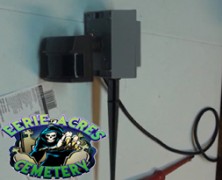
If you’ve ever wanted a motion sensor to trigger your Halloween props but didn’t feel like laying out the cash for an overpriced store bought unit then pay close attention. The reality is, they’re not that difficult to make if you’ve got a moderate amount of electrical skills and you’ll end up with a unit that is tailor made for your use. You’ll also end up saving yourself a lot of money because once you realize how easy it is, you’ll want to make more! I’m sure the folks at Eerie Acres Cemetery wouldn’t mind you sending some of that extra cash their way because they’ve posted a really descriptive tutorial on how to create a motion sensor that will more than get you up and running creating your own. Items needed to complete this include: Replacement motion sensor GFCI outlet 4 hole single gang outdoor outlet box (metal) Outdoor electrical outlet cover (metal) Clamps for gang box PC power cable Threaded ground stake Silicone...
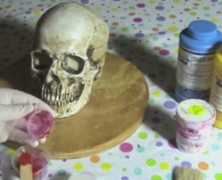
Silicone Skull Mold
posted by Tony
If you’re interested in making your own skulls, and I’m talking seriously making a lot of your own skulls, then you’re going to need a pretty serious mold to cast them in. You can use the Cheap Easy Skulls method provided by Dr. Kreepy, but if you’re interested in some serious skulls you’re going to want to checkout the tutorial that The Devil’s Workshop posted. Creating your mold is a pretty elaborate process but this two part tutorial will walk you through the process from start to finish. http://youtu.be/QetqLES6MXA...
Aging Wood Quickly
posted by Tony
There’s nothing worse than a building a toe pincher coffin with pristine looking lumber. Yeah, it still looks good, but you probably want it to look as though it’s fresh from the ground instead of Home Depot. If you’re lucky enough to have some old pallets or some weathered wood laying around, then read no further, but if you’re anything like me you’re going to want to age it pretty quickly. Terror Tom has a great technique for aging wood that’s easy to achieve and only takes 1 night to prep for. You’ll need to fill a mason jar with as much white vinegar as you think you’ll need to coat your wood and add a nicely rusted item to it. You can use rusty nails, screws, or even steel wool. Let it soak over night and when you wake up you should have a rather rusty (and pungent) solution that will quickly age your wood. Items needed to complete this include: Rusty nails or steel wool Mason jar White...
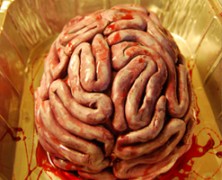
Make a Fake Brain
posted by Tony
It turns out the Scarecrow didn’t need to make a pilgrimage to see the Wizard of Oz after all, he just needed to check in with a Girl In Winnipeg! Her tutorial on how to make a fake brain is awesome in its simplicity and seems like the kind of project that the whole family can participate in. You’ll start with a base of crumpled newspaper covered in duct tape to form your brain mass. The next step is to painstakingly roll your playdough into long round lengths so you’ve got enough to completely cover your brain. After applying some spray adhesive to your duct taped brain mass, the playdough is simply placed on it in a sufficiently wavy brain pattern. Once your gray matter is in place you can paint it in whatever color scheme pleases you. Items needed to complete this include: 2 parts red playdough, 1 part blue newspaper duct tape spray adhesive corn syrup food...

Cheap Rusty Chain
posted by Tony
I must admit that when I first glanced at the tutorial that Lake of the Dead penned over at the HalloweenForum for Cheap Rusty Chain I was a bit underwhelmed. The opening photos of the PVC used to create the chain left me skeptical that the finished product would deliver. Luckily I didn’t stop reading because the finished chain looks amazing and it’s incredibly easy to create. You’ll need to start by cutting all of the links for your full chain. Next, using a PVC pipe cutter you’re going to cut a slit in 1/3 of your links to easily attach the rest of the links. Once you’ve got all your links threaded you can paint the chain using a rust colored paint. Rust-Oleum’s multicolored texture sprays are perfect for this. Items needed to complete this include: 3/4 PVC pipe Rust colored...
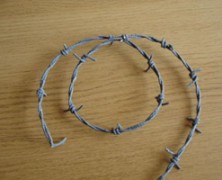
Cheap Fake Barbed Wire...
posted by Tony
If you’ve got a scene that requires realistic looking barbed wire your best bet is to head over to Home Depot and pick up a roll, it’s only $65 for 1300 feet! I mean, what’s the worst that can happen? Someone grabs it to see if it’s real and cuts their hand, or rips their clothing on it, or actually falls into it and slices themselves up real good leaving a bloody mess on your floor, and if any of that happens you know what that means… BEST HAUNT EVER!!!! It’s probably not worth the liability, though, so with that said, you may want to checkout the tutorial that msraynsford created on how to create Cheap Fake Barbed Wire You’ll start by folding your length of string in half, tying one end of it down and twisting the string whichever direction you prefer. Once you’ve got it good and twisted you’ll dip it completely in your glue. You can mix your paint directly into the glue to ensure a nice even color. Let it dry making sure that it doesn’t touch itself or unwind during this time. You’ll next need to add your barbs, which are nothing more than lengths of 10cm (3 inch) string dipped in the glue and then wrapped around the main string. Once you’ve got the barbs wrapped around the main string and they’ve dried completely, simply cut the barbs on an angle to give them a sharp pointed appearance. Once your barbed wire is completely dried your wire is ready to hang. It looks realistic and won’t cut anybody (probably). Items needed to complete this include: String (roughly 2.5 times more string than you want barbed wire) PVA glue (Elmer’s) Grey...
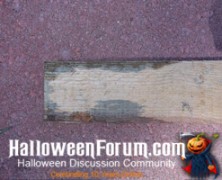
Rickety Floor
posted by Tony
An unstable, rickety old floor is a great way to catch visitors to your haunt off guard, especially when lights are low. It’s a simple project, and if you’re so inclined (pun intended), Raymond from RFHaunt has a tutorial on how to quickly and easily add this effect to your haunt. Your floor will be made of plywood and is best suited to a hallway section where you can have it extend from wall to wall. You’ll start by making a stationary section which consists of your piece of plywood with sections of 1 x 2 lumber nailed to the entire length of the center and both sides. For the rocking piece you’ll simply nail the 1 x 2 to the length of the center which will allow it to rock back and forth when you walk on it. You’ll want to be careful to make sure there are no gaps between the two sheets of plywood because you don’t want anyone getting their feet stuck in between and a piece of carpet draped on top of it allows for worry free enjoyment. Items needed to complete this include: Two large plywood boards On thin length of wood (Optional) Thick...

Faux Moss Application...
posted by Tony
A rolling stone gathers no moss, but a tombstone (and my patio) gathers plenty. So if you want a realistic looking tombstone you’re going to need to find a way to add some realistic moss that will stick to it. Troy from Halloween Hellmouth has a great method that produces a great looking moss for any prop utilizing a mixture of pre-dried moss and paint. You can buy dried moss at most craft stores, but if you have access to moss you can dry it out for a couple of days and use it. You’ll start by puréeing the dried moss in a blender and then you’re going to start mixing your paint until you get your desired color. Once you’ve got the correct color mix you’re ready to start spreading it onto your prop. Use your fingers to spread it and don’t worry if you’re a bit sloppy because moss doesn’t exactly grow straight. After you’ve spread the moss mixture onto your prop you’re going to want to wait for a good three days for the entire mixture to set, which sounds like an inordinate amount of time to wait for something to dry, but trust me, it’s worth it. The end result looks amazing. Troy adds even more detail by tea staining his moss application, but even before doing this his method is a success. Items needed to create this include: Bag of moss (or actual dried moss) Paintbrush Mixing stick Mixing bowl Spray bottle filled with water Drip pan (for water to drip in to) Acrylic paint...
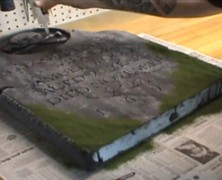
Tombstone Lettering
posted by Tony
Nothing spoils a good tombstone more than poor lettering carved into it. No matter how realistic your tombstone looks, all eyes will eventually focus on the text, and if you want it to look really good, you’ll want to check out the video tutorial that Eerie Acres Cemetery put together on effective tombstone lettering. It covers some very simple but essential techniques for creating really good looking tombstone text....
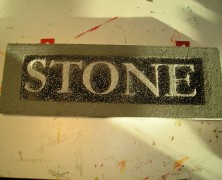
Carved Granite From Foam...
posted by Tony
Acetone will eat away at your styrofoam, and while that’s not exactly what I would call a newsflash here, but Creativeman uses it to great advantage in his instructable on how to use this to create really good looking granite lettering. This is a great way to create a sandblasted stone sign for use on cemetery columns, or to add depth to your tombstone, and it requires only the most rudimentary of skills. The process is simple. Cut your pre-printed letters out with an exacto knife, glue them to your styrofoam, and then spray paint the styrofoam. It’s literally easier than breathing, but it adds a great level of detail to your lettering or sign. Items needed to complete this include: Styrofoam Printout of your letters (each letter cut) Elmer’s glue Spray paint containing...
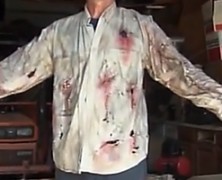
Making Zombie Clothes...
posted by Tony
If a zombie can take the time to dig its way out of its grave, the least you can do is make sure he’s got some appropriate looking clothes, right? And if you’ve taken the time to build a Full Sized Zombie Prop, or just plan on becoming the zombie yourself, you should probably pay equal attention to the clothing since it’s a major part of your zombie’s appearance. If you want truly realistic looking zombie clothing you’re going to want to give Robertb7864’s video a look. This twenty minute trek through zombie clothes modification features a full five minutes dedicated to Robertb7864 taking a belt sander to a shirt. The end result is pretty great looking, though, and is way more authentic looking than you’d achieve by tearing or cutting the cloth yourself....
Foam Masonry
posted by Tony
If you’re in need of some stone or brick panels for your haunt, you’re definitely going to want to check out the tutorial that HIY Productions created. This tutorial takes you through the process of creating brick panels out of styrofoam from start to finish. The tips provided in this tutorial are invaluable if you’re planning on creating any sort of stone or brick for your haunt. The finished product looks amazingly real....
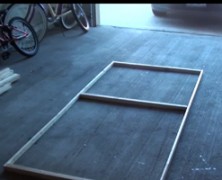
Haunted House Wall Panels...
posted by Tony
Whether your haunt is in a warehouse somewhere, or just in your garage, you’re eventually going to need to build some wall panels for it. Luckily, there’s nothing tricky about framing walls, especially if you follow Hawthorne Manor Haunted House’s tutorial on building wall panels. These panels are made of 1×2 furring strips with 2×2 cross bracing, and black sheets. Once you’ve got your panels built you can configure and connect them however you want using some three-hole flat brackets. They’re easy to build, go up easily, and (if you’ve got the room) store easily in your attic....
Tombstone Weathering
posted by Tony
It seems like I spend more time watching tutorials on how to carve tombstones than I do actually carving tombstones, and that’s ok with me, because it’s all part of the learning process. Well a major part of that process comes in the form of the two video tutorials that S.K. Austin of The Haunting Grounds provided. This two part in depth analysis of how to weather your tombstones properly is an invaluable resource for those of us interested in created the most realistic looking tombstones possible. ...
Prop Dental Plates
posted by Tony
If you create your own masks or creatures for your haunt, you’ve probably needed to find some teeth for them. I always heard the phrase that necessity was the mother of invention, but it turns out it’s actually Allen Hopps. He’s got a great tutorial on how to make dental plates for your masks and props. Since they’re made from hot glue sticks you really don’t want to put them in your mouth, but they’ll look great as an accent to any prop....
Dry Brushing Tips & Tricks...
posted by Tony
Whether you just finished building your latest masterpiece, or simply want to age a store bought prop a bit, properly painting your prop can make all the difference in the world. Eerie Acres Cemetery has a great video tutorial with some really helpful dry brushing techniques that might just give your next prop that extra bit of realism....
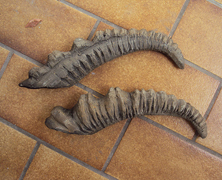
Ermelyn’s Horns...
posted by Tony
If you like creating your own creatures for your haunt you’ll eventually have the need to create some horns for them. You can probably buy some actual antlers, but if you’re planning on incorporating them into a mask or don’t want an overly heavy static prop, you may want to follow Ermelyn Hollerborn’s tutorial for making horns in 10 easy steps. The horns are made using multiple layers of styrofoam that’s shaved down to give it a more rounded appearance. From their it’s a matter of adding detail to it with a soldering iron, or heat gun. Ermelyn’s horns are then coated with Pattex adhesive and painted. They look fantastic and can be made as large as you like without weighing down your prop. Items needed to complete this include: Styrofoam Contact adhesive Acrylic paint Soldering iron / heat gun Google Translate (unless you read German) ...
Outback Gorehouse Fake Intestines...
posted by Tony
Many years ago I had to create a scene where an actor’s stomach was sliced open allowing their intestines to spill out. My solution was to buy a long link of Italian sausage, which was boiled and soaked in a Karo syrup blood solution. This allowed the intestines to be eaten by the actor as the neighborhood kids passed through creating quite a memorable scene (it was pretty dark, and they were pretty young, so we could get away with sausage guts). So if you need to make some fake intestines for your haunt, my advice to you is remember my method fondly, and DO NOT USE IT. No matter what you do, sausage guts do not make good intestines, besides that, Sonya and Caid from Outback Gorehouse have a better solution. Their method utilizes paper towels that are wrapped in a mixture of liquid latex and paint. The latex is spread on a flat glass surface for a total of eight layers before it’s wrapped around the towels. The resulting intestines are pretty good looking and you can make a ton of these for hardly any cost, but whatever you do, DO NOT eat them!...
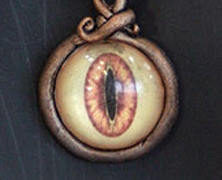
Jeepers Peepers!
posted by Tony
I’ve posted a couple of tutorials on how to make realistic eyes for your props, but the one that Sytnathotep posted over at HauntForum may be the easiest yet. This method only produces a half of an eye, but sometimes that’s more than enough. Before you get started on this you’re going to need to print and cut your iris to fit the circumference of your round palettes. Once you’re ready to start it’s just a matter of pouring some of the epoxy into the palette, making sure to leave a little room for another pour. Place your iris face down into the palette and push it slightly into the epoxy making sure that it’s completely covered, then add enough epoxy so it’s completely level with the top of your palette. That’s all there is to it! Once they’re dry, just pound them out of the palette and you’re good to go. Items needed to complete this include: Plastic paint palettes Smooth-On’s Epoxy Cast 690 Iris...

Making Glow In The Dark Teeth...
posted by Tony
If you’ve taken the time to follow Dr. Kreepy’s tutorial on making Cheap Easy Skulls, you’ve no doubt ended up with a boatload of superb looking skulls. The only thing that could possibly make those skulls look better is a little variety. And what can help give a skull some variety better than some realistic looking teeth. Well the Devil’s Workshop has a tutorial on how to make glow in the dark teeth that will really help. It’s a reallysimple process involving a mixture of translucent white and glow in the dark baking clay....
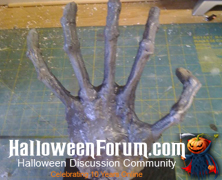
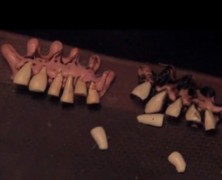
Cheap and easy Skeleton Hands...
posted by Tony
Since many of the prop builds featured on HauntersList involve PVC frames it’s probably not a bad idea to post another tutorial on how to create hands for those frames. LastHouse from HalloweenForum has a tutorial on how to make some gruesome looking skeletal hands that won’t take you too long and the cost is next to nothing. They’re made of styrofoam and wood dowels coated with a little hot glue and then painted. The hardest part about this tutorial is melting the styrofoam to give them a more natural boney look. Make sure to do this step in a well ventilated area as burning styrofoam can be highly toxic (it’s a good idea to wear a respirator). Items needed to complete this include: Styrofoam Hot Glue Wooden dowels Drylock Paint...
Grime Up Props
posted by Tony
Making a prop from scratch takes skill, but aging the prop so that it looks like it’s been around for a few years takes talent. Now, it’s well known that Terra from HalloweenForum can build anything. I mean, I honestly think she could build a structurally sound house out of styrofoam if she wanted to. But when she needs to make something look old, or grunged up, she’s definitely got the talent to make it so. Her video tutorial on how to Grime Up Props details exactly how she does it, and it’s the perfect guide for anyone who needs help making props look and feel like they’ve been around for years. ...
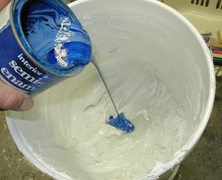
Monster Mud
posted by Tony
If you’re a veteran prop builder you’re no doubt familiar with how to mix monster mud. But for those that have never had the pleasure of mixing a batch and slopping a handful on their latest prop, well what are you waiting for? And since most tutorials reference monster mud with no additional details, I figured it would probably be a good idea to provide a tutorial from TwistedVisions on how to mix Monster Mud for the uninitiated. It is quite literally, the easiest thing I’ve ever posted on HauntersList and should be considered mandatory reading. ...

Blood on the Cheap
posted by Tony
If you’re looking for the perfect recipe for blood then look no further. Actually, Allen Hopps from Stiltbeast Studios would probably disagree completely with that. He’s provided some great recipes for blood in his Blood on the Cheap tutorial, but I’m sure he would encourage you to experiment with other formulas until you find the blend that best suits your needs....
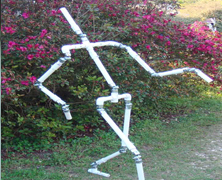
The Bride of Articulation...
posted by Tony
If you’re building any type of body form PVC is ultimately going to be the best framing option. Wood is good, but PVC is worry free (I want credit for that phrase if it catches on). Anyway, if you like the Movable PVC Joints tutorial then you’re really going to like this one. The Bride of Articulation tutorial that Beelce over at HauntForum has provided us is an incredible example of how to create the skeleton for any form you’re creating. You can literally create any pose that you want, and then cover it in any fashion you see fit. This is not a difficult tutorial, and allows for incredibly detailed forms. Items needed to complete this include (but will need to be calculated per joint): 1″ PVC (for the bones) 1″ PVC coupling Post caps for each joint Flat washers Lock washers Bolts Lock nuts Drywall / Deck screws ...

Hot Burning Coals Prop...
posted by Tony
Loach160 over at HalloweenForum.com has posted a great tutorial on how to make hot burning coals without the heat. This effect looks great with a witches cauldron above it and is super simple to create (I actually think I might be able to do this one). Items used to create this effect include: 1 string of 50 orange LED Christmas lights 1 can expanding spray foam 1 12 inch square piece of wood or plastic 1 can black spray paint masking tape assorted plastic bottle tops and/or bottoms box cutter or...