


Nothing looks better than a well crafted Monster Mud Reaper standing guard over your cemetery. As he welcomes recently departed souls to their final resting grounds, this dark and foreboding spirit will cause all eyes to focus their attention to him if for no other reason than to make sure he isn’t actually alive. And the best part is, he’s pretty easy to build if you follow the tutorial that Jimmyzdc wrote up at HalloweenForum. The frame of your reaper will be created by securing a steel flange to a 2 x 2′ piece of MDF board and then threading a 4” steel pipe to the flange. You’ll connect the PVC that will create your reaper’s spine to the 4″ steel pipe and then connect your 4 way PVC cross fitting to the top so you can add your arms. Once the PVC frame is complete you’ll wrap some chicken wire around the skeleton for the reaper’s body and then measure out your burlap and drape it on the chicken wire to verify you have the correct size and shape for the reaper you want. Once you have the reaper shaped to your liking you’ll peel your burlap off and dip it in your monster mud until its completely submerged in the mud. Once coated, remove it from the mud and squeeze off the excess mud as you pull. Re-drape it on your frame and continue until you’ve got all of your burlap reassembled on the reaper. Once coated in monster mud, make sure you use a some Drylock masonry sealer to weather proof your reaper otherwise you may have a mess on your hands if it rains. Items needed to complete this include: (2) 90 degree PVC elbows (3) 45 degree PVC elbows (1) 4-Way PVC...

Tombstone Lettering
posted by Tony
Nothing spoils a good tombstone more than poor lettering carved into it. No matter how realistic your tombstone looks, all eyes will eventually focus on the text, and if you want it to look really good, you’ll want to check out the video tutorial that Eerie Acres Cemetery put together on effective tombstone lettering. It covers some very simple but essential techniques for creating really good looking tombstone text....

Halloween Graves
posted by Tony
You’ve built your fence, carved your tombstones, and even built a grave grabber to put in your cemetery. Job well done, but if you want to add a touch of that “freshly buried” look to your cemetery you do have a couple of options. You could dig down about 2 inches into your yard removing the top layer of nicely manicured green grass and mix up your dirt until it’s nicely mounded, or you could follow the tutorial provided by Adrian McCarthy on creating Halloween Graves. His method utilizes a beach towel, some chicken wire, and some potting soil. No need for a shovel or grass seed when you’re done! Items needed to complete this include: an old beach towel brown fabric dye spray glue potting soil or mulch chicken wire or newspapers several 3-inch nails (optional) tombstone (optional) skeletal hands and feet...

Mr. Gravedigger
posted by Tony
I’ve wanted to build every prop I’ve come across lately, but none as much as I want to build this one. The Gravedigger that Mizerella at 102 Wicked Things To Do created for her cemetery is amazing looking and doesn’t seem that difficult to pull off (said the guy that’s never created an entire person out of paper mache). The head of this fellow will take the most care and attention to detail when creating. It’s made using a foam skull that’s a blend of paper mache, mache pulp, and Creative paper clay. The features of his face including the nose, ears, tongue, teeth and eye brows will need to be built up with the Creative paper clay which is where some basic sculpting abilities will come in handy. Once you’ve got the head done you’re almost done. The rest of the prop is a pvc frame that’s been heated and bent to give him a warped stance. The pvc frame is then covered in chicken wire and paper mached numerous times. The arms and legs incorporated pool noodles to build them up before coating them in paper mache. The final piece of the puzzle when creating this fellow were the hands, which were a mixture of wire, cut straws and many layers of paper mache and mache pulp. Once all of the pieces of the puzzle are complete it’s just a matter of dressing this guy up in your favorite old clothes and finding a final resting spot for him. Mizerella’s gravedigger looks incredible and I’m a little skeptical on whether I can make one that looks as nice, but I will definitely be giving this guy a...
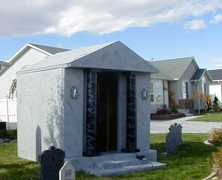
Raven Manor Mausoleum...
posted by Tony
When does your passion for home haunting become an obsession? When you have to file a building permit to construct a temporary Mausoleum in your yard. Which is good, because I don’t think that Raven Manor had to file for a permit, but the passion for their yard haunt is second to none. The Mausoleum is a perfect fit in their front yard cemetery, but it’s real purpose is to house their flying crank ghost, Eleanor. That’s right, they built it for their flying crank ghost, how awesome is that! The Mausoleum stands 9′ tall by 10′ deep by 8′ wide and was framed in sections that are connected by carriage bolts. It looks superb and is the perfect house for Eleanor. While there really isn’t a step by step tutorial for this build, they do have the plans used to construct the Mausoleum as well as some general information about the framing of it, which should be more than enough to get your creative juices...

Killer Tombstones
posted by Tony
If you’ve ever wanted to make some really nice looking tombstones but didn’t think you had the skills to get the job done welcome to the club. Oh, and keep reading, because while making your own tombstones can range from being an easy project to an arduous task, once you have a few basic techniques down I can guarantee that you’ll be adding to your tombstone collection on an annual basis. DevonTT’s three part series on how to create some killer tombstones will definitely help to get you started. Items needed to create this include: 2″ Styrofoam Laserjet printout of your text Iron Dremel & Router bit Exterior Latex paint ...

Keeba’s Tombstones...
posted by Tony
If you’ve ever had a cemetery in your haunt or yard you already know the pain of having to purchase tombstones for it. The pain revolves around having to pay for a foam product that you could easily produce yourself. Moreover, yours will certainly look better because you can put as much detail as you desire into it, and personalize it to your hearts content. Personally, I can’t stand working with styrofoam, but for those that don’t have a problem with it, you’re going to want to take a look at Keeba’s Tombstones. Not only is Keeba’s tutorial nicely laid out from the start of the project to completion, but offers some really good examples of detailing techniques like dry and wet warping that you just don’t find in most tombstone tutorials. After undergoing some simple painting and aging, the finished products look fantastic. These will take a while to make, and you’re going to have to factor your time into these when deciding whether or not it’s worth your while, but you certainly don’t find tombstones this nice for sale. ...

Faux Wrought Iron Fence...
posted by Tony
Ok, so we all know there are about 1,000 tutorials on the web about how to build a fence for a graveyard. Most of them use the typical 1 x 2″ furring strips at the top and bottom with PVC creating the bars of the fence. Well, Scott A. Stoll has definitely taken it up a notch, and if I was going to pick a tutorial to follow to make my own cemetery fence, I would choose his method. His tutorial on how to build his fencing is incredibly detailed, and the resulting product is well worth the time spent because it is remarkably realistic looking. This could pass for a real fence. The finials and curved iron is also incredibly easy to implement and adds so much to this fence. The best part is that you won’t have to worry about running out of finials, or heating up the PVC to accomplish this because it’s done using craft foam! If you are thinking of making some cemetery fence, you would be well served to check out this tutorial, it is the real deal. Items used to create fencing include: 1×2″ lumber 1/2″ PVC Craft Foam Drywall screws Hot...