Difficulty: Beginner | Build Time: 1 weekend | Estimated Cost: $15–$30 A ghoul pressing through a crumbling brick wall is one of the most effective cemetery displays you can build for almost no money. This prop uses a styrofoam base, hand-carved foam bricks, joint compound mortar, and a Bucky skull and hand to create the illusion of a specter forcing its way through solid masonry. It reads at distance and holds up indoors or out — and the total material cost is well under $30. Materials & Tools MaterialQty / Notes 1/2" styrofoam insulation boardOne 2×4 ft sheet for the base 1" or 2" styrofoam scrapsFor cutting individual bricks All-purpose joint compoundFor mortar in the brick gaps Bucky skeleton skullStandard full-size skeleton skull Bucky skeleton hand & armOne arm reaching forward Black poster boardBacking behind the skull for contrast String of LED lightsOrange or purple; battery-operated preferred Foam-safe construction adhesiveLiquid nails for foam or hot glue Flat black spray paintBase coat — use foam-safe formula Grey and brown craft paintDry brushing and wash coats Serrated knife or bread knifeCutting and texturing foam Wire brush or stiff-bristle brushRoughening foam brick faces Step-by-Step Instructions Step 1: Cut the Foam Base Start with a 1/2" styrofoam sheet cut to the desired finished size of your wall prop — a good starting size is 18" wide x 24" tall, which is large enough to look impressive but small enough to store flat. This base layer is the structural foundation everything else glues to. Mark your dimensions with a marker and cut with a sharp serrated knife using long, smooth strokes — sawing with short strokes tears the foam instead of slicing it cleanly. Measure and cut your foam base to the finished prop dimensions — a long serrated...

Monster Mud Reaper
posted by SkeleTony
Nothing looks better than a well crafted Monster Mud Reaper standing guard over your cemetery. As he welcomes recently departed souls to their final resting grounds, this dark and foreboding spirit will cause all eyes to focus their attention to him if for no other reason than to make sure he isn’t actually alive. And the best part is, he’s pretty easy to build if you follow the tutorial that Jimmyzdc wrote up at HalloweenForum. The frame of your reaper will be created by securing a steel flange to a 2 x 2′ piece of MDF board and then threading a 4” steel pipe to the flange. You’ll connect the PVC that will create your reaper’s spine to the 4″ steel pipe and then connect your 4 way PVC cross fitting to the top so you can add your arms. Once the PVC frame is complete you’ll wrap some chicken wire around the skeleton for the reaper’s body and then measure out your burlap and drape it on the chicken wire to verify you have the correct size and shape for the reaper you want. Once you have the reaper shaped to your liking you’ll peel your burlap off and dip it in your monster mud until its completely submerged in the mud. Once coated, remove it from the mud and squeeze off the excess mud as you pull. Re-drape it on your frame and continue until you’ve got all of your burlap reassembled on the reaper. Once coated in monster mud, make sure you use a some Drylock masonry sealer to weather proof your reaper otherwise you may have a mess on your hands if it rains. Items needed to complete this include: (2) 90 degree PVC elbows (3) 45 degree PVC elbows (1) 4-Way PVC...

Stone Wall Facade
posted by SkeleTony
Stone walls for your haunted castle may be hard to come by but if you’ve got some time and some plywood you can create your own. The Bronson Boneyard has a tutorial that shows how to create a stone wall facade using monster mud applied onto plywood. You’ll start by painting the plywood black, and then applying masking tape where you would like the mortar joints. Then, you’ll apply a thick coat of monster mud to the entire sheet, and then remove the masking tape. The great thing about this method is that once the monster mud starts to dry it lightens up, which eliminates the need to paint the mortar joints, and it also begins to crack slightly, which gives it a realistic stone appearance. Items needed to complete this include: Plywood (4′ x 8′ sheets) Black paint Masking tape Monster mud Shop These Materials on Amazon USG Sheetrock Drywall Joint Compound 4.5 Gallon Cheesecloth Unbleached 36×36" (for Monster Mud draping) Affiliate Disclosure: HauntersList.com is a participant in the Amazon Services LLC Associates Program. As an Amazon Associate we earn from qualifying purchases at no extra cost to...
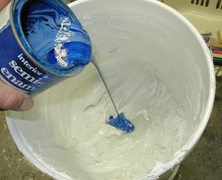
Monster Mud
posted by SkeleTony
If you’re a veteran prop builder you’re no doubt familiar with how to mix monster mud. But for those that have never had the pleasure of mixing a batch and slopping a handful on their latest prop, well what are you waiting for? And since most tutorials reference monster mud with no additional details, I figured it would probably be a good idea to provide a tutorial from TwistedVisions on how to mix Monster Mud for the uninitiated. It is quite literally, the easiest thing I’ve ever posted on HauntersList and should be considered mandatory reading. Shop These Materials on Amazon USG Sheetrock Drywall Joint Compound 4.5 Gallon Cheesecloth Unbleached 36×36" (for Monster Mud draping) Affiliate Disclosure: HauntersList.com is a participant in the Amazon Services LLC Associates Program. As an Amazon Associate we earn from qualifying purchases at no extra cost to...
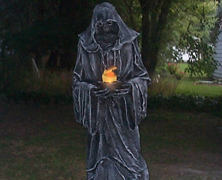
Merlin’s Reaper Stone...
posted by SkeleTony
The old abandoned Haunter’s Hangout has a nice tutorial on how to make a great looking Monster Mud Reaper holding a faux flame light. I’ve seen a lot of tutorials on making similar props, but this one looks especially nice, and the tutorial is pretty straight forward (albeit a bit lacking in some of the details). You’ll need to create a base for the Reaper to stand on, but it’s pretty much a PVC Frame with skull and hands, chicken wire, and burlap covered in Monster Mud. Of course the faux flame light adds a bit of a wrinkle that really isn’t covered much by the tutorial, but by the looks of it, it’s well worth the extra planning. Items needed to create this include (but are not limited to): 12′ – 2 x 2″ Wood 6′ – 2 X 3″ Wood 1 – 2 x 4′ sheet 1/4″ plywood 1 – 2 x 4′ sheet 1/2″ foam board 1-1/4 by 4″ piece of pipe 1″ PVC 4 way joint 4 – 90 degree joints 3 – 45 degree joints Skull Skeletal hands Chicken wire Burlap 1/4″ bolts Aluminum stock Flame box Shop These Materials on Amazon 1/2" Hardware Cloth 19-Gauge 48"x100ft Galvanized Roll Aviation Tin Snips 3-pc Set (straight/left/right) USG Sheetrock Drywall Joint Compound 4.5 Gallon Cheesecloth Unbleached 36×36" (for Monster Mud draping) 1" Schedule 40 PVC Pipe 6-Pack Ratcheting PVC Pipe Cutter (up to 1-1/4") 1" PVC Furniture Fittings Assortment 12-Pack Oatey PVC Clear Cement + Primer Handy Pack Realistic Replica Human Skull Statue 6.5" 5.4ft Full Size Halloween Foam Skeleton Affiliate Disclosure: HauntersList.com is a participant in the Amazon Services LLC Associates Program. As an Amazon Associate we earn from qualifying purchases at no extra cost to...
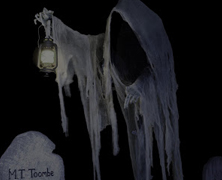
Grim Hollow’s Cloaked Ghost...
posted by SkeleTony
There’s a great tutorial on how to make a Cloaked Ghost over at Grim Hollow that is well worth your time to check out. This eerie prop was inspired by Pumpkinrot’s Cloaked Ghost and is pretty easy to build for something so awesome looking. It looks great both day and night and is sure to be an attention grabber at your haunt. Items needed to create this include: 5′ – 1-1/2″ pvc pipe 10′ – 1 x 2 wood Chicken Wire Burlap Monster Mud Glue Sticks Cheesecloth Lantern Plywood (for base) Shop These Materials on Amazon Instant Paper Mache Powder Mix 3.3 lbs Assorted 12" Latex Balloons 120-Pack 1/2" Hardware Cloth 19-Gauge 48"x100ft Galvanized Roll Aviation Tin Snips 3-pc Set (straight/left/right) USG Sheetrock Drywall Joint Compound 4.5 Gallon Cheesecloth Unbleached 36×36" (for Monster Mud draping) 1" Schedule 40 PVC Pipe 6-Pack Ratcheting PVC Pipe Cutter (up to 1-1/4") 1" PVC Furniture Fittings Assortment 12-Pack Oatey PVC Clear Cement + Primer Handy Pack Affiliate Disclosure: HauntersList.com is a participant in the Amazon Services LLC Associates Program. As an Amazon Associate we earn from qualifying purchases at no extra cost to...
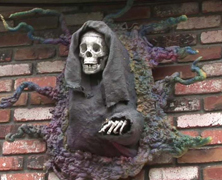
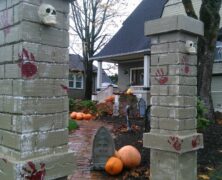
Monster Mud Wall Breaker...
posted by SkeleTony
If you’re looking for an eye grabbing prop to welcome guests to your haunt then look no further. The late PerfessorEvil created an excellent Monster Mud Wall Breaker tutorial that looks great. After glancing at the tutorial I was surprised at just how simple this is to create. The pvc frame is simple to put together and the chicken wire framing doesn’t require a high degree of accuracy, it’s a simple cloak wrap. The rest is just monster mudded burlap and great stuff, what could be easier? The finished product looks great and will really be a nice focal point in or around your haunt. I’m not a hunter, so I’ll never be able to mount a deer above my fireplace, but I could easily see putting this beauty up there (at least during the Halloween season) Items needed to create this include: 10′ – PVC – 3/4″ 4 -PVC 3/4″ 90 degree connectors 4 – PVC 3/4″ “T” connectors 1 – Bucky Skull 1 – Bucky Hand 5 gallons – Joint Compound (You will have a LOT left over, but that’s how it comes) 1 gallon Black (or whatever color you want) paint Chicken wire Burlap Heat Gun Assorted drywall screws Zip ties Flat piece of plastic (dropcloth type) Great Stuff Triple Expanding Foam Shop These Materials on Amazon USG Sheetrock Drywall Joint Compound 4.5 Gallon Cheesecloth Unbleached 36×36" (for Monster Mud draping) Affiliate Disclosure: HauntersList.com is a participant in the Amazon Services LLC Associates Program. As an Amazon Associate we earn from qualifying purchases at no extra cost to...