
If you’re looking for a gruesome looking makeup effect for your scare actors then CrazyHappy08 has a tutorial that may suit your needs. Its a super simple effect to achieve (assuming you’re reasonably adept at applying makeup) and the results look amazing. You’ll need glue, foundation, some makeup, and a bit of a depraved imagination....

HauntX Haunter’s Retreat & Tradeshow 2014...
posted by SkeleTony
HauntX Haunter’s Retreat & Tradeshow is coming to the Circus Circus Hotel in Reno, Nevada May 9th – 11th, 2014 and whether you’re a pro haunter, home haunter, or just love Halloween, you’re going to want to check out this show! This three day Haunter’s retreat offers seminars, workshops, and a trade show including Froggy’s Fog, EFX-TEK, Trick or Treat Studios, and Skulltronix just to name a few. You’ll also be able to join in on a Paranormal tour of Virginia City, Vampire Pub crawl, attend the Circus of the Damned Masquerade Ball, or browse through the Graveyard sale & swap meet. Seminars included in the admission price include: LED Lighting Options for Your Haunt Writing a Back Story Managing your Monsters Production Makeup Techniques for Your Haunt Choosing a Ticketing Solution Evil Super Genius: Diabolically Successful Haunt Advertising & Marketing Foam Cutting tools Foam Cutting techniques Advanced Prop Programming Intro to Microprocessors Taking Your Haunt to the Next Level PicAxe Programming Living With Your Fire Marshal at Outdoor Events If you’re looking for more in depth training you can purchase tickets to the advanced training sessions offered on Thursday and Saturday including: I Know Why You Didn’t Sleep Last Summer (It’s Because You’re A Haunt Builder), hosted by Steve O’Connor, creator of The Garage of Evil Open Your First Haunted Attraction: Without Losing An Arm And A Leg Drew Badgers Scare Actor Training (limited to 20 students) Several Ticket options are available online. Show Hours: Thursday: 11:00 am – 4:30 pm (advanced training session) Friday: 9:00 am – 11:00 pm Saturday: 9:00 am – 11:00 pm Sunday: 9:00 am – 11:00...
1-2-3 EZ Creep
posted by SkeleTony
It’s 5 pm on Halloween night and you’ve put up no decorations to great your trick or treaters. Actually, if you’re a regular at Haunter’s List, there’s probably no chance that this has ever happened to you, but it might be the type of recurring dream that plagues you. If anyone you know finds themselves in this predicament, though, tell them not to panic, because they’ve probably got all the materials they need to create this cheap and EZ Creep that SpookySam from HauntForum created. You’ll take your ladder and attach your skull (and arms if you’ve got them) to a piece of scrap wood and then set it on the paint shelf. You can add a cardboard box to the top rung of the ladder and attach it to the scrap wood. This will add a little bulk to your Creep as well as hold both items in place. The final step is to add your fabric or clothes to your creep, which can be stapled to itself to keep its shape. This creep looks great and is the perfect last minute no hassle prop to build. Items needed to create this include: Step stool (preferably with paint shelf) Foam skull (arms and hands optional) Scrap board Cardboard box Scrap cloth or landscaping fabric Shop These Materials on Amazon Realistic Replica Human Skull Statue 6.5" 5.4ft Full Size Halloween Foam Skeleton Affiliate Disclosure: HauntersList.com is a participant in the Amazon Services LLC Associates Program. As an Amazon Associate we earn from qualifying purchases at no extra cost to...
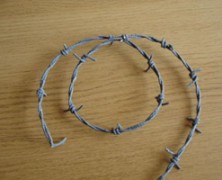
Cheap Fake Barbed Wire...
posted by SkeleTony
If you’ve got a scene that requires realistic looking barbed wire your best bet is to head over to Home Depot and pick up a roll, it’s only $65 for 1300 feet! I mean, what’s the worst that can happen? Someone grabs it to see if it’s real and cuts their hand, or rips their clothing on it, or actually falls into it and slices themselves up real good leaving a bloody mess on your floor, and if any of that happens you know what that means… BEST HAUNT EVER!!!! It’s probably not worth the liability, though, so with that said, you may want to checkout the tutorial that msraynsford created on how to create Cheap Fake Barbed Wire You’ll start by folding your length of string in half, tying one end of it down and twisting the string whichever direction you prefer. Once you’ve got it good and twisted you’ll dip it completely in your glue. You can mix your paint directly into the glue to ensure a nice even color. Let it dry making sure that it doesn’t touch itself or unwind during this time. You’ll next need to add your barbs, which are nothing more than lengths of 10cm (3 inch) string dipped in the glue and then wrapped around the main string. Once you’ve got the barbs wrapped around the main string and they’ve dried completely, simply cut the barbs on an angle to give them a sharp pointed appearance. Once your barbed wire is completely dried your wire is ready to hang. It looks realistic and won’t cut anybody (probably). Items needed to complete this include: String (roughly 2.5 times more string than you want barbed wire) PVA glue (Elmer’s) Grey...

How to Chop Someone in Half...
posted by SkeleTony
Seeing a person cut in half can be a life altering event. The kind of event that makes you want to try to recreate yourself, which is ok, provided you see the person cut in half at a haunt and not in some back alley in the wee hours of the night. And that’s pretty much how I’ve felt ever since I was 10 years old and got to see this done at the March of Dimes Haunted House. It was a terrifying and exhilarating thing for a kid to see, and while it may seem a bit campy by today’s standards, it’s still one of my fondest haunt memories. I’ve seen several tutorials that tackle this prop, but I really like the video tutorial that HauntingHooligan has created. The tutorial is fairly general, but will give you everything you need to get started creating this effect. Items needed to complete this include: 16′ – 1 x 3″ lumber (approximate) 2′ x 6′ sheet of 1/4″ plywood (approximate) Wire Styrofoam Cloth to cover platform Great stuff Newspaper Old pants Old shirt...

Monster Mud Reaper
posted by SkeleTony
Nothing looks better than a well crafted Monster Mud Reaper standing guard over your cemetery. As he welcomes recently departed souls to their final resting grounds, this dark and foreboding spirit will cause all eyes to focus their attention to him if for no other reason than to make sure he isn’t actually alive. And the best part is, he’s pretty easy to build if you follow the tutorial that Jimmyzdc wrote up at HalloweenForum. The frame of your reaper will be created by securing a steel flange to a 2 x 2′ piece of MDF board and then threading a 4” steel pipe to the flange. You’ll connect the PVC that will create your reaper’s spine to the 4″ steel pipe and then connect your 4 way PVC cross fitting to the top so you can add your arms. Once the PVC frame is complete you’ll wrap some chicken wire around the skeleton for the reaper’s body and then measure out your burlap and drape it on the chicken wire to verify you have the correct size and shape for the reaper you want. Once you have the reaper shaped to your liking you’ll peel your burlap off and dip it in your monster mud until its completely submerged in the mud. Once coated, remove it from the mud and squeeze off the excess mud as you pull. Re-drape it on your frame and continue until you’ve got all of your burlap reassembled on the reaper. Once coated in monster mud, make sure you use a some Drylock masonry sealer to weather proof your reaper otherwise you may have a mess on your hands if it rains. Items needed to complete this include: (2) 90 degree PVC elbows (3) 45 degree PVC elbows (1) 4-Way PVC...
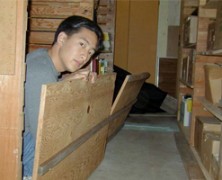
Rickety Floor
posted by SkeleTony
An unstable, rickety old floor is a great way to catch visitors to your haunt off guard, especially when lights are low. It’s a simple project, and if you’re so inclined (pun intended), Raymond from RFHaunt has a tutorial on how to quickly and easily add this effect to your haunt. Your floor will be made of plywood and is best suited to a hallway section where you can have it extend from wall to wall. You’ll start by making a stationary section which consists of your piece of plywood with sections of 1 x 2 lumber nailed to the entire length of the center and both sides. For the rocking piece you’ll simply nail the 1 x 2 to the length of the center which will allow it to rock back and forth when you walk on it. You’ll want to be careful to make sure there are no gaps between the two sheets of plywood because you don’t want anyone getting their feet stuck in between and a piece of carpet draped on top of it allows for worry free enjoyment. Items needed to complete this include: Two large plywood boards On thin length of wood (Optional) Thick...

Faux Moss Application...
posted by SkeleTony
A rolling stone gathers no moss, but a tombstone (and my patio) gathers plenty. So if you want a realistic looking tombstone you’re going to need to find a way to add some realistic moss that will stick to it. Troy from Halloween Hellmouth has a great method that produces a great looking moss for any prop utilizing a mixture of pre-dried moss and paint. You can buy dried moss at most craft stores, but if you have access to moss you can dry it out for a couple of days and use it. You’ll start by puréeing the dried moss in a blender and then you’re going to start mixing your paint until you get your desired color. Once you’ve got the correct color mix you’re ready to start spreading it onto your prop. Use your fingers to spread it and don’t worry if you’re a bit sloppy because moss doesn’t exactly grow straight. After you’ve spread the moss mixture onto your prop you’re going to want to wait for a good three days for the entire mixture to set, which sounds like an inordinate amount of time to wait for something to dry, but trust me, it’s worth it. The end result looks amazing. Troy adds even more detail by tea staining his moss application, but even before doing this his method is a success. Items needed to create this include: Bag of moss (or actual dried moss) Paintbrush Mixing stick Mixing bowl Spray bottle filled with water Drip pan (for water to drip in to) Acrylic paint Blender Shop These Materials on Amazon 5-Pack Foam RIP Tombstone Blanks for Carving Decorative Cemetery Fence Sections Rust-Oleum Flat Black Spray Paint 12oz Affiliate Disclosure: HauntersList.com is a participant in the Amazon Services...
Tombstone Lettering
posted by SkeleTony
Nothing spoils a good tombstone more than poor lettering carved into it. No matter how realistic your tombstone looks, all eyes will eventually focus on the text, and if you want it to look really good, you’ll want to check out the video tutorial that Eerie Acres Cemetery put together on effective tombstone lettering. It covers some very simple but essential techniques for creating really good looking tombstone text. http://youtu.be/lI2jnU1verk Shop These Materials on Amazon 5-Pack Foam RIP Tombstone Blanks for Carving Decorative Cemetery Fence Sections Rust-Oleum Flat Black Spray Paint 12oz Affiliate Disclosure: HauntersList.com is a participant in the Amazon Services LLC Associates Program. As an Amazon Associate we earn from qualifying purchases at no extra cost to...
Spirit Panel
posted by SkeleTony
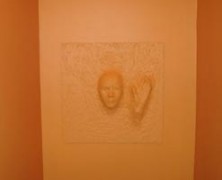
If you want to add a bit of subtle detail to your haunt walls, Violetkitty has an instructable for a Spirit Panel that could very easily be used. The tutorial is based on an original idea titled Ghosts in the Bookcase Halloween Project, and it’s a simple way to add some depth to any flat surface. In a nutshell you’re going to glue or screw down the item you want protruding from the wall. You’ll then start to cover the protruding items with your paper mache mixture so that it completely covers them and appears to be stretching the wall. After you’ve got the items coated you’ll need to let them dry a bit and then cover the entire surface with the paper mache mixture. Once completely coated you can sand it down a bit and paint it. The great thing about this idea is that you can use plastic masks, skulls, prop hands, pretty much whatever you want to appear to be coming through the walls. It’s not a tricky project, and it can add a nice wrinkle to an otherwise plain wall. Items needed to complete this include: Plywood (or the flat surface of your choice) Plastic Mask Manicure plastic hand Gorilla glue Celluclay paper- mache Sandpaper Latex paint Shop These Materials on Amazon Instant Paper Mache Powder Mix 3.3 lbs Assorted 12" Latex Balloons 120-Pack Affiliate Disclosure: HauntersList.com is a participant in the Amazon Services LLC Associates Program. As an Amazon Associate we earn from qualifying purchases at no extra cost to...
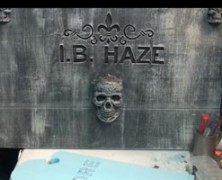
Carved Granite From Foam...
posted by SkeleTony
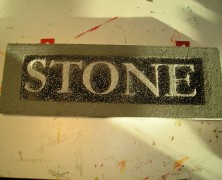
Acetone will eat away at your styrofoam, and while that’s not exactly what I would call a newsflash here, but Creativeman uses it to great advantage in his instructable on how to use this to create really good looking granite lettering. This is a great way to create a sandblasted stone sign for use on cemetery columns, or to add depth to your tombstone, and it requires only the most rudimentary of skills. The process is simple. Cut your pre-printed letters out with an exacto knife, glue them to your styrofoam, and then spray paint the styrofoam. It’s literally easier than breathing, but it adds a great level of detail to your lettering or sign. Items needed to complete this include: Styrofoam Printout of your letters (each letter cut) Elmer’s glue Spray paint containing acetone Shop These Materials on Amazon XPS Foam Board 1" Thick Craft Sheets 4-Pack 4-in-1 Hot Wire Foam Cutter Kit 15W Loctite Power Grab Foam-Safe Construction Adhesive Affiliate Disclosure: HauntersList.com is a participant in the Amazon Services LLC Associates Program. As an Amazon Associate we earn from qualifying purchases at no extra cost to...
Making Zombie Clothes...
posted by SkeleTony
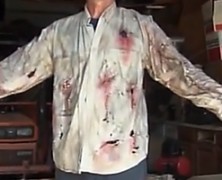
If a zombie can take the time to dig its way out of its grave, the least you can do is make sure he’s got some appropriate looking clothes, right? And if you’ve taken the time to build a Full Sized Zombie Prop, or just plan on becoming the zombie yourself, you should probably pay equal attention to the clothing since it’s a major part of your zombie’s appearance. If you want truly realistic looking zombie clothing you’re going to want to give Robertb7864’s video a look. This twenty minute trek through zombie clothes modification features a full five minutes dedicated to Robertb7864 taking a belt sander to a shirt. The end result is pretty great looking, though, and is way more authentic looking than you’d achieve by tearing or cutting the cloth yourself....
Full Size Zombie
posted by SkeleTony
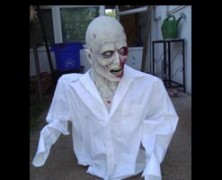
If you’re looking to build a full size zombie that you can leave outside you’re going to need something that is a little more solid, and once again, Dr. Kreepy has just the tutorial you’re looking for. The lower body is framed using 2 x 4’s for legs attached to a 1 x 6 waist while the spine, shoulders, and arms are crafted out of PVC. After the frame is in place you’ll need to bulk out the torso and the legs. You can certainly wrap the legs and body with foam and duct tape it tight, or you can use the Dr. Kreepy method and use balled up newspaper or plastic. When mounting it you can use a plywood base and screw the legs to it, otherwise you can grab a pair of old boots and throw in some quick drying cement. You’ll need to add your favorite mask and a pair of prop hands if they’ll be visible. Items needed to complete this include: 2 – 2×4 approximately 35″ 1 – 1 x 6 appoximately 17″ 1 – 20″ 2 x 4 6 pieces 3/4 PVC 4 – 3/4″90 degree PVC 3/8″ or thicker 2′ x 2′ plywood Old clothes Skull or mask Duct Tape Newspaper or foam Screws Shop These Materials on Amazon 1" Schedule 40 PVC Pipe 6-Pack Ratcheting PVC Pipe Cutter (up to 1-1/4") 1" PVC Furniture Fittings Assortment 12-Pack Oatey PVC Clear Cement + Primer Handy Pack Affiliate Disclosure: HauntersList.com is a participant in the Amazon Services LLC Associates Program. As an Amazon Associate we earn from qualifying purchases at no extra cost to...
Quick & Easy Armature...
posted by SkeleTony
I’ve got to tip my hat to Nightrideproductions from the HalloweenForum, who has proof that literally everything you own can be incorporated into your next prop build. This Quick and Easy Armature is built using a tomato cage and is all you’ll need to get a few more last minute zombies popping out of your cemetery without exerting much effort along the way. You’ll start by flipping your tomato cage so the largest circle is on the ground and then bend the two side wires so they form shoulders and arms. The third and final wire should be bent inward and then up 90 degrees so the styrofoam head can slide down onto it. The newspaper and duct tape should be added around the shoulders and arms to add a little body to your armature before adding your mask and shirt, but that’s pretty much all there is to it. Bend the wires back into place when your done using it and it’ll be ready for the spring tomato crop. Items needed to complete this include: Tomato cage Styrofoam head Tent stakes Newspaper Duct tape Wire...
Alone 2013
posted by SkeleTony
There is nothing more terrifying than having to face your fears alone. Perhaps that’s why it’s rare to see someone go to a haunted attraction solo, but visitors to Alone [an existential haunting] will be required to have this experience Alone. Billed as one part interactive theater and one part psychological haunting Alone forces you to become a part of your own nightmare. There’s no gore, no chainsaws and no clowns with this experience. This attraction promises that you will be dislocated, disoriented and disturbed, and I have no doubt in my mind that they will succeed. This attraction is my idea of what fear is, and what most haunted attractions lack, the sense of isolation. ALONE will take place in downtown Los Angeles in a former fraternal order temple built in 1924. It’s just south of the 10 freeway, and just west of the 110 freeway. The exact address will be emailed to you prior to the event. Each participant must present valid photo identification and be over the age of 18, and must enter ALONE....

Brad’s Boo Barn 2013...
posted by SkeleTony
Brad Silverstein’s got a haunted barn on his hands and on Fridays and Saturdays this October you can venture through the Slaughterhouse that is Brad’s Boo Barn. With over 25 actors and 6 areas to explore, this home haunt located in Spanaway, Washington will make sure you get a fun scare out of Halloween. Featuring the dark school house, jail, and back by popular demand, the new clown maze. With all new scares for 2013 from the human B.B.Q. to the Slaughter house, will you have what it takes to make it all the way through Brad’s Boo Barn? Proceeds from this haunt benefit the Bethel School...
Rockin’ Granny
posted by SkeleTony
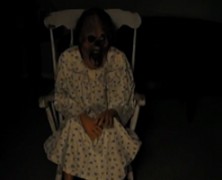
There’s something completely unsettling about a decrepit looking old lady slowly rocking back and forth in her chair. If you know a decrepit looking old lady then you’re half way there, but if you don’t, you can always follow ScareFX’s tutorial and make your own Rockin’ Granny prop. What you’re building in this tutorial is a self contained rocking mechanism that you’ll build your Granny on top of. The frame is built of 2×6 material with the wiper motor mounted vertically. A piece of aluminum flat bar connects the wiper motor to a piece of 2×6 that is connected to the base via a 4″ hinge which will allow it to rock back and forth when the motor spins. The upper part of the Granny is built on the 2×6 that is hinged by connecting some 1″ PVC to the 2×6 and then creating some shoulders with the 90 degree elbows and adding some sections of pool noodles over the PVC for the upper arms. You’ll need to add some prop hands if they’ll be visible. The lower body is connected to the base and consists of a PVC T connection which connects some 1″ PVC to two 90 degree elbows and forms the legs. Again, you’ll need to add some prop legs if they’ll be visible. Once your mechanism and skeleton is complete, the entire device is connected to the rocking chair with clamps to prevent it from flying forward once it gets rocking. After you’ve got everything clamped down it’s time to put the Styrofoam head on it and you’ll probably want to put a mask on it as well. Oh, and don’t forget to put some clothes on Granny! Items needed to complete this include: Rocking Chair Wiper motor 4′ of 2×6 board 4×4 post cap & brackets (or...

Sparking Fence
posted by SkeleTony
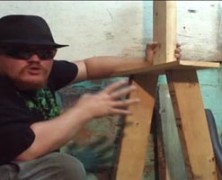
Want to create an impressive looking spark effect for your haunt that’s absolutely harmless? Bradsboobarn has a video tutorial on how you can achieve this effect and it’s easier than you think. If you take one thing away from this video, it should be that in order to achieve this effect safely, you’ll need to utilize a car battery charger, and not just a car battery. Using a regular car battery in place of the battery charger could potentially cause the battery to heat up and explode. Items needed to complete this include: Chain link fence Jumper cables Car battery charger Long metal object...