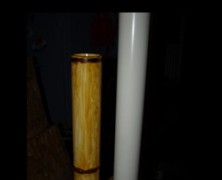
Bamboo, while often being mistaken for wood, is actually an incredibly strong grass. It’s got an ultimate tensile strength of 265 MPa (Megapascals), which is pretty incredible when you consider that cast iron only carries with it an ultimate strength of 200 MPa (spider silk has an incredible 1200 MPa, fyi). This is no doubt the reason that a single 8 foot bamboo cage could contain 5 stranded castaways so well. PVC on the other hand only carries an ultimate strength of 52 MPa, but since it is considerably cheaper and easier to get than bamboo you might want to consider using petejc’s tutorial to make some Faux Bamboo if you have the need to build a cage. You’ll start by using some acetone to clean all of the writing off of the PVC. Once the PVC has been cleaned you’ll want to cut some notches with a razor blade around the pipe for the bamboo nodes. Petejc recommends going around the pipe a couple of times to get the notch deeper for a better effect. Once the nodes are notched in you’re going to need to grab a blow torch and heat your PVC up a bit. This will not only give it a slight discoloration, but will also allow you to compress the pipe a little bit to give the nodes an actual raised appearance. Once the nodes are complete it’s time to sand and stain the PVC. Petejc went with an amber shellac instead of stain on his bamboo. Sanding the pipe adds some texture to the pipe allowing the shellac to adhere to. The shellac when applied with a rag gives a great uneven finish that looks amazingly like real bamboo. Items needed to complete this include: PVC Blow torch...

Gorey Eyeballs
posted by SkeleTony
It’s one thing to make realistic looking eyeballs for use in a skull or creature, but what if you want eyeballs that have been freshly plucked from their sockets? You know what I’m talking about, the eyeball that’s being pecked at by a crow with muscles and optic nerve still attached. If that’s what you’re looking for, and trust me, you definitely want some of these, then you’re going to want to check out the Gorey Eyeballs tutorial that Chiapetrescue posted. You’ll start with your pristine, perfectly round eyeball and add a few layers of hot glue to the bottom of it. Once you’ve got a couple layers of hot glue added you’re going to start turning it upside down to let the hot glue start running. Once you’ve built up enough layers of hot glue to give the appearance of an extended optic nerve, you’re ready for painting. Chiapetrescue did an awesome job of painting these by starting with a base coat of red spray paint for a bit of a splatter effect and then added an additional coat of red acrylic to it. Some black acrylic paint was then dry brushed over the base to add a darker finish to it. A final coat of polyurethane was applied to give it a glossy appearance. The finished eye balls look fantastically gruesome and are incredibly easy to make. Items needed to complete this include: Plastic eyeballs Glue Gun Glue Sticks Red Spray Paint Red Acrylic Paint Black Acrylic...
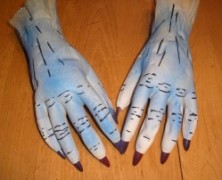
Easy Monster Hands
posted by SkeleTony
Ok, remember when you were getting ready to use the Frankenstein Plans to build your very own Frankenstein and it said you’d have to supply your own set of hands? Well unless you were able to run out to your local Halloween store and buy a pair of hands you were out of luck. And a Frankenstein without hands isn’t very scary now is it? Making your own hands isn’t that difficult though, and the crew over at Screaming Scarecrow Studios have created a simple tutorial on how to make really great looking monster hands using latex gloves, witches fingers, and some expanding foam. You’ll start by turning the glove inside out and cutting a small slit in the tips of the fingers of your rubber glove. Once you’ve got your witches fingers securely inserted into each of the fingers you’ll need to get a 12″ piece of 1/2″ pvc pipe for an arm bone. You’ll need to drill a hole in both the bottom and top of your pipe approximately an inch from the bottom. Once you’ve got your holes drilled you’re going to thread some wire through the hole in the pipe to secure the hand to the bone. You’ll also need to secure the wire through the witch’s fingers which is what will keep the hand secured to the bone once its filled with foam. Once you’ve got your hand securely wired to the arm bone you’re ready to add some foam. You can hang the hand by threading another wire through the hole you drilled in the top of the pvc. It may take a while for the foam to fully cure (2 to 3 days), but once they’ve hardened you can remove the glove from around the hands. You’ll need...
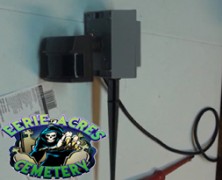
Motion Detector Hack
posted by SkeleTony
If you’ve ever wanted a motion sensor to trigger your Halloween props but didn’t feel like laying out the cash for an overpriced store bought unit then pay close attention. The reality is, they’re not that difficult to make if you’ve got a moderate amount of electrical skills and you’ll end up with a unit that is tailor made for your use. You’ll also end up saving yourself a lot of money because once you realize how easy it is, you’ll want to make more! I’m sure the folks at Eerie Acres Cemetery wouldn’t mind you sending some of that extra cash their way because they’ve posted a really descriptive tutorial on how to create a motion sensor that will more than get you up and running creating your own. Items needed to complete this include: Replacement motion sensor GFCI outlet 4 hole single gang outdoor outlet box (metal) Outdoor electrical outlet cover (metal) Clamps for gang box PC power cable Threaded ground stake Silicone...

Small Faux Wood Barrel...
posted by SkeleTony
Any Halloween prop that necessitates the drinking of beer is naturally going to pique my interest. After all, Halloween prop building and beer go together like peanut butter and jelly, right? I’m pretty sure Ollieee who posted a great tutorial over at the HalloweenForum detailing how to make a small faux wood barrel using an empty 5 liter mini-keg would agree with me. Ok, truth is, you don’t really have to buy a keg filled with beer to get this done, you can purchase empty mini-kegs from Midwest Supplies and save a few bucks, but what fun is that. You’ll start by emptying the barrel if you opted for one filled with beer, you can use whatever method you like for this step, however a pint sized glass works best for me. Once emptied make sure you give it’s good rinse out to remove any leftover suds and the give the exterior a light sanding. Ollieee gave the barrel a solid base coat of flat black paint, then an additional coat of a dark brown flat paint. Once the brown base is completed you’ll want to add some faux wood grain to your barrel. Once the wood grain is completed you’re going to want to paint some metal bands around the barrel as well as any additional decorative text to complete your barrel. The finished product is pretty great looking and the barrel is just the right size to make me feel like a giant pirate, Arrr! Items needed to complete this include: 5 liter mini-keg A drinking buddy (optional)...

Kindred Moon Productions 2014 Additions...
posted by SkeleTony
If you’re a fan of Kindred Moon Productions video projection effects then you’ll want to checkout their latest offerings for 2014. The additions to their already impressive lineup include: Mirror Mirror Effects Kit – $1000 Pumpkins Volume 3 – $34.99 Zombies –...
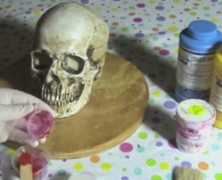
Silicone Skull Mold
posted by SkeleTony
If you’re interested in making your own skulls, and I’m talking seriously making a lot of your own skulls, then you’re going to need a pretty serious mold to cast them in. You can use the Cheap Easy Skulls method provided by Dr. Kreepy, but if you’re interested in some serious skulls you’re going to want to checkout the tutorial that The Devil’s Workshop posted. Creating your mold is a pretty elaborate process but this two part tutorial will walk you through the process from start to finish. http://youtu.be/T261p0MAHdA Shop These Materials on Amazon Realistic Replica Human Skull Statue 6.5" 5.4ft Full Size Halloween Foam Skeleton Affiliate Disclosure: HauntersList.com is a participant in the Amazon Services LLC Associates Program. As an Amazon Associate we earn from qualifying purchases at no extra cost to...
Bottomless Pit
posted by SkeleTony
I’ve always wanted to do a bottomless pit but it’s always seemed like more effort than It was worth. I’ve always told myself that if I had an extra two way mirror that I’d build one for sure. That’s not really a valid excuse, though, because I could always make a Two Way Mirror. Bottom line, I guess I’m just too lazy to make this prop, but that shouldn’t stop you because it’s really not that difficult of a build. Trisha Morse put together a nice tutorial based on Larry Lund’s original build that employs the use of a home made plexiglass two way mirror. You’ll start by building the support frames for the two mirrors. You’re going to cut a groove in the length of your 2×4 to slide the mirror into. Once you’ve got all grooves cut in your four frame pieces you can screw three of them together, slide your mirror in and attach the final 2×4. The walls of the pit are framed with 3/8″ plywood that are secured together using L-brackets. Wood blocks on the outside bottom and top of the walls of the pit allow for it to sit on top of the frame with the regular mirror, while the frame holding the two way mirror can sit on top. This allows the pit walls to run straight into the bottom mirror which is reflecting the two way mirror above, which is also reflecting the pit walls. Since you’ll be viewing it through the two way mirror side, you won’t have to worry about seeing your own reflection. You can add styrofoam rocks to both the inside and outside of your pit to make it look a bit more realistic and you’ll want to be sure to add...

Creepy Shelly
posted by SkeleTony
I used to know a girl named Shelly, and while she was hardly what I would consider creepy, I couldn’t help but think of her when I saw undead_october’s tutorial for Creepy Shelly. And that would probably bum her out because Creepy Shelly is terrifying! I mean, I genuinely find it unsettling. Job well done undead_october. I also have to give a tip of the hat to undead_october because I had heretofore never heard of snot rag mâché, or the process of utilizing Kleenex, glue, and water, in place of the typical paper mâché. Again, job well done! This macabre masterpiece started with a child sized skull sculpted using DAS clay. It was hot glued to a two liter bottle that was then attached to a wood base. After extending the neck over the bottle with more clay some aluminum foil arms and shoulders were attached to the bottle with more hot glue. The legs were created with wood dowels attached to the undersized of the wood base and the feet were crafted using oval pieces of craft wood. Once the full frame was in place the entire body was snot rag mâchéd. The final part of the body was the hands, which were sculpted with more clay. Once the body is fully sculpted and mâchéd it was given a coat of brown paint. Undead_october did more than just slap some brown paint on Shelly, though, the highlights added give a truly decayed look to Shelly. Items needed to complete this include: DAS modeling clay Aluminum foil 2 liter bottle Wood base Wood dowel 2 – Oval wood plaques Kleenex Elmer’s glue Brown paint Old dress...
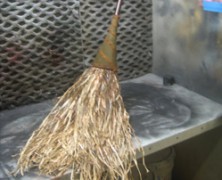
Deluxe Witches Broom
posted by SkeleTony
My mother was the driving force behind my love for all things Halloween. She was born on October 31st so I suppose there was little chance that she wouldn’t love Halloween herself, but It was more than just Halloween. She had a great appreciation for classic horror films, too. I remember on Saturday evenings our local UHF channel (UHF, how’s that for dating yourself!?) would show a classic horror film followed with a few of the old Flash Gordon episodes. Saturday Night at the Movies was a staple at our house and those films have always been a major source of my inspiration. For that I have my mother to thank, and while I can’t imagine my mother doing many of the tutorials on HauntersList, this Deluxe Witches Broom tutorial that Stanley Basconbe (aka Gary Benson) posted is exactly the kind of crafting project that my mother would have loved to do. And she would have owned it, too. You’ll need to start off with a standard straw broom. You’re going to want to remove the metal band if it has one and then cut off the twine that holds the bristles in place. Once you’ve got the twine removed you’ll have a pretty nicely fanned out broom. You’ll want to remove the outer layer of the bristles to create a more narrow broom. At this point you’ll want to focus your attention on creating the ferrule, which is crafted from an automotive oil funnel. You’ll need to cut it down so that it will fit down the broom handle. Once you’ve got the ferrule in place you’re going to want to hot glue some grass skirt to the top of the bristles which will complete your witches broom. Of course you can decorate...
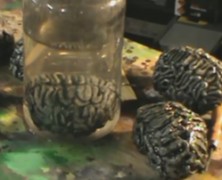
Easy Brain in a Jar
posted by SkeleTony
Allen Hopps has a brain the size of a baked potato. Ok, now that I’ve got your attention I should probably rephrase that. Allen’s got a great tutorial on how to easily make a brain in a jar that starts out roughly the size of a baked potato and requires far fewer ingredients than I would put on said potato. His method starts by balling up some aluminum foil and then adding some caulk to it to create the sulci and gyri (brain grooves). Once you drop it in a jar filled with water the size of the brain looks deceptively larger! Items needed to complete this include: 1 gallon jar Aluminum foil Gray silicone caulk Black paint White acrylic paint Polyurethane spray...

The Build of Giant Mushrooms...
posted by SkeleTony
Ever hear the phrase “Go big or go home”? Well I’m pretty sure Rania Peet has, and her larger than life Halloween props sure live up to that standard. This time she’s set her sites on The Build of Giant Mushrooms, and her finished fungi could not have turned out any better! Her mushroom build is broken down into three core parts: the stem, the cap and the underside gills. Realistically, I could get the stem and the cap done, but I’d probably fail miserably on the gills. The top and bottom of the stem was made from 3/4″ plywood. She used (3) 2x4s in the center to create an approximately 18″ diameter stem. The 2×4’s are secured to the base using lag screws and washers for extreme strength and stability. For her build, Rania was lucky enough to have access to a wood cable spool which provided the perfect oversized round base. The stem was then wrapped with chicken wire. The build of the mushroom cap is pretty ingenious, it consists of a 1′ piece of 4×4 that is securely screwed to a sheet of plywood with lag screws. She then proceeded to bore four holes through the four by four and ran some rigid electrical conduit through it. Once in place the conduit was bent to provide the cap with a more “mushroom” shaped appearance. Some 3/4″ poly-flex tubing was screwed to the end of the rigid conduit to give the cap a finished, rounded edge. A layer of chicken wire was then added to the cap which was covered with a dense cheesecloth to hold the layers of spray foam. Think Rania bought a couple of cans of Great Stuff? Guess again, because this is where she takes this project up a...

Davis Graveyard 2014 Workshops...
posted by SkeleTony
So are you ready to scare your friends and neighbors this Halloween? Well, The Davis Graveyard is ready to lend you a hand with the announcement of their 2014 workshop schedule. You’ll learn some incredible techniques plus you’ll walk out with a finished prop! Workshops for 2014 include: Tombstone Workshops $50 per person; $20 partner fee – Limited to 12 per session Saturday June 21, 2014 – 9:00 am – 1:00 pm Saturday June 21, 2014 – 2:00 pm – 6:00 pm Saturday July 19, 2014 – 9:00 am – 1:00 pm Saturday July 19, 2014 – 2:00 pm – 6:00 pm Advanced Tombstone Workshops $75 per person; $20 partner fee – Limited to 8 per session Saturday August 30, 2014 – 9:00 am – 1:00 pm Saturday August 30, 2014 – 2:00 pm – 6:00 pm Foam Coffin Workshop $45 per person; $55 materials fee ($100 total); partner fee $20 – Limited to 6 per session Saturday July 26, 2014 – 9:00 am – 3:00 pm Time Monument Workshop $45 per person; $180 materials fee ($225 total); partner fee $20 – Limited to 6 per session Saturday August 16-17, 2014 – 9:00 am – 3:00 pm (Sunday will start later & end earlier) ...
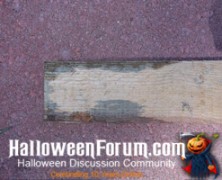
Aging Wood Quickly
posted by SkeleTony
There’s nothing worse than a building a toe pincher coffin with pristine looking lumber. Yeah, it still looks good, but you probably want it to look as though it’s fresh from the ground instead of Home Depot. If you’re lucky enough to have some old pallets or some weathered wood laying around, then read no further, but if you’re anything like me you’re going to want to age it pretty quickly. Terror Tom has a great technique for aging wood that’s easy to achieve and only takes 1 night to prep for. You’ll need to fill a mason jar with as much white vinegar as you think you’ll need to coat your wood and add a nicely rusted item to it. You can use rusty nails, screws, or even steel wool. Let it soak over night and when you wake up you should have a rather rusty (and pungent) solution that will quickly age your wood. Items needed to complete this include: Rusty nails or steel wool Mason jar White...
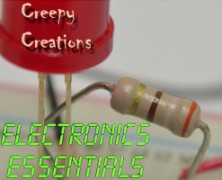
LED Lunacy
posted by SkeleTony
I’ve got a confession to make. I’m clueless when it comes to basic electrical circuitry. In fact, pretty much all of the concepts of electricity other than don’t stick your fingers in the outlets seem to be over my head (ok, well, don’t stick your fingers in the outlets while your standing in water, yeah, I got that one too). So when it came to buying the components to make my own Homemade LED Spotlights my inexperience with a few basic LED concepts was a definite confidence killer. The worst part is that up until this point every written tutorial I’ve seen on this has been a complete snoozer. Thankfully, CreepyCreations have posted a really simple to follow tutorial that outlines all of the essentials you’ll need to purchase the correct resistors to power your LED’s without fear of them blowing up on you. The tutorial is really well made and it’s really simple to follow....

Make a Fake Brain
posted by SkeleTony
It turns out the Scarecrow didn’t need to make a pilgrimage to see the Wizard of Oz after all, he just needed to check in with a Girl In Winnipeg! Her tutorial on how to make a fake brain is awesome in its simplicity and seems like the kind of project that the whole family can participate in. You’ll start with a base of crumpled newspaper covered in duct tape to form your brain mass. The next step is to painstakingly roll your playdough into long round lengths so you’ve got enough to completely cover your brain. After applying some spray adhesive to your duct taped brain mass, the playdough is simply placed on it in a sufficiently wavy brain pattern. Once your gray matter is in place you can paint it in whatever color scheme pleases you. Items needed to complete this include: 2 parts red playdough, 1 part blue newspaper duct tape spray adhesive corn syrup food...

DOT: Terror in April
posted by SkeleTony
If you didn’t get a chance to checkout The Sheboygan Jacycees Dominion of Terror in 2013, consider yourself lucky! Not because you missed it, but because they’re presenting an encore show just for you! That’s right, before they tear down the rooms that terrorized patrons last October and start prepping for the 2014 scares, they’re opening the doors once again to spread some fear. The doors will be open from 7:00 pm to 10:00 pm on Friday April 11th & 12th with tickets costing just $10.00! All proceeds from this event will benefit a local food drive to be held on May 3rd from 11am-3pm at the Quarry View Center. All those in need are encouraged to come and each family will receive paper bags to fill with non-perishable and perishable items. For more information please call 920-918-2270. This event is sponsored by :...

Cheap Rusty Chain
posted by SkeleTony
I must admit that when I first glanced at the tutorial that Lake of the Dead penned over at the HalloweenForum for Cheap Rusty Chain I was a bit underwhelmed. The opening photos of the PVC used to create the chain left me skeptical that the finished product would deliver. Luckily I didn’t stop reading because the finished chain looks amazing and it’s incredibly easy to create. You’ll need to start by cutting all of the links for your full chain. Next, using a PVC pipe cutter you’re going to cut a slit in 1/3 of your links to easily attach the rest of the links. Once you’ve got all your links threaded you can paint the chain using a rust colored paint. Rust-Oleum’s multicolored texture sprays are perfect for this. Items needed to complete this include: 3/4 PVC pipe Rust colored paint Shop These Materials on Amazon 1" Schedule 40 PVC Pipe 6-Pack Ratcheting PVC Pipe Cutter (up to 1-1/4") 1" PVC Furniture Fittings Assortment 12-Pack Oatey PVC Clear Cement + Primer Handy Pack Affiliate Disclosure: HauntersList.com is a participant in the Amazon Services LLC Associates Program. As an Amazon Associate we earn from qualifying purchases at no extra cost to...