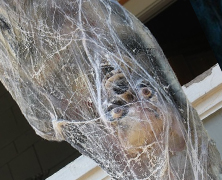
Derek Greenwood has a tutorial on how to make a skin face mask using hot glue, which looks great, and could easily add a super creepy element to any haunt. He states that the mask is not intended to be worn, which I suspect is because it’s flat, however as you can see by the photo below, it certainly could be. I could easily see a hallway wall full of these with people peering out from the other side at a haunt. Now that’s creepy....
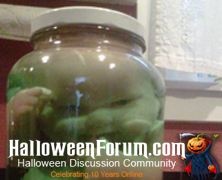
Baby in a Jar
posted by SkeleTony
I love this prop. At least I think I do. Actually, I find it kind of unsettling, (I mean look at the picture below), but that might only be because the doll that Old Man Bakke over at HalloweenForum chose to use is the creepiest doll every produced. I mean, in his defense, if there was ever a doll that needed to go into a jar it’s the one he used…look at those eyes. Anyway, this is a simple prop that adds a lot of creep factor to any scene that you put it in. I’d be a little worried about putting it right on my oven rack, but as long as you monitor the heating you should be good to go. Items needed to complete this include: Mason jar Plastic doll...
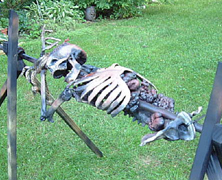
Boneyard BBQ
posted by SkeleTony
Well if you’ve gone to the trouble of following the charred corpse tutorial, you may as well go the extra mile and check out the Haunt 101 tutorial to create a Boneyard BBQ for it. This barbaric looking prop is the perfect exclamation point for a prop that’s pretty in your face as it is. Put a cauldron creep next to it and you’re well on your way to an incredibly creepy scene. This one is getting filed as a static prop, but it wouldn’t take much to put a motor on this baby and take it up a notch, now would it? Items needed to create this include: Rubber skeleton Metal shower curtain rod (6) lengths of pressure treated 1”X1” deck spindles 2 1/2” U-brackets (1) 10” length 9/16” all-thread rod, nuts and...
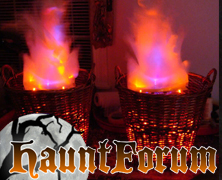
Faux Fire Basket
posted by SkeleTony
I know Beelce’s tutorial on how to build a Faux Fire Basket has been featured on a ton of home haunting how-to sites, but it really is one of the best tutorials for this effect that I’ve run across so it would be hard not to feature it on HauntersList. It’s a very simple effect to create and will set the right mood for any scene that requires flames. If you’re going to be using the wicker basket make sure that you’re extra careful with the power cords as you don’t want to turn this faux fire into a real fire. Items needed to create this include: Wicker basket Electrical wire Assorted holiday light strings (for embers) LED spotlights for flames Silk like fabric 12″ high velocity 3 speed fan 3M High performance 2mil decal material (or equivalent heavy duty tape) ...
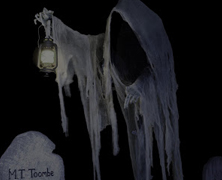
Grim Hollow’s Cloaked Ghost...
posted by SkeleTony
There’s a great tutorial on how to make a Cloaked Ghost over at Grim Hollow that is well worth your time to check out. This eerie prop was inspired by Pumpkinrot’s Cloaked Ghost and is pretty easy to build for something so awesome looking. It looks great both day and night and is sure to be an attention grabber at your haunt. Items needed to create this include: 5′ – 1-1/2″ pvc pipe 10′ – 1 x 2 wood Chicken Wire Burlap Monster Mud Glue Sticks Cheesecloth Lantern Plywood (for base) Shop These Materials on Amazon Instant Paper Mache Powder Mix 3.3 lbs Assorted 12" Latex Balloons 120-Pack 1/2" Hardware Cloth 19-Gauge 48"x100ft Galvanized Roll Aviation Tin Snips 3-pc Set (straight/left/right) USG Sheetrock Drywall Joint Compound 4.5 Gallon Cheesecloth Unbleached 36×36" (for Monster Mud draping) 1" Schedule 40 PVC Pipe 6-Pack Ratcheting PVC Pipe Cutter (up to 1-1/4") 1" PVC Furniture Fittings Assortment 12-Pack Oatey PVC Clear Cement + Primer Handy Pack Affiliate Disclosure: HauntersList.com is a participant in the Amazon Services LLC Associates Program. As an Amazon Associate we earn from qualifying purchases at no extra cost to...
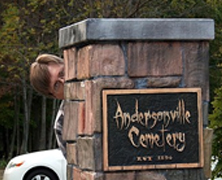
Cemetery Entrance Columns...
posted by SkeleTony
Some people are capable of producing great things using very few resources. Such is the case with Robert Anderson and his Cemetery Entrance Columns tutorial. These remarkable columns consist of nothing more than a few pieces of scrap wood and boxes covered with newspaper. The paper mache mortar seems like an incredibly tedious detail but it really helps make this prop that much more authentic, I mean, this looks like actual masonry here. Robert admits to being cheap, and that’s a really great thing here because he’s managed to create an incredibly detailed prop without having to break the bank. Items needed to create this include: 60′ – 1 x 2 16′ – 2 x 4 Foam insulation, MDF, particle board, or cardboard Assorted boxes or Styrofoam Insulation Assorted latex & acrylic paint...
Cheap Easy Skulls
posted by SkeleTony
In the immortal words of Dr. Kreepy, “A home haunt without skulls is like a cake without icing…” And to the great benefit of us all, Dr. Kreepy has given us the icing (in video form) in his tutorial on how to make your own skulls using Great Stuff expanding foam. There are a few variables that can affect your success in making your own skulls using this tutorial, but even your failures will result in useable skulls. A few of mine resulted in really thin sliver sections of the skull that seem more like broken fragments that had been bashed in. They looked great just laying in front of my tombstones. For the price per skull, you cannot go wrong in doing this tutorial, just don’t make too much of a mess. Items needed to create this include: Hollow plastic skull Great Stuff expanding foam Vaseline Duct Tape Latex Gloves http://www.youtube.com/watch?v=edhDTaLMpng Shop These Materials on Amazon Great Stuff Gaps & Cracks Expanding Foam 12oz Professional Spray Foam Applicator Gun (2-Pack) XPS Foam Board 1" Thick Craft Sheets 4-Pack 4-in-1 Hot Wire Foam Cutter Kit 15W Loctite Power Grab Foam-Safe Construction Adhesive Realistic Replica Human Skull Statue 6.5" 5.4ft Full Size Halloween Foam Skeleton Affiliate Disclosure: HauntersList.com is a participant in the Amazon Services LLC Associates Program. As an Amazon Associate we earn from qualifying purchases at no extra cost to...
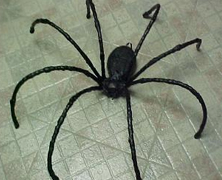
Making Spiders
posted by SkeleTony
If you need some spiders for you web and don’t feel like purchasing posable spiders then have a look at Born2haunt’s tutorial on Making Spiders. This project is pretty easy to complete and the detail on the spider is pretty forgiving to most sculpting imperfections. Once you get started you’re not going to want to stop making these things, and that can only add to your creep quotient. Items needed to complete this include: Foam Plastic tubing Wire Latex Hot glue Shop These Materials on Amazon 300 Sq Ft Stretch Spider Web with 20 Fake Spiders Giant 295" Fake Spider + Triangular Web Black Braided Fishing Line (for rigging props) Affiliate Disclosure: HauntersList.com is a participant in the Amazon Services LLC Associates Program. As an Amazon Associate we earn from qualifying purchases at no extra cost to...

Heat Exchanger Fog Chiller...
posted by SkeleTony
This may just be the ultimate homemade fog chiller, but it’s going to take some skill and effort to find out just how ultimate it is! It uses the same basic concept as Froggy’s Vortex Fog Chiller, but does so much more efficiently. Put simply, this chiller will continuously pump ice cold water through the copper piping ensuring that they remain ice cold at all times. As the fog is sent through the stove pipe which houses the copper piping the fog is chilled and hugs the ground. It’s the same process that occurs in a car radiator, whereby the airflow over the surface of the radiator cools the hot radiator fluid. The real benefit of this design is that you can shoot hot fog through this all day long and it won’t run out of “coolant”. The tutorial originates from Chuck Rice, however, I find the images on the Kickthefog version to be most helpful. Whichever tutorial you choose, good luck, this one is definitely going to test your skills. Shop These Materials on Amazon 400W Fog Machine with Wireless & Wired Remote FogWorx Extreme High Density Fog Juice Gallon Copper Coil Refrigeration Tubing 1/8" OD x 6.5ft (fog chiller) Affiliate Disclosure: HauntersList.com is a participant in the Amazon Services LLC Associates Program. As an Amazon Associate we earn from qualifying purchases at no extra cost to...
Cocooned Spider Victim...
posted by SkeleTony
Grimvisions has an interesting take on how to create a cocooned spider victim. While most tutorials would have you wrap a plastic skeleton or torso, Grimvisions utilizes a pvc frame with newspaper and plastic bags to fill the body. While it may take a little more effort to create your own torso (and let’s be honest, it won’t take that much effort), you’ll feel better knowing that you haven’t wasted a perfectly good skeleton for a prop that would render most of it barely visible anyway. Items needed to complete this include: PVC Duct Tape Spray Adhesive Spider Webbing Saran Wrap Fake Eyeballs Wire A skull either plastic or foam Pipe insulation Newspaper Plastic Bags Spray Paint Liquid Latex Shop These Materials on Amazon 1" Schedule 40 PVC Pipe 6-Pack Ratcheting PVC Pipe Cutter (up to 1-1/4") 1" PVC Furniture Fittings Assortment 12-Pack Oatey PVC Clear Cement + Primer Handy Pack 300 Sq Ft Stretch Spider Web with 20 Fake Spiders Giant 295" Fake Spider + Triangular Web Black Braided Fishing Line (for rigging props) Affiliate Disclosure: HauntersList.com is a participant in the Amazon Services LLC Associates Program. As an Amazon Associate we earn from qualifying purchases at no extra cost to...

ScaryVisions Haunt Seminar #4...
posted by SkeleTony
On Wednesday June 19th, ScaryVisions & HaunTopic Radio will be hosting the fourth in it’s Haunt Start-up 101 series of online seminars. The fourth installment, Scare Acting 101: Managing, Teaching, and Keeping Your Actors Alive All Season with Allen Hopps will feature scare acting techniques, as well as how to manage and keep your actors interested all season long. The twenty dollar fee covers the two hour seminar, access to view the video recording forever, an mp3 download of the audio recording of the seminar as well as all downloads and material discussed in the seminar. You’ll have to register to view the live event or recording. After registration and purchase you’ll be given the instructions on how to attend the live event or the recording. Allen Hopps brings over 25 years of haunting knowledge to this seminar. He’s acted, designed, built, and decorated for small haunts as well as larger haunts like Universal Studios Halloween Horror Nights Orlando and Spookyworld in Mass. This is definitely worth the price of admission. ...

Chicago Zombie Prom 2013...
posted by SkeleTony
Tickets for Chicago Zombie Prom 2013 are now on sale! Zombie Army Productions will be hosting the event on July 12, 2013 at the Bottom Lounge in Chicago’s Near West Side. Tickets are $25 until July 1st, will be $30 until July 11th, and will be $35 at the door. All attendees must be 21 years of age, and of course, zombie attire and makeup are required (if you don’t have the makeup skills they’ll be happy to give you and on site zombie makeover for $10.00). Chicago Zombie Prom 2013 will feature a free buffet from 9:00pm – 10:30pm, a Zombie Prom King & Queen Contest, Prize Giveaways, the musical stylings of Trash Martini as well as a Zombie DJ Sponsors of this event include Zombie Army Productions, Q87.7, Sinister Visions, Statesville Haunted Prison and City of the Dead, Kitty Zombie, Chicago Zombie, and Elevate Chicago. 1375 West Lake StreetChicago, IL 60607(312) 666-6775bottomlounge.com ...
Monster Mud Wall Breaker...
posted by SkeleTony
If you’re looking for an eye grabbing prop to welcome guests to your haunt then look no further. The late PerfessorEvil created an excellent Monster Mud Wall Breaker tutorial that looks great. After glancing at the tutorial I was surprised at just how simple this is to create. The pvc frame is simple to put together and the chicken wire framing doesn’t require a high degree of accuracy, it’s a simple cloak wrap. The rest is just monster mudded burlap and great stuff, what could be easier? The finished product looks great and will really be a nice focal point in or around your haunt. I’m not a hunter, so I’ll never be able to mount a deer above my fireplace, but I could easily see putting this beauty up there (at least during the Halloween season) Items needed to create this include: 10′ – PVC – 3/4″ 4 -PVC 3/4″ 90 degree connectors 4 – PVC 3/4″ “T” connectors 1 – Bucky Skull 1 – Bucky Hand 5 gallons – Joint Compound (You will have a LOT left over, but that’s how it comes) 1 gallon Black (or whatever color you want) paint Chicken wire Burlap Heat Gun Assorted drywall screws Zip ties Flat piece of plastic (dropcloth type) Great Stuff Triple Expanding Foam Shop These Materials on Amazon USG Sheetrock Drywall Joint Compound 4.5 Gallon Cheesecloth Unbleached 36×36" (for Monster Mud draping) Affiliate Disclosure: HauntersList.com is a participant in the Amazon Services LLC Associates Program. As an Amazon Associate we earn from qualifying purchases at no extra cost to...
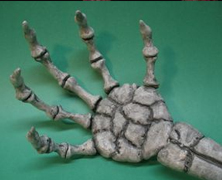
Clay Skeletal Hands
posted by SkeleTony
There’s a great tutorial on how to craft some skeletal hands out of Crayola Model Magic and coat hangers at a site called Mousecave. I’m not a good sculptor so I would normally shy away from something like this, but it sure seems super simple, and what could be easier than skeleton arms, right? Items needed to complete this include: Coat hangers – 3 to 5, depending on the length of the forearm Craft wire – any solid single strand wire will do Marker pen Lineman’s pliers – any pliers will do, so long as you can cut and bend the wire Two-part epoxy – because it’s strong and sets fast Acrylic craft paint – black and white Soft paint brush and small mixing dish Paper towels Scissors Modeling tools – nothing fancy, just something to etch some jagged lines Crayola Model Magic –...

Zombie Prom 2013 – Hartford, WI...
posted by SkeleTony
It’s good to know that after the zombie apocalypse is upon us we’ll still have to worry about other things than finding more brains…like getting a date. And just so you’re ready when this happens, you might want to attend Zombie Prom on June 1st, 2013. This fun fundraising event benefits Hartford Community Service Inc., the people responsible for the Terror on Rural Street haunt. Tickets are $15 per person in advance and $20 at the door (if not sold out). You must be 21 to attend this event, and yes, zombie attire and make-up are required (you can leave the tux at home). Zombie Prom Saturday June 1st, 2013 8:00pm – 12:00am Pikes Peak Room @ The Hartford Schauer Center $15 per Person in advance $20 at door 21 and Older Featuring: Undead DJ, Cash Bar, Free Hors D’oeuvres,Door Prizes, Zombie Prom King and Queen Contest. Buy Tickets ...
Vent Motor Headpopper...
posted by SkeleTony
If you’ve ever wanted a headpopper prop in your haunt but didn’t think that a wiper/vent motor would create a good enough effect? Relax, Dave the Dead has a really good tutorial over at HauntForum on how to create your own headpopper. What I like best about this one is that as the head peeks over the tombstone it slowly rotates its way from side to side. This makes for a much creepier effect than just a popup / popdown. Items needed for this prop include: 16″ square of 1/2 inch plywood, cut in half (two 8″ X 16″ pieces) 20″ long 1″ X 4″ wood slat 1/8 X 1/2″ aluminum bar stock, cut into 5″ and 25″ lengths 3/8″ X 4-1/2 inch lag Screw Eye (2) 1/4-20 X 1.5″ Bolts (3) 1/4-20 Nuts (2) 1/4″ lock washers (1) 1/4-20 locking nut (2) 1 1/2″ wood screws Motor 12Vdc wallwart Shop These Materials on Amazon 12V Wiper Motor 2.5" Shaft 110 Degree (prop building) PWM DC Motor Speed Controller 9-70V 35A 45Kg High-Torque Waterproof Digital Servo Motor Affiliate Disclosure: HauntersList.com is a participant in the Amazon Services LLC Associates Program. As an Amazon Associate we earn from qualifying purchases at no extra cost to...
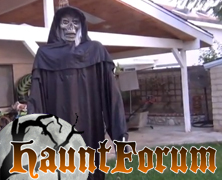
Homemade Stalkaround
posted by SkeleTony
I’ve always wanted my very own stalkaround costume. I’ve never wanted to pay $1500 for my very own stalkaround costume. Those two statements have always been synonymous until I found Rottincorps‘ video tutorial over at HauntForum, Stalkaround No Backpack. I’m not saying that I could make one as nice as Rottincorps’ myself, but I certainly feel empowered enough in the simplicity of this costume that I would be willing to give it a try. His costume turned out really nice and the motion appears as smooth as silk as he’s walking around in it. ...
The Scarecrow
posted by SkeleTony
Like a giant sentry standing guard against the legions of masked marauders that descend upon our fair homestead, the pumpkin king provides tasty treats to the interlopers in exchange for their deference. Ok, that may be waxing poetic a bit, but I’ve always wanted to build a giant Pumpkin King prop to mount to the side of our garage to welcome the neighborhood kids to our house on Halloween. Most of the ones that I’ve seen involve using vines to create the body, and while I think that those tend to look more realistic, there’s just no way that I see myself gathering all of the vine necessary to pull it off. That’s why the DemonWare Scarecrow tutorial appeals to me, because with a pvc frame, I could actually see myself getting this one done. You can still use vines to fill in the gaps, but it’s not the major component here. The best part is you can make this prop as tall as your house if you want (although the size of the pumpkin may make it look a bit disproportionate if you do). Items needed to complete this include: 20 feet of PVC pipe PVC Fittings: (2) tees, (2) 45° Angle, 2 straight 2 Yards of crinkled cotton (or other cheap material) Fake Pumpkin Sticks- 6 long ones for fingers, 6-8 short ones for ribs Screws Paint (to cover PVC) Raffia (found at local craft store) Wire RIT Dye, 2 boxes of purple or black 5 Gallon Plastic Bucket Optional Materials: Large cardboard box Leaves 50 lbs of sand Eye hooks 5ft 1/2 – 3/4 in metal pipe PVC and connectors for...