


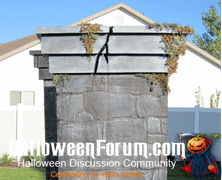
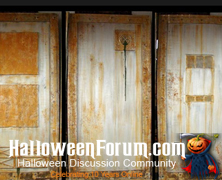
There are numerous tutorials on how to make cemetery fence so it stands to reason that there would be multiple tutorials on how to make cemetery columns, and Camsauce from HalloweenForum has a highly detailed tutorial on how to easily build some really realistic looking columns. These columns are solidly built around a 2 x 2″ lumber and OSB / Plywood base. The joint compound is spread around the entire structure to create the stone facade, which is easy to do and looks great. Once you’ve got your joint compound spread you’re ready to black wash the columns to suit your taste. It’s really that simple, and the finished product couldn’t look any more realistic without a trowel! Camsauce’s tutorial includes some optional skeletal sconces, which seem like a lot of extra work, but judging from the photo below are well worth the time and effort. Items needed to complete this include: 2 x 2″ (approx 85′) 2 x 4 (approx 16′) 2 x 6 (approx 14′) 5 sheets 4 x 8′ OSB board (or plywood) 2 sheets 2″ Styrofoam insulation 2 gallons joint compound Exterior primer Acylic paints to black wash Optional items: Moss Skeletons Candles...
Spider & Spider Victim Plans...
posted by Tony
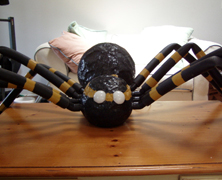
Every home deserves an over sized spider hanging around on the roof, and if you can blow up a balloon you might just be able to create your own. Dano from Dano’s Spider House has a tutorial on how to create some really good looking paper mache spiders that are worthy of any haunt. The good news is they’re easy to create and you can make them as large as you want since all of the parts used are sizable based on your needs. It”ll help if you’ve got some experience creating with paper mache, but even if you don’t you should still be able to create these awesome arachnids. Dano’s even got a great single bodied option using PVC legs that’s worth trying as well! Items needed to complete this include: Balloons Water Flour PVC connectors Foam pipe insulation Indoor/Outdoor lights Plastic semi-transparent ball Black tempera paint Waterproof sealer Coffee grounds for texture...
Dave Lowe’s Moving Eye Portrait...
posted by Tony
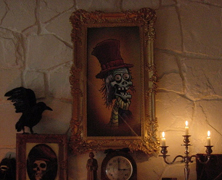
Dave Lowe is an incredibly talented artist and one heck of a prop builder, and If you’ve never checked out his Para Abnormal web comics, do not wait any longer, because there’s a pretty good chance that you’re going to love them. Anyway, he’s got a quick little tutorial on how he built his moving eye portrait. Of course, it really helps if you have your own art that you can enlarge to start with (I honestly think that if I had Dave’s artistic abilities I’d probably fill an entire room with moving eye portraits). The prop build is pretty straight forward. Once you have your favorite portrait enlarged, just cut out the eye sockets and glue two ping pong ball halves on the back (concave so they have some depth). Dave utilized green craft crystals for the iris which added a little sparkle to his portrait, but you could always just print one. That’s all there is to it, but this prop is definitely a crowd pleaser, and well worth the time it takes to create (especially if it turns out as good looking as...
Bust (fake) Holes in your Walls...
posted by Tony
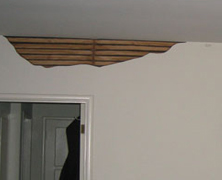
If you’re looking for an effective and inexpensive way to give your haunt some extreme distressing then you may want to check out the tutorial that Marcus132 posted over at HauntForum. His tutorial utilizes wood grain shelf paper and a little bit of paint shadowing to create a faux wood lathe look. From there, it’s just cut into cracked hole shapes an applied to the drywall. This project is just another great example of how you can sometimes get great results without having to follow long and tedious...
The Build of a GIANT PumpkinHead!...
posted by Tony
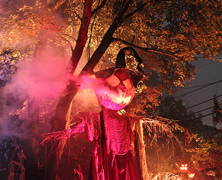
Some props are big and some props are larger than life. Rania Peet’s Build of a Giant Pumpkin tutorial falls into the “larger than life” category. I’m not even sure I would want to attempt to duplicate this, I’m pretty content to just revel in its awesomeness. This Giant Pumpkinhead Scarecrow that she built for her Haunted Garden measures in at an impressive 18-feet tall and breathes fog. That’s not just a little too cool, now, is it? If you’ve got some prop building skills you should be good to go with this tutorial as it’s a pretty straightforward build. The Pumpkin is constructed using Great Stuff sprayed over a chicken wire frame. The threaded rods are wrapped in chicken wire to help give the pumpkin its shape before the Great Stuff is sprayed on. The hat was updated on July 26th, 2013 and is now made of chicken wire with tension wire wrapped around it and tension rods to support it. The frame is then wrapped with landscape fabric with burlap applied to give it a more seasoned look. The chilled fog is pumped in through the back of the Pumpkin’s head and should be considered mandatory if you are going to attempt this prop because it looks incredible. Items needed to complete this include: PumpkinHead 2×2 wood Flat pieces of wood for bases 1/4″ threaded rods Wing nuts for rods 1″ Galvanized Chicken wire Stainless Steel Screw Eye Tie Line/Rope Cheesecloth A ton of Great Stuff Spray Foam Protective Eyewear/goggles Protective Mask White Spandex Burlap Hat 1″ and 2″ rolls of Galvanized Chicken Wire Galvanized Steel Chain Link Fence tension wire Galvanized Steel Chain Link Fence Tension Bars Zip Ties Craft wire Black Craft Fabric/Landscape Fabric...
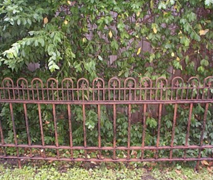
Simple Fancy Fence
posted by Tony
If you want a really good looking fence for your cemetery but don’t want to go through the heavy detail of the Faux Wrought Iron Fence tutorial, then have no fear, you can get a great effect for just pennies on the dollar if you follow this tutorial from the old abandoned Haunter’s Hangout. The fence is made of 1/2″ PVC and 1×2″ lumber, but you crown the top of it with the fancy garden fence that is available at WalMart, or most home improvement stores. After antiquing the fence a bit it looks fantastic, and the time you’ve saved in not adding the detail from the Faux Wrought Iron Fence tutorial can be better spent on other endeavors. Items needed to complete this include, but should be measured per section: 1×2″ Lumber 1/2″ PVC Decorative garden fence Black spray paint Brown craft paint Sponge...
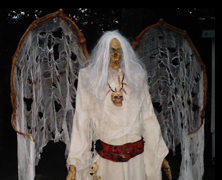
Winged Reaper
posted by Tony
I love it when you set out to build a prop a certain way and a better prop or process reveals itself to you along the way. That very scenario happened to SpyderWood when he saw a grossly overpriced Winged Reaper prop and decided to alter the course of an existing prop and build his own version. His Winged Reaper tutorial marries a Bucky skull to a Blucky torso and throws in a variety of Bucky bones for the wings. The build originally utilized the whole Blucky, but as the project progressed he realized that he’d only need the top half. With the robe covering the reaper, though, you may not even need much more than the Skull! The tricky part with this prop is obviously the wings, but if you can get the Bucky bones screwed together so they can hold the weight of the cheesecloth, the results will be spectacular. Items needed to create this include but are not limited to: 1 Blucky Skeleton 1 Bucky skull 10 to 12 assorted Bucky bones Cheesecloth Latex (for wings) 3′ – 2×4 wood 6′ – 2″...
Milk Jug Skulls
posted by Tony
What was it that Dr Kreepy said? “A home haunt without skulls is like a cake without icing”? Well what if I like a whole lotta icing? I’m a big proponent of saving money, and the less money I have to pay for a quality prop the better. Bearing that in mind, I don’t think that you can get more cost effective than this tutorial, especially if you have little kids running around your house. You see, we go through milk in my house like they’re giving it away on street corners. And being a good eco-friendly household, we’ve recycled all of our containers. But now that I’ve seen this cool tutorial that Mystang posted on the HauntForum, I realize that for every empty gallon of milk I’ve recycled, I may as well have chucked a skull in the trash. And I would never throw a skull in the trash. So if you like drinking milk and saving money on your haunt props, check out Mystang’s video tutorials on how to make Milk Jug Skulls. http://youtu.be/Ca0fEiO6FVk http://youtu.be/oUeOFOQFWWQ ...
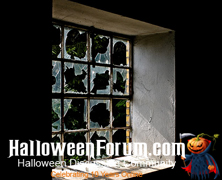
Making Glass Look Broken...
posted by Tony
The great thing about the haunting community is that when someone is struggling with an idea for a prop build there is usually someone around that has a solution, or an alternate method to accomplish the same idea. Such is the case with TK421’s solution to the question of how to make glass look broken posed at HalloweenForum. And while TK421’s solution wasn’t the only idea provided (and there were several offered), it does look to be the best. It’s very easy to do actually, utilizing frosted contact paper cut to look like cracked glass and applied to the window. The results look great....

Clockwerk’s Ghost Girl...
posted by Tony
Clockwerk from HalloweenForum has built a really eerie, almost cartoonish looking Ghost Girl and has posted some great pictures and a brief tutorial on how it was constructed. This creepy little girl sits atop her tombstone with an ominous glow beckoning passers by to enter her cemetery. There’s nothing I don’t like about this prop. Heck, I think the tombstone alone looks great, but Clockwerk has really shown some artistic skill with this girl. It seems like a pretty easy prop to build, but the arms, legs, and head may take some skill to craft (ok, so maybe it’s not that easy). You’ll need to create and mount a PVC frame to the tombstone. The head is constructed out of a styrofoam craft ball with ping pong balls (with LED’s implanted) for eyeballs, while the legs and arms are created using a combination of paper mache and Crayola model magic. Items needed to complete this include: Tombstone Styrofoam craft ball Ping Pong balls LED lights Paper Mache Crayola Model Magic (4) – 90 degree 3/4″ pvc (2 or 3) – 3/4″ pvc T joints 4 feet – 3/4″...
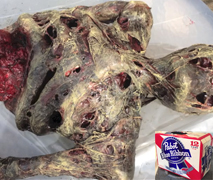
How to Make a Corpse
posted by Tony
Some people have great tutorials on how to corpsify a Bucky, and that’s truly fantastic. Others, like Mr. X & Dr. V, the brains behind MonstarCraft Productions, have tutorials on how to actually build a skeleton and then further tutorialize how to corpsify the Hell out of it. Chris, aka Mr. X sent this tutorial to HauntersList via our Facebook page, and I cannot thank him enough. The production value of the video alone is worth the time spent watching it, but the product that they’ve created in this video is nothing short of spectacular. The best part is that you get a gruesome looking prop for far less money than you would spend buying a prop as good looking as this!...
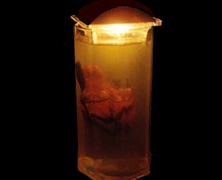
Strange Jell-O Thing
posted by Tony
It has been brought to our attention that while we’re heading in the right direction with HauntersList, we’ve completely omitted family friendly haunt projects. While this may or not be true (and it definitely is), we’ve decided to spend a little time on the softer side of haunt projects (at least for today). All hyperbole aside, this hanging heart tutorial by Uncialle’s Halloween Darksite is an easy project that really looks cool and would look great in any haunt. The best part is that the parts are really easy to come by if you don’t already own them (and trust me, you’ve already got most of these parts). Items needed to complete this include: Vase or suitable container Heart Jell-O Sticks (dowels, or pencils) Monofilament (fishing line)...
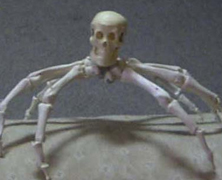
PerfessorEvil’s Mini-Spider Bucky...
posted by Tony
The late PerfessorEvil left us with a great tutorial on how to craft a truly creepy mini-spider. These gems are crafted using a pair of Bucky hands (thumbs removed) and a Tiny Tim skull. I’m not sure how many spare pairs of Bucky hands you’ve got laying around, but I know I can’t get enough of this prop. Items needed to complete this include: 2 Bucky hands (thumbs removed) Tiny Tim skull Wire Hot...
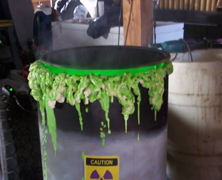
Goldie’s Toxic Waste Barrels...
posted by Tony
Woodhegm has posted a great tutorial on how to make some awesome Toxic Waste Barrels. These cool looking props utilize the same technique as Goldie’s Bubbling Halloween Cauldron, but the sheer size and the addition of fog help take this prop to new heights. I think the hardest part of this tutorial may be getting your hands on some empty 55 gallon drums, but the rest should be smooth sailing. Items needed to complete this include: 55 gallon drum 1 set orange lights (solid) 1 set orange lights (flashing) Rope party lights Great stuff Paint Fog...
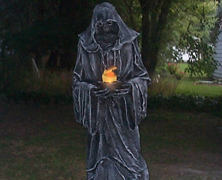
Merlin’s Reaper Stone...
posted by Tony
The old abandoned Haunter’s Hangout has a nice tutorial on how to make a great looking Monster Mud Reaper holding a faux flame light. I’ve seen a lot of tutorials on making similar props, but this one looks especially nice, and the tutorial is pretty straight forward (albeit a bit lacking in some of the details). You’ll need to create a base for the Reaper to stand on, but it’s pretty much a PVC Frame with skull and hands, chicken wire, and burlap covered in Monster Mud. Of course the faux flame light adds a bit of a wrinkle that really isn’t covered much by the tutorial, but by the looks of it, it’s well worth the extra planning. Items needed to create this include (but are not limited to): 12′ – 2 x 2″ Wood 6′ – 2 X 3″ Wood 1 – 2 x 4′ sheet 1/4″ plywood 1 – 2 x 4′ sheet 1/2″ foam board 1-1/4 by 4″ piece of pipe 1″ PVC 4 way joint 4 – 90 degree joints 3 – 45 degree joints Skull Skeletal hands Chicken wire Burlap 1/4″ bolts Aluminum stock Flame box...
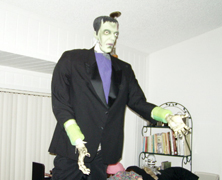
Frankenstein Plans
posted by Tony
Dano’s Spider House has what is probably the easiest set of plans I’ve ever seen to make an 8′ Frankenstein prop. The design doesn’t account for much flexibility after you create it because the PVC frame is not jointed, but if you need a prop that doesn’t require any movement, you’re all set. And if you’ve got the chops to deviate from these plans, you can add whatever flexibility you may need to your design. You’ll need to create a PVC frame, have plenty of bubble wrap, a set of hands, and a mask, but that’s pretty much it. This thing is easy to build and offers a life sized prop at barely any cost! ...
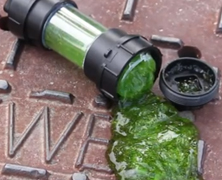
How To Make Slime
posted by Tony
Grant Thompson of thekingofrandom.com posted a great tutorial on how to create your own Slime, or as he likes to refer to it, Ninja Turtle Ooze. This is really easy to make, inexpensive, is non-toxic and looks great when you add a couple of glow sticks to it! The container he creates for it is a perfect match for radioactive ooze and is easy to make as well!...
Steel Haunt Panels
posted by Tony
If you’ve ever browsed the HalloweenForum you’re no doubt familiar with Terra. Suffice to say, she’s a prop making goddess. Her video tutorial on making steel haunt panels showcases the kind of cool, realistic looking props you can make for your haunt if you’ve got a little bit of skill and a lot of desire. This prop is not hard to create by any stretch of the imagination and won’t cost you a lot of money to create. Items needed to create one panel include: Little over one 3/4″ thick pink or blue foamboard panel Three 8′ furring strips Twelve 4″ x 1 1/2″ pieces of plywood Four 2 1/2″ coarse drywall screws Twenty-four 1 5/8″ coarse drywall screws Foamboard glue Super 77 glue Twenty 3/8″ tile spacers Quart of exterior gray Glidden Gripper paint (exterior) Silver latex paint (had used Ralph Lauren) Raw sienna acrylic paint Rust colored monster mud Light rust colored monster mud Flat black acrylic paint Clear gloss acrylic varnish Paper towels Optional Accessories include: 4 mini louvers 3″ (air vents) 1/2″ thick pink or blue foamboard panel PVC drain strainer Plastic rafter vent 16″ x 8″ air vent 16″ x 4″ air vent Hooks and zip ties for mounting to house Cement...
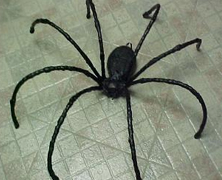
Making Spiders
posted by Tony
If you need some spiders for you web and don’t feel like purchasing posable spiders then have a look at Born2haunt’s tutorial on Making Spiders. This project is pretty easy to complete and the detail on the spider is pretty forgiving to most sculpting imperfections. Once you get started you’re not going to want to stop making these things, and that can only add to your creep quotient. Items needed to complete this include: Foam Plastic tubing Wire Latex Hot...