


There’s something completely unsettling about a decrepit looking old lady slowly rocking back and forth in her chair. If you know a decrepit looking old lady then you’re half way there, but if you don’t, you can always follow ScareFX’s tutorial and make your own Rockin’ Granny prop. What you’re building in this tutorial is a self contained rocking mechanism that you’ll build your Granny on top of. The frame is built of 2×6 material with the wiper motor mounted vertically. A piece of aluminum flat bar connects the wiper motor to a piece of 2×6 that is connected to the base via a 4″ hinge which will allow it to rock back and forth when the motor spins. The upper part of the Granny is built on the 2×6 that is hinged by connecting some 1″ PVC to the 2×6 and then creating some shoulders with the 90 degree elbows and adding some sections of pool noodles over the PVC for the upper arms. You’ll need to add some prop hands if they’ll be visible. The lower body is connected to the base and consists of a PVC T connection which connects some 1″ PVC to two 90 degree elbows and forms the legs. Again, you’ll need to add some prop legs if they’ll be visible. Once your mechanism and skeleton is complete, the entire device is connected to the rocking chair with clamps to prevent it from flying forward once it gets rocking. After you’ve got everything clamped down it’s time to put the Styrofoam head on it and you’ll probably want to put a mask on it as well. Oh, and don’t forget to put some clothes on Granny! Items needed to complete this include: Rocking Chair Wiper motor 4′ of 2×6 board 4×4 post cap & brackets (or...

Making a Medieval Cauldron...
posted by Tony
Five years ago CreepChrisS took the medieval cauldron prop build as seen on Woody Carr’s ScareFX site and won the Mad Lab’s September 2007 contest with it! His prize? A foam tombstone of course, but in doing so he’s left us all a prize in a clear and concise tutorial on how to build this fine looking cauldron. Before you do anything you’ll want to find a spare 55 gallon plastic drum, which can be tricky, but if you don’t have access to one you can always find a water storage barrel at a hardware store that will fit the bill. You’ll need to start by cutting approximately 1/4 off the top. Next you’re going to spray paint the entire barrel with your black spray paint and then add the pool noodle, sill foam, and styrofoam balls. After painting the styrofoam pieces with the black acrylic paint you’ll need to drybrush the entire cauldron with the grey and brown acrylic paints to give it some character. If you really want to make it look good, you’ll go ahead and add some Hot Burning Coals underneath it. Items needed to complete this include: 55 gallon plastic drum Pool noodle Flat black spray paint Sill foam Styrofoam balls Black acrylic paint Grey acrylic paint Brown acrylic...
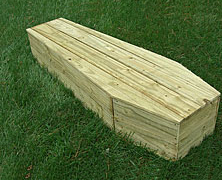
$25 Full-Size Toe-Pincher Coffin...
posted by Tony
Every haunt needs a toe pincher coffin. It’s a fact. Ok, well, it’s not a hard and fast rule, but if you’re looking for a good tutorial on how to build your own full sized toe-pincher coffin, look no further. Woody over at ScareFX has a great tutorial on how to build one and here’s the best part, his build should only cost around $25.00! You’ll need a modicum of skill with a circular or table saw to get this done, but the rest is just piecing it together and gluing / screwing the pieces in place. The thing I like best about this tutorial (besides the fact that it doesn’t involve any miter cuts) is that it looks just rough enough to be completely realistic looking. There are 100’s of tutorials on how to build a toe pincher coffin, but this is the one for me. Items needed to complete this include (ScareFX pricing included): $15 for 15 Fence Pickets $5 for drywall screws $4 for wood...