


What do you get when you take a plastic skull and shove it into a funkin foam pumpkin? Epic awesomeness is what you get my friends! Think that’s overselling it just a bit? Well, maybe it is, but after looking at the wicked Pumpkin Demon prop The-Hog-Flu built by doing just that I am content with that designation. The prop started by cutting a hole in the funkin and shoving the skull inside. Some sculpting material was then added to fill the gap between the skull and the pumpkin and to also give the face a little bit more detail. Once the sculpting material was applied and sanded down a base coat of a darker blend of orangish-brown paint was applied. The eyes were crafted out of ping pong balls and it appears that the teeth were cut from an opaque plastic bottle (the tongue is a mystery). Note to self: hot glue makes for a nice coating of drool. The lower body was constructed with a hybrid 1 x 2 wood base and a PVC spine that was wrapped with some tree branches where visible, as well as chicken wire near the lower legs. The upper chest consists of a piece of plywood. The-Hog-Flu added some spray foam over the plywood and then inserted another branch for the neck of the pumpkin demon where the head will be attached. The lower portion was also spray foamed and a variety of skulls and lesser pumpkins were peppered throughout. Once completed the upper torso was given a coat of purple spray paint while the lower body was a mixture of blood red and green. The-Hog-Flu fabricated a rib cage and some incredibly detailed arms out of branches. The word epic is too easily tossed around, but if a picture is worth a thousand...
1-2-3 EZ Creep
posted by Tony
It’s 5 pm on Halloween night and you’ve put up no decorations to great your trick or treaters. Actually, if you’re a regular at Haunter’s List, there’s probably no chance that this has ever happened to you, but it might be the type of recurring dream that plagues you. If anyone you know finds themselves in this predicament, though, tell them not to panic, because they’ve probably got all the materials they need to create this cheap and EZ Creep that SpookySam from HauntForum created. You’ll take your ladder and attach your skull (and arms if you’ve got them) to a piece of scrap wood and then set it on the paint shelf. You can add a cardboard box to the top rung of the ladder and attach it to the scrap wood. This will add a little bulk to your Creep as well as hold both items in place. The final step is to add your fabric or clothes to your creep, which can be stapled to itself to keep its shape. This creep looks great and is the perfect last minute no hassle prop to build. Items needed to create this include: Step stool (preferably with paint shelf) Foam skull (arms and hands optional) Scrap board Cardboard box Scrap cloth or landscaping...
Jeepers Peepers!
posted by Tony
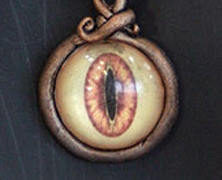
I’ve posted a couple of tutorials on how to make realistic eyes for your props, but the one that Sytnathotep posted over at HauntForum may be the easiest yet. This method only produces a half of an eye, but sometimes that’s more than enough. Before you get started on this you’re going to need to print and cut your iris to fit the circumference of your round palettes. Once you’re ready to start it’s just a matter of pouring some of the epoxy into the palette, making sure to leave a little room for another pour. Place your iris face down into the palette and push it slightly into the epoxy making sure that it’s completely covered, then add enough epoxy so it’s completely level with the top of your palette. That’s all there is to it! Once they’re dry, just pound them out of the palette and you’re good to go. Items needed to complete this include: Plastic paint palettes Smooth-On’s Epoxy Cast 690 Iris...
Bust (fake) Holes in your Walls...
posted by Tony
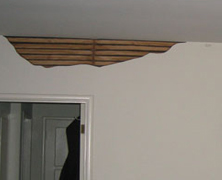
If you’re looking for an effective and inexpensive way to give your haunt some extreme distressing then you may want to check out the tutorial that Marcus132 posted over at HauntForum. His tutorial utilizes wood grain shelf paper and a little bit of paint shadowing to create a faux wood lathe look. From there, it’s just cut into cracked hole shapes an applied to the drywall. This project is just another great example of how you can sometimes get great results without having to follow long and tedious...
Milk Jug Skulls
posted by Tony
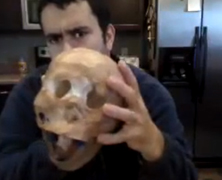
What was it that Dr Kreepy said? “A home haunt without skulls is like a cake without icing”? Well what if I like a whole lotta icing? I’m a big proponent of saving money, and the less money I have to pay for a quality prop the better. Bearing that in mind, I don’t think that you can get more cost effective than this tutorial, especially if you have little kids running around your house. You see, we go through milk in my house like they’re giving it away on street corners. And being a good eco-friendly household, we’ve recycled all of our containers. But now that I’ve seen this cool tutorial that Mystang posted on the HauntForum, I realize that for every empty gallon of milk I’ve recycled, I may as well have chucked a skull in the trash. And I would never throw a skull in the trash. So if you like drinking milk and saving money on your haunt props, check out Mystang’s video tutorials on how to make Milk Jug Skulls. http://youtu.be/Ca0fEiO6FVk http://youtu.be/oUeOFOQFWWQ ...
The Bride of Articulation...
posted by Tony
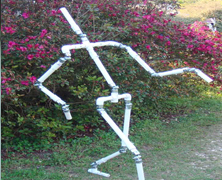
If you’re building any type of body form PVC is ultimately going to be the best framing option. Wood is good, but PVC is worry free (I want credit for that phrase if it catches on). Anyway, if you like the Movable PVC Joints tutorial then you’re really going to like this one. The Bride of Articulation tutorial that Beelce over at HauntForum has provided us is an incredible example of how to create the skeleton for any form you’re creating. You can literally create any pose that you want, and then cover it in any fashion you see fit. This is not a difficult tutorial, and allows for incredibly detailed forms. Items needed to complete this include (but will need to be calculated per joint): 1″ PVC (for the bones) 1″ PVC coupling Post caps for each joint Flat washers Lock washers Bolts Lock nuts Drywall / Deck screws ...
Vent Motor Headpopper...
posted by Tony
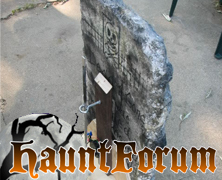
If you’ve ever wanted a headpopper prop in your haunt but didn’t think that a wiper/vent motor would create a good enough effect? Relax, Dave the Dead has a really good tutorial over at HauntForum on how to create your own headpopper. What I like best about this one is that as the head peeks over the tombstone it slowly rotates its way from side to side. This makes for a much creepier effect than just a popup / popdown. [iframe src=”http://vid105.photobucket.com/player.swf?file=http://vid105.photobucket.com/albums/m240/davethedead/headpopper%20prop/headpopperprop.flv&sr=1″ width=”425″ height=”350″] Items needed for this prop include: 16″ square of 1/2 inch plywood, cut in half (two 8″ X 16″ pieces) 20″ long 1″ X 4″ wood slat 1/8 X 1/2″ aluminum bar stock, cut into 5″ and 25″ lengths 3/8″ X 4-1/2 inch lag Screw Eye (2) 1/4-20 X 1.5″ Bolts (3) 1/4-20 Nuts (2) 1/4″ lock washers (1) 1/4-20 locking nut (2) 1 1/2″ wood screws Motor 12Vdc...
Homemade Stalkaround
posted by Tony
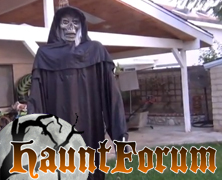
I’ve always wanted my very own stalkaround costume. I’ve never wanted to pay $1500 for my very own stalkaround costume. Those two statements have always been synonymous until I found Rottincorps‘ video tutorial over at HauntForum, Stalkaround No Backpack. I’m not saying that I could make one as nice as Rottincorps’ myself, but I certainly feel empowered enough in the simplicity of this costume that I would be willing to give it a try. His costume turned out really nice and the motion appears as smooth as silk as he’s walking around in it. ...
Zombie Doll
posted by Tony
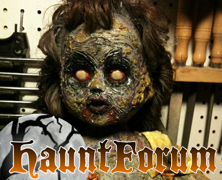
What’s more creepy than those two little girls from The Shining? How about imagining the creepy dolls those girls would play with! I expect that they would look something like the zombie dolls that Cyclonejack from HauntForum creates, and he’s been nice enough to create a video detailing exactly how to make them. They look amazingly creepy and the only real cost involved is the doll and some paint! If you have a creepy little girl in your haunt, be sure to make one of these for her, because nothing says “abnormal” quite like a little girl that would play with one of these!...
Super Sticky Cobwebs
posted by Tony
If you’ve ever used the stretchable spider webs that everyone sells you know that they sometimes don’t stay stretched quite as nicely as you’d like them to. Well the tutorial below from the Dapper Cadaver might be just the solution you’re looking for. I originally found this video in a post on HauntForum, and I strongly urge you to read the posts associated with it. The Dapper Cadaver uses 3M 90 spray adhesive to get the webbing super tacky, which results in a highly flammable finished product. The group over at HauntForum have weighed in on some suggestions to combat the flammability, but do use extra caution if you are going to attempt this. Despite the fact that this is a pretty permanent and highly flammable solution, I have to admit, it does provide some quality looking cobwebs....
Simple Pneumatic Ground Breaker...
posted by Tony
I gotta admit, when I first watched Casa Fear’s tutorial on how to build a simple pneumatic ground breaker at HauntForum, I didn’t think the finished product was going to be worth the effort. The frame of this prop doesn’t exactly inspire confidence that it’s going to stay in one piece, let alone be creepy looking. Boy was I wrong. And that’s what’s so great about this prop. It’s simple to build, won’t break the bank, and really results in a great prop. The quick jerking of the cylinders creates a nice startling effect that you just don’t get from a standard ground breaker. So if you’ve got your head wrapped around the pneumatics, the rest of this prop should be smooth sailing for you. Items needed for this prop include: 6′ of 2×4 2 pneumatic cylinders 2 foot brackets 2 rod clevis 2 clevis mounting brackets 2 – 4 way solenoid valves 1 prop controller 4 – 3″ hinges (wrist/elbow) 2 – 2.8″ hinges (shoulders) 12 carriage bolts (attaching cylinders) 10 flat phillips bolts (hinges) 2 hex bolts (shoulders) Locking nuts/washers for all bolts Plywood for base ...
Mr. Chicken’s Madame Leota...
posted by Tony
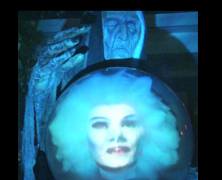
This prop tutorial is an oldie but a goodie. I first saw Mr. Chicken’s Madame Leota tutorial when it appeared on HauntForum. He moved it to the Mr. Chicken’s Yard Haunt blog quite a while ago and it deserves to be featured because of the great job he did on it. Positioning of the projector on this prop is just as essential and tricky as creating the form inside the globe and will make or break this effect....