


If you have access to a sandbox, or even just have some sand and a box you can put it to good use in making some skulls using the sand casting tutorial that partsman at HalloweenForum wrote. You’ll need some play sand, a box, some great stuff, and a foam skull (or whatever you chose to cast). Once you’ve got all your supplies, you’re basically just pressing the skull into the sand and packing the sand really tight around it. Once it’s packed, just remove the form and add some great stuff to the impression you’ve created. As you can see the resulting product has a really great looking stone appearance to it....
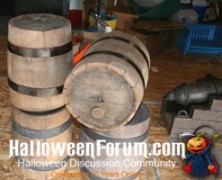
Foam Barrels
posted by Tony
Ok, since September 19th was International Talk Like a Pirate Day, (and I was completely unaware of this fact), I thought I’d post the tutorial that fravak from HalloweenForum penned on how to make foam barrels. The barrels are crafted using styrofoam blocks, the kind that are used to stack small flatbed trailers, and while these may be hard to come by, even if you don’t need barrels and have access to these, they are gold, take them. Since the foam blocks start out square, fravak utilized the lid from a 5-gallon bucket to outline the round shape you’ll need. From there the corners were cut off using a hot wire cutter and the entire block was sanded down using a drywall rasp to round it out. Once this is complete the detailing of the barrel will actually begin. A soldering iron will be needed to carve out the individual pieces of wood on all sides of the barrel. Once this is complete you can add some finer detail by adding graining to all the wood planks with the soldering iron. Fravak utilized paper mache for the straps around the barrels and a piece of blue foam for the plug. Once all of these steps are complete it’s time to paint it up. The base is a browish color while the top he top is covered with a black wash that fravak rubbed all over the barrel to make the color more uneven. The end result is phenomenal, these barrels look completely realistic they don’t cost much, and they’re light as a feather. So next International Talk Like a Pirate Day, don’t forget to grab one of your barrels as you strut around town saying “Ahoy, me hearties, let’s see what crawled out of the bung hole.”, it’ll just make a lot more...

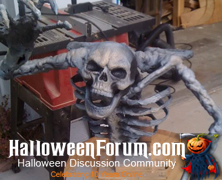
Spider Egg Sack
posted by Tony
WIth all the spider tutorials that we’ve been posting lately, isn’t it about time you see where they all come from? The answer, of course, is from Spider Egg sacs, and Voodoo Willy from Halloween Forum has a great tutorial on how to create them. These egg sacs are crafted using chicken wire wrapped in polyester batting to form the mass of the prop. The ping pong balls are then glued to the surface of the egg sac and the entire sac is painted. After its dried up the webbing is dipped in latex and stretched around the egg sac. They’re easy to produce and are a creepy finishing touch to any haunt that has a giant spider. Items needed to complete this include: Chicken wire Wire cutters Ping pong balls exacto blade Hot glue gun polyester batting (the thin kind) Spider webbing Liquid latex airbrush acrylic...
PVC Skeletons
posted by Tony
Not all grave grabbers need to be motorized, and if you’re interested in building an inexpensive one that still looks good then checkout LastHouse’s tutorial over at HalloweenForum. It’s a pretty easy project that allows for plenty of artistic freedom, but you will need a little bit of skill to cut the PVC for the rib cage, and of course you’ll need a blowtorch to get the PVC hot enough to bend. Once the ribcage is done, though, you’re all set to pose and bring your skeleton to life. The nice thing about this prop is that while it may look like a complete disaster while you’re framing it, once you’ve coated it with the Great Stuff and painted it up, it’ll take on a life of its own. And don’t forget to reference LastHouse’s tutorial on skeletal hands to add to your skeleton. Items needed to complete this include: Two 3/4 ” pieces of PVC 3 PVC T’s Some scrap 2 x 4 Hot glue ( LOTS) Liquid Nails Great Stuff Some Scrap foam Duct tape Drylock paint Model Magic clay...
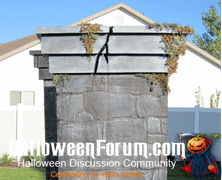
Nightmare on Bayshore Crypt Cemetery Columns...
posted by Tony
There are numerous tutorials on how to make cemetery fence so it stands to reason that there would be multiple tutorials on how to make cemetery columns, and Camsauce from HalloweenForum has a highly detailed tutorial on how to easily build some really realistic looking columns. These columns are solidly built around a 2 x 2″ lumber and OSB / Plywood base. The joint compound is spread around the entire structure to create the stone facade, which is easy to do and looks great. Once you’ve got your joint compound spread you’re ready to black wash the columns to suit your taste. It’s really that simple, and the finished product couldn’t look any more realistic without a trowel! Camsauce’s tutorial includes some optional skeletal sconces, which seem like a lot of extra work, but judging from the photo below are well worth the time and effort. Items needed to complete this include: 2 x 2″ (approx 85′) 2 x 4 (approx 16′) 2 x 6 (approx 14′) 5 sheets 4 x 8′ OSB board (or plywood) 2 sheets 2″ Styrofoam insulation 2 gallons joint compound Exterior primer Acylic paints to black wash Optional items: Moss Skeletons Candles...
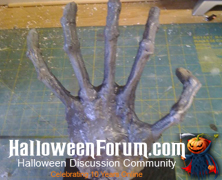
Cheap and easy Skeleton Hands...
posted by Tony
Since many of the prop builds featured on HauntersList involve PVC frames it’s probably not a bad idea to post another tutorial on how to create hands for those frames. LastHouse from HalloweenForum has a tutorial on how to make some gruesome looking skeletal hands that won’t take you too long and the cost is next to nothing. They’re made of styrofoam and wood dowels coated with a little hot glue and then painted. The hardest part about this tutorial is melting the styrofoam to give them a more natural boney look. Make sure to do this step in a well ventilated area as burning styrofoam can be highly toxic (it’s a good idea to wear a respirator). Items needed to complete this include: Styrofoam Hot Glue Wooden dowels Drylock Paint...

Clockwerk’s Ghost Girl...
posted by Tony
Clockwerk from HalloweenForum has built a really eerie, almost cartoonish looking Ghost Girl and has posted some great pictures and a brief tutorial on how it was constructed. This creepy little girl sits atop her tombstone with an ominous glow beckoning passers by to enter her cemetery. There’s nothing I don’t like about this prop. Heck, I think the tombstone alone looks great, but Clockwerk has really shown some artistic skill with this girl. It seems like a pretty easy prop to build, but the arms, legs, and head may take some skill to craft (ok, so maybe it’s not that easy). You’ll need to create and mount a PVC frame to the tombstone. The head is constructed out of a styrofoam craft ball with ping pong balls (with LED’s implanted) for eyeballs, while the legs and arms are created using a combination of paper mache and Crayola model magic. Items needed to complete this include: Tombstone Styrofoam craft ball Ping Pong balls LED lights Paper Mache Crayola Model Magic (4) – 90 degree 3/4″ pvc (2 or 3) – 3/4″ pvc T joints 4 feet – 3/4″...

Movable PVC Joints
posted by Tony
Discozombie over at HalloweenForum.com has come up with a great way to give your PVC creations moveable joints. This technique is so simple to do, but really gives your creations an added level of realism. Items needed to create this include: PVC Heat gun clamp sander or grinder drill Bolts Locking Nuts...