


I love scarecrows. There’s something eerily majestic about the way they stand guard over isolated fields, just swaying in the wind. They’re selfless as they monitor everything that happens, day and night, silently watching. Waiting. I’m pretty sure they eat the birds that make the mistake of landing on them, and its entirely possible that they do get off their perches and walk around while I’m asleep, but, I can’t confirm that. With all of that said, if you’re interested in building a scarecrow, Nightfisher posted some great details on the build of his Creepy Scarecrow over at the HalloweenForum that are worth looking at. This project started by hot glueing some burlap over a foam skull and stretching it tight so most of the features of the skull would be visible through the burlap. After adding some stains and shadows Nightfisher added some large metal staples along the scarecrows mouth. The skull itself rests on a PVC spine. The shoulders and arms of the scarecrow were crafted with some heavy branches. The torso was created by spraying some Great Stuff over a 2 inch block of styrofoam. Nightfisher did an awesome job of spraying the ribs with expanding foam because I’ve got to imagine that was a fairly stressful process. A few vines were sprayed over the ribs as well to complete the torso. Once completed some black latex was painted in between the ribs and all of the crevices of the torso. A base coat of brown was dry brushed on after the black latex dried followed by another layer of black and a final coat of light brown. The vines were given a coat of green paint. Finishing touches included adding some stitches to the eyes, wrapping some twine around the joints of the arms and hands, and of course, adding a...

Wailing Tree
posted by Tony
When I was little the one thing that used to creep me out more than anything was walking through any kind of wooded area. I was certain the trees were alive and it would absolutely freak the heck out of me. I never truly felt like I was alone out there. Thank goodness I didn’t see the Wailing Tree that the Ghostess over at the Dead End created when I was a kid, because I’m pretty sure I wouldn’t have ever gone near a tree again. The frame of this tree is made of PVC while the body is a combination of chicken wire, paper mache, and a little bit of Great Stuff to seal the bottom. While not tremendously hard to create, you can tell that the Ghostess really put a lot of care into the creation of this prop. It’s an absolute thing of beauty, and I don’t think I’d be happy building just one, I want a whole forest of these things! Items needed to complete this include: 1 Bucky Skull PVC (variable depending on the size) Chicken wire Paper mache Great Stuff 14 gauge wire (for branches) Silk leaves DryLok masonry sealer Black / Brown / Gray Paint...
Make Monster and Alien Feet...
posted by Tony
Dave Simon is a good dad. I don’t actually know Dave, but any father that makes his three year old daughter a pair of pink and purple monster feet is my kind of dad. His tutorial on how to Make Monster & Alien Feet is not only easy and inexpensive, but the feet actually look fantastic. And since they’re made using Crocs as a base, you know they’re really comfortable too! Items needed to complete this include: Old or new foam shoes Great Stuff minimal expanding foam Disposable gloves Newspaper Spray...
PVC Skeletons
posted by Tony
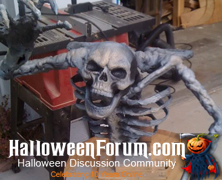
Not all grave grabbers need to be motorized, and if you’re interested in building an inexpensive one that still looks good then checkout LastHouse’s tutorial over at HalloweenForum. It’s a pretty easy project that allows for plenty of artistic freedom, but you will need a little bit of skill to cut the PVC for the rib cage, and of course you’ll need a blowtorch to get the PVC hot enough to bend. Once the ribcage is done, though, you’re all set to pose and bring your skeleton to life. The nice thing about this prop is that while it may look like a complete disaster while you’re framing it, once you’ve coated it with the Great Stuff and painted it up, it’ll take on a life of its own. And don’t forget to reference LastHouse’s tutorial on skeletal hands to add to your skeleton. Items needed to complete this include: Two 3/4 ” pieces of PVC 3 PVC T’s Some scrap 2 x 4 Hot glue ( LOTS) Liquid Nails Great Stuff Some Scrap foam Duct tape Drylock paint Model Magic clay...
The Build of a GIANT PumpkinHead!...
posted by Tony
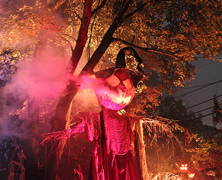
Some props are big and some props are larger than life. Rania Peet’s Build of a Giant Pumpkin tutorial falls into the “larger than life” category. I’m not even sure I would want to attempt to duplicate this, I’m pretty content to just revel in its awesomeness. This Giant Pumpkinhead Scarecrow that she built for her Haunted Garden measures in at an impressive 18-feet tall and breathes fog. That’s not just a little too cool, now, is it? If you’ve got some prop building skills you should be good to go with this tutorial as it’s a pretty straightforward build. The Pumpkin is constructed using Great Stuff sprayed over a chicken wire frame. The threaded rods are wrapped in chicken wire to help give the pumpkin its shape before the Great Stuff is sprayed on. The hat was updated on July 26th, 2013 and is now made of chicken wire with tension wire wrapped around it and tension rods to support it. The frame is then wrapped with landscape fabric with burlap applied to give it a more seasoned look. The chilled fog is pumped in through the back of the Pumpkin’s head and should be considered mandatory if you are going to attempt this prop because it looks incredible. Items needed to complete this include: PumpkinHead 2×2 wood Flat pieces of wood for bases 1/4″ threaded rods Wing nuts for rods 1″ Galvanized Chicken wire Stainless Steel Screw Eye Tie Line/Rope Cheesecloth A ton of Great Stuff Spray Foam Protective Eyewear/goggles Protective Mask White Spandex Burlap Hat 1″ and 2″ rolls of Galvanized Chicken Wire Galvanized Steel Chain Link Fence tension wire Galvanized Steel Chain Link Fence Tension Bars Zip Ties Craft wire Black Craft Fabric/Landscape Fabric...

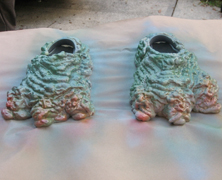
Cheap Easy Skulls
posted by Tony
In the immortal words of Dr. Kreepy, “A home haunt without skulls is like a cake without icing…” And to the great benefit of us all, Dr. Kreepy has given us the icing (in video form) in his tutorial on how to make your own skulls using Great Stuff expanding foam. There are a few variables that can affect your success in making your own skulls using this tutorial, but even your failures will result in useable skulls. A few of mine resulted in really thin sliver sections of the skull that seem more like broken fragments that had been bashed in. They looked great just laying in front of my tombstones. For the price per skull, you cannot go wrong in doing this tutorial, just don’t make too much of a mess. Items needed to create this include: Hollow plastic skull Great Stuff expanding foam Vaseline Duct Tape Latex Gloves...