


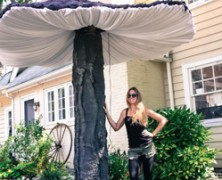
Ever hear the phrase “Go big or go home”? Well I’m pretty sure Rania Peet has, and her larger than life Halloween props sure live up to that standard. This time she’s set her sites on The Build of Giant Mushrooms, and her finished fungi could not have turned out any better! Her mushroom build is broken down into three core parts: the stem, the cap and the underside gills. Realistically, I could get the stem and the cap done, but I’d probably fail miserably on the gills. The top and bottom of the stem was made from 3/4″ plywood. She used (3) 2x4s in the center to create an approximately 18″ diameter stem. The 2×4’s are secured to the base using lag screws and washers for extreme strength and stability. For her build, Rania was lucky enough to have access to a wood cable spool which provided the perfect oversized round base. The stem was then wrapped with chicken wire. The build of the mushroom cap is pretty ingenious, it consists of a 1′ piece of 4×4 that is securely screwed to a sheet of plywood with lag screws. She then proceeded to bore four holes through the four by four and ran some rigid electrical conduit through it. Once in place the conduit was bent to provide the cap with a more “mushroom” shaped appearance. Some 3/4″ poly-flex tubing was screwed to the end of the rigid conduit to give the cap a finished, rounded edge. A layer of chicken wire was then added to the cap which was covered with a dense cheesecloth to hold the layers of spray foam. Think Rania bought a couple of cans of Great Stuff? Guess again, because this is where she takes this project up a...
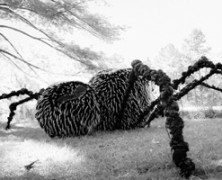
The Build of a Giant Spider...
posted by Tony
It seems like we can’t go more than a few weeks without a good spider tutorial here at Haunter’s List, but Rania Peet’s latest prop tutorial, The Build of a Giant Spider is way better than “good”. This is one oversized arachnid that could not possibly have turned out any better. In her tutorial you’ll start off making your head and body out of tension wire covered with chicken wire. The tension wire comes round but is completely bendable to get whatever shape you see fit to make, it doesn’t necessarily have to be round. The base is a rounded sheet of plywood that holds securely in place the 8 pieces of pvc that will form your legs. Once the base is complete and painted, the body of your spider can be connected to it via a piece of metal flat bar. The legs consist of three sections of 1″ pvc, a 5′ section that comes off the 45 degree fittings at the base, then connects to a 3′ section at the middle of the leg, and finishes with a 2′ section at the end. Once the legs are attached Rania wrapped the pvc with some burlap and proceeded to spray Great Stuff in the gap. The Great Stuff pushes the burlap and expands through the tiny gaps creating an amazingly creepy appearance that look both bulbous and hairy (just as I suspect spider legs would look like if you enlarged them to 17 feet in diameter). Once complete they legs were coated with flat black spray paint. The body is covered with several yards of two tone long pile fur that were applied in sections. The fur can be costly, but you cannot beat the appearance it gives the spider, it’s creepy unto...