


Nothing looks better than a well crafted Monster Mud Reaper standing guard over your cemetery. As he welcomes recently departed souls to their final resting grounds, this dark and foreboding spirit will cause all eyes to focus their attention to him if for no other reason than to make sure he isn’t actually alive. And the best part is, he’s pretty easy to build if you follow the tutorial that Jimmyzdc wrote up at HalloweenForum. The frame of your reaper will be created by securing a steel flange to a 2 x 2′ piece of MDF board and then threading a 4” steel pipe to the flange. You’ll connect the PVC that will create your reaper’s spine to the 4″ steel pipe and then connect your 4 way PVC cross fitting to the top so you can add your arms. Once the PVC frame is complete you’ll wrap some chicken wire around the skeleton for the reaper’s body and then measure out your burlap and drape it on the chicken wire to verify you have the correct size and shape for the reaper you want. Once you have the reaper shaped to your liking you’ll peel your burlap off and dip it in your monster mud until its completely submerged in the mud. Once coated, remove it from the mud and squeeze off the excess mud as you pull. Re-drape it on your frame and continue until you’ve got all of your burlap reassembled on the reaper. Once coated in monster mud, make sure you use a some Drylock masonry sealer to weather proof your reaper otherwise you may have a mess on your hands if it rains. Items needed to complete this include: (2) 90 degree PVC elbows (3) 45 degree PVC elbows (1) 4-Way PVC...

Mr. Gravedigger
posted by Tony
I’ve wanted to build every prop I’ve come across lately, but none as much as I want to build this one. The Gravedigger that Mizerella at 102 Wicked Things To Do created for her cemetery is amazing looking and doesn’t seem that difficult to pull off (said the guy that’s never created an entire person out of paper mache). The head of this fellow will take the most care and attention to detail when creating. It’s made using a foam skull that’s a blend of paper mache, mache pulp, and Creative paper clay. The features of his face including the nose, ears, tongue, teeth and eye brows will need to be built up with the Creative paper clay which is where some basic sculpting abilities will come in handy. Once you’ve got the head done you’re almost done. The rest of the prop is a pvc frame that’s been heated and bent to give him a warped stance. The pvc frame is then covered in chicken wire and paper mached numerous times. The arms and legs incorporated pool noodles to build them up before coating them in paper mache. The final piece of the puzzle when creating this fellow were the hands, which were a mixture of wire, cut straws and many layers of paper mache and mache pulp. Once all of the pieces of the puzzle are complete it’s just a matter of dressing this guy up in your favorite old clothes and finding a final resting spot for him. Mizerella’s gravedigger looks incredible and I’m a little skeptical on whether I can make one that looks as nice, but I will definitely be giving this guy a...

Chicken Wire Ghosts
posted by Tony
I’m going to be honest here, I’m not sure exactly who is making all of these chicken wire ghosts for their haunts, but I’m guessing that their hands and arms are covered with tiny little red spots from where the chicken wire pierced their skin. Seriously, though, I’ve noticed that a ton of people lately are searching for the chicken wire ghost prop, and while it’s not something that I would ever consider doing, they sure do look cool when they’re done right. Shawn and Lynne Mitchell have put together a pretty concise DIY tutorial on how to make these. You can make them with or without the cheesecloth dressing to get the look that’s best for you. Items needed to complete this include: semi-transparent fabric S-hooks thin wire mannequin head roll of chicken wire with 1-inch cells roll of chicken wire with 2-inch cells wire cutters cheesecloth scissors wire hanger work...

Wailing Tree
posted by Tony
When I was little the one thing that used to creep me out more than anything was walking through any kind of wooded area. I was certain the trees were alive and it would absolutely freak the heck out of me. I never truly felt like I was alone out there. Thank goodness I didn’t see the Wailing Tree that the Ghostess over at the Dead End created when I was a kid, because I’m pretty sure I wouldn’t have ever gone near a tree again. The frame of this tree is made of PVC while the body is a combination of chicken wire, paper mache, and a little bit of Great Stuff to seal the bottom. While not tremendously hard to create, you can tell that the Ghostess really put a lot of care into the creation of this prop. It’s an absolute thing of beauty, and I don’t think I’d be happy building just one, I want a whole forest of these things! Items needed to complete this include: 1 Bucky Skull PVC (variable depending on the size) Chicken wire Paper mache Great Stuff 14 gauge wire (for branches) Silk leaves DryLok masonry sealer Black / Brown / Gray Paint...

The Making of Grim
posted by Tony
In 2008 the Grim Hollow Haunt created an incredible looking prop simply named Grim. This sinister looking creation stands approximately 5 feet tall and represents everything I fear is walking through the woods at night. I cannot imagine a better prop to welcome guests to a haunt than Grim, and thankfully, Grim, host of the Grim Hollow Haunt has left a short tutorial on the steps needed to create this amazing monstrosity. This creation rests on a 1 x 2″ wood skeleton that is covered in chicken wire and paper mache. The hands and feet are simply wire coat hangers with duct tape wrapped around them. Grim did some additional distressing of the creature via rope vines and cheesecloth, while a foam Funkin head was carved and given an ominous paint job. Items needed to complete this include: 1 x 2″ lumber 1 x 3″ lumber Chicken wire Wire coat hangers Paper mache Duct tape Rope (as needed) Flat black paint Cheesecloth Foam Funkin...

The Build of a GIANT PumpkinHead!...
posted by Tony
Some props are big and some props are larger than life. Rania Peet’s Build of a Giant Pumpkin tutorial falls into the “larger than life” category. I’m not even sure I would want to attempt to duplicate this, I’m pretty content to just revel in its awesomeness. This Giant Pumpkinhead Scarecrow that she built for her Haunted Garden measures in at an impressive 18-feet tall and breathes fog. That’s not just a little too cool, now, is it? If you’ve got some prop building skills you should be good to go with this tutorial as it’s a pretty straightforward build. The Pumpkin is constructed using Great Stuff sprayed over a chicken wire frame. The threaded rods are wrapped in chicken wire to help give the pumpkin its shape before the Great Stuff is sprayed on. The hat was updated on July 26th, 2013 and is now made of chicken wire with tension wire wrapped around it and tension rods to support it. The frame is then wrapped with landscape fabric with burlap applied to give it a more seasoned look. The chilled fog is pumped in through the back of the Pumpkin’s head and should be considered mandatory if you are going to attempt this prop because it looks incredible. Items needed to complete this include: PumpkinHead 2×2 wood Flat pieces of wood for bases 1/4″ threaded rods Wing nuts for rods 1″ Galvanized Chicken wire Stainless Steel Screw Eye Tie Line/Rope Cheesecloth A ton of Great Stuff Spray Foam Protective Eyewear/goggles Protective Mask White Spandex Burlap Hat 1″ and 2″ rolls of Galvanized Chicken Wire Galvanized Steel Chain Link Fence tension wire Galvanized Steel Chain Link Fence Tension Bars Zip Ties Craft wire Black Craft Fabric/Landscape Fabric...
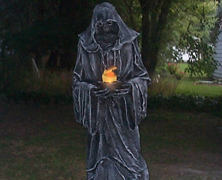
Merlin’s Reaper Stone...
posted by Tony
The old abandoned Haunter’s Hangout has a nice tutorial on how to make a great looking Monster Mud Reaper holding a faux flame light. I’ve seen a lot of tutorials on making similar props, but this one looks especially nice, and the tutorial is pretty straight forward (albeit a bit lacking in some of the details). You’ll need to create a base for the Reaper to stand on, but it’s pretty much a PVC Frame with skull and hands, chicken wire, and burlap covered in Monster Mud. Of course the faux flame light adds a bit of a wrinkle that really isn’t covered much by the tutorial, but by the looks of it, it’s well worth the extra planning. Items needed to create this include (but are not limited to): 12′ – 2 x 2″ Wood 6′ – 2 X 3″ Wood 1 – 2 x 4′ sheet 1/4″ plywood 1 – 2 x 4′ sheet 1/2″ foam board 1-1/4 by 4″ piece of pipe 1″ PVC 4 way joint 4 – 90 degree joints 3 – 45 degree joints Skull Skeletal hands Chicken wire Burlap 1/4″ bolts Aluminum stock Flame box...
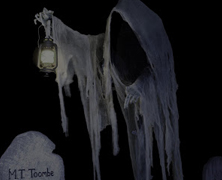
Grim Hollow’s Cloaked Ghost...
posted by Tony
There’s a great tutorial on how to make a Cloaked Ghost over at Grim Hollow that is well worth your time to check out. This eerie prop was inspired by Pumpkinrot’s Cloaked Ghost and is pretty easy to build for something so awesome looking. It looks great both day and night and is sure to be an attention grabber at your haunt. Items needed to create this include: 5′ – 1-1/2″ pvc pipe 10′ – 1 x 2 wood Chicken Wire Burlap Monster Mud Glue Sticks Cheesecloth Lantern Plywood (for base)...