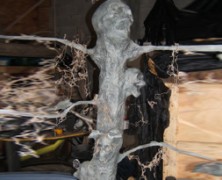
The Haunted Yard in Ontario, Canada is host to Draven Cemetery, which is apparently so terrifying that it is actually scaring the trees! Well, at least one that we know of. The Petrified Tree is the brainchild of Trevor Baldwin, owner and caretaker of Draven Cemetery, and it’s a great looking prop that’s fairly simple to complete. The prop is composed of a post with a pool noodle wrapped around it to add some bulk to it. Some wire from coat hangers is used to make the branches of the tree. Once you have the general shape of a tree the skulls can be added to the tree. In the tutorial, three mini plastic skulls and one full sized plastic skull were used, but that can obviously be determined by the size of your tree. Trevor actually cut the jaws off the skulls before attaching them to the tree so that once attached the jaws could be added in more of a screaming position. With the skulls in place a few plastic leaves were added to the branches before a coat of paper mache was added to the entire tree. Once the paper mache was completed a coat of mossy green paint was dry brushed on followed by a coat of black paint to highlight the texture and shadows. The final step for this project was to add some fake moss around the tree. It’s a pretty simple project but it looks fantastic and is sure to be a head turner. Items needed to complete this include: A post Pool noodle 3 small pastic skulls 1 life sized plastic skull Coat hanger wire Plastic leaves White glue Spray bottle Paper towel Fake moss Paint Shop These Materials on Amazon Instant Paper Mache...

Burlap Skulls
posted by SkeleTony
If you’re looking for a creative alternative to the paper mache skull then feast your eyes on the tutorial for Burlap Skulls that OctART posted over at the HalloweenForum. It’s pretty much the same process as making a paper mache skull (although considerably less messy) and the finished burlap skull looks amazingly creepy with a tea light inside. You’ll need to start by wrapping your skull with aluminum foil and then cut your burlap into strips. Grab your hot glue gun and start to apply the burlap over the foil covering as much of the skull as necessary. You’ll want to make sure that you don’t use too much glue in the back so you’ll be able to pull it off the skull. Also, if you’re planning on using a tea light, make sure you’re only applying one layer of burlap where your light will shine through. You’ll have to remove the foil from those areas as well. Once all the burlap is in place and dried you can remove it from the skull and spray it will some of your sealant. Items needed to complete this include: Skull Aluminum foil Burlap Hot glue Spray sealant Tea lights (optional) Shop These Materials on Amazon Instant Paper Mache Powder Mix 3.3 lbs Assorted 12" Latex Balloons 120-Pack Realistic Replica Human Skull Statue 6.5" 5.4ft Full Size Halloween Foam Skeleton Affiliate Disclosure: HauntersList.com is a participant in the Amazon Services LLC Associates Program. As an Amazon Associate we earn from qualifying purchases at no extra cost to...
Silicone Skull Mold
posted by SkeleTony
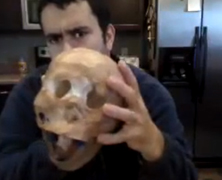
If you’re interested in making your own skulls, and I’m talking seriously making a lot of your own skulls, then you’re going to need a pretty serious mold to cast them in. You can use the Cheap Easy Skulls method provided by Dr. Kreepy, but if you’re interested in some serious skulls you’re going to want to checkout the tutorial that The Devil’s Workshop posted. Creating your mold is a pretty elaborate process but this two part tutorial will walk you through the process from start to finish. http://youtu.be/T261p0MAHdA Shop These Materials on Amazon Realistic Replica Human Skull Statue 6.5" 5.4ft Full Size Halloween Foam Skeleton Affiliate Disclosure: HauntersList.com is a participant in the Amazon Services LLC Associates Program. As an Amazon Associate we earn from qualifying purchases at no extra cost to...

Sand Casting Skulls
posted by SkeleTony
If you have access to a sandbox, or even just have some sand and a box you can put it to good use in making some skulls using the sand casting tutorial that partsman at HalloweenForum wrote. You’ll need some play sand, a box, some great stuff, and a foam skull (or whatever you chose to cast). Once you’ve got all your supplies, you’re basically just pressing the skull into the sand and packing the sand really tight around it. Once it’s packed, just remove the form and add some great stuff to the impression you’ve created. As you can see the resulting product has a really great looking stone appearance to it. Shop These Materials on Amazon Realistic Replica Human Skull Statue 6.5" 5.4ft Full Size Halloween Foam Skeleton Affiliate Disclosure: HauntersList.com is a participant in the Amazon Services LLC Associates Program. As an Amazon Associate we earn from qualifying purchases at no extra cost to...
The Making Skulls Series...
posted by SkeleTony
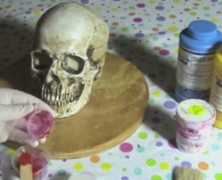
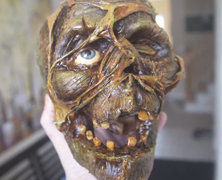
What makes Canadian skulls better than American Skulls? Brad Goodspeed,of course! The skulls he produces in his Making Skulls series of videos are so good looking it’s hard to believe that they start off being a cheap styrofoam skull. These videos are an invaluable tool to anyone that wants to create gruesome looking skulls. There’s a ton of useful information packed into 40 minutes that every haunter needs to see. And don’t forget to check out the Making Glow In The Dark Teeth tutorial to make some teeth for your skulls! Shop These Materials on Amazon Creature Liquid Latex 16oz Clear Special Effects Cheesecloth Unbleached (for draping and corpsing) Polyester Fiberfill Stuffing 30 LB Bag Realistic Replica Human Skull Statue 6.5" 5.4ft Full Size Halloween Foam Skeleton XPS Foam Board 1" Thick Craft Sheets 4-Pack 4-in-1 Hot Wire Foam Cutter Kit 15W Loctite Power Grab Foam-Safe Construction Adhesive Affiliate Disclosure: HauntersList.com is a participant in the Amazon Services LLC Associates Program. As an Amazon Associate we earn from qualifying purchases at no extra cost to...
Making Glow In The Dark Teeth...
posted by SkeleTony
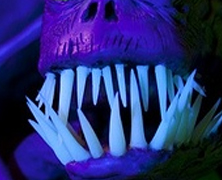
If you’ve taken the time to follow Dr. Kreepy’s tutorial on making Cheap Easy Skulls, you’ve no doubt ended up with a boatload of superb looking skulls. The only thing that could possibly make those skulls look better is a little variety. And what can help give a skull some variety better than some realistic looking teeth. Well the Devil’s Workshop has a tutorial on how to make glow in the dark teeth that will really help. It’s a reallysimple process involving a mixture of translucent white and glow in the dark baking clay. http://youtu.be/FbjK2r1Wv0A Shop These Materials on Amazon Realistic Replica Human Skull Statue 6.5" 5.4ft Full Size Halloween Foam Skeleton Affiliate Disclosure: HauntersList.com is a participant in the Amazon Services LLC Associates Program. As an Amazon Associate we earn from qualifying purchases at no extra cost to...
Milk Jug Skulls
posted by SkeleTony
What was it that Dr Kreepy said? “A home haunt without skulls is like a cake without icing”? Well what if I like a whole lotta icing? I’m a big proponent of saving money, and the less money I have to pay for a quality prop the better. Bearing that in mind, I don’t think that you can get more cost effective than this tutorial, especially if you have little kids running around your house. You see, we go through milk in my house like they’re giving it away on street corners. And being a good eco-friendly household, we’ve recycled all of our containers. But now that I’ve seen this cool tutorial that Mystang posted on the HauntForum, I realize that for every empty gallon of milk I’ve recycled, I may as well have chucked a skull in the trash. And I would never throw a skull in the trash. So if you like drinking milk and saving money on your haunt props, check out Mystang’s video tutorials on how to make Milk Jug Skulls. http://youtu.be/Os1Wj-VeYvA Shop These Materials on Amazon Realistic Replica Human Skull Statue 6.5" 5.4ft Full Size Halloween Foam Skeleton Affiliate Disclosure: HauntersList.com is a participant in the Amazon Services LLC Associates Program. As an Amazon Associate we earn from qualifying purchases at no extra cost to...

Cheap Easy Skulls
posted by SkeleTony
In the immortal words of Dr. Kreepy, “A home haunt without skulls is like a cake without icing…” And to the great benefit of us all, Dr. Kreepy has given us the icing (in video form) in his tutorial on how to make your own skulls using Great Stuff expanding foam. There are a few variables that can affect your success in making your own skulls using this tutorial, but even your failures will result in useable skulls. A few of mine resulted in really thin sliver sections of the skull that seem more like broken fragments that had been bashed in. They looked great just laying in front of my tombstones. For the price per skull, you cannot go wrong in doing this tutorial, just don’t make too much of a mess. Items needed to create this include: Hollow plastic skull Great Stuff expanding foam Vaseline Duct Tape Latex Gloves http://www.youtube.com/watch?v=edhDTaLMpng Shop These Materials on Amazon Great Stuff Gaps & Cracks Expanding Foam 12oz Professional Spray Foam Applicator Gun (2-Pack) XPS Foam Board 1" Thick Craft Sheets 4-Pack 4-in-1 Hot Wire Foam Cutter Kit 15W Loctite Power Grab Foam-Safe Construction Adhesive Realistic Replica Human Skull Statue 6.5" 5.4ft Full Size Halloween Foam Skeleton Affiliate Disclosure: HauntersList.com is a participant in the Amazon Services LLC Associates Program. As an Amazon Associate we earn from qualifying purchases at no extra cost to...