
What do you get when you take a plastic skull and shove it into a funkin foam pumpkin? Epic awesomeness is what you get my friends! Think that’s overselling it just a bit? Well, maybe it is, but after looking at the wicked Pumpkin Demon prop The-Hog-Flu built by doing just that I am content with that designation. The prop started by cutting a hole in the funkin and shoving the skull inside. Some sculpting material was then added to fill the gap between the skull and the pumpkin and to also give the face a little bit more detail. Once the sculpting material was applied and sanded down a base coat of a darker blend of orangish-brown paint was applied. The eyes were crafted out of ping pong balls and it appears that the teeth were cut from an opaque plastic bottle (the tongue is a mystery). Note to self: hot glue makes for a nice coating of drool. The lower body was constructed with a hybrid 1 x 2 wood base and a PVC spine that was wrapped with some tree branches where visible, as well as chicken wire near the lower legs. The upper chest consists of a piece of plywood. The-Hog-Flu added some spray foam over the plywood and then inserted another branch for the neck of the pumpkin demon where the head will be attached. The lower portion was also spray foamed and a variety of skulls and lesser pumpkins were peppered throughout. Once completed the upper torso was given a coat of purple spray paint while the lower body was a mixture of blood red and green. The-Hog-Flu fabricated a rib cage and some incredibly detailed arms out of branches. The word epic is too easily tossed around, but if a picture is worth a thousand...

Installing a Servo in a Bucky Skull...
posted by SkeleTony
There’s nothing more satisfying than creating your own talking skull. I would have no way of knowing this since I opted to purchase one for fear that I would horribly botch the installation, but I honestly suspect there’s nothing more satisfying than creating your own. With that in mind, Scary Terry has a great tutorial on Installing a Servo in a Bucky Skull. You’ll start by building a mounting bracket for your servo out of aluminum and then you’ll mount the servo bracket in the Bucky skull (ok, there’s a little more to it, but trust me, you’re going to need to check out Scary Terry’s Tutorial). You’re going to break the jaw of your skull next and reconnect it utilizing the zip ties as the new pivot point of the jaw. You’ll next drill a hole in the skull and connect the servo to the jaw using a piece of the music wire. That’s all there is to it, more or less, but you’ll still need an audio circuit to drive the servo. Luckily, Scary Terry has an audio circuit solution as well! Items needed to complete this include: Bucky Skull Servo (HiTec HS-425BB – See details at ServoCity) (2) 3/4″ long 1″x1″x1/16″ angle aluminum 0.039″ Music wire, aka piano wire (1) 1/2″ #6 screw, nut, washer Servo mounting hardware (#4/ 40 screws and nuts) (2) 4″ Zip ties Shop These Materials on Amazon Realistic Replica Human Skull Statue 6.5" 5.4ft Full Size Halloween Foam Skeleton Affiliate Disclosure: HauntersList.com is a participant in the Amazon Services LLC Associates Program. As an Amazon Associate we earn from qualifying purchases at no extra cost to...

Creepy Scarecrow
posted by SkeleTony
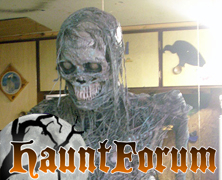
I love scarecrows. There’s something eerily majestic about the way they stand guard over isolated fields, just swaying in the wind. They’re selfless as they monitor everything that happens, day and night, silently watching. Waiting. I’m pretty sure they eat the birds that make the mistake of landing on them, and its entirely possible that they do get off their perches and walk around while I’m asleep, but, I can’t confirm that. With all of that said, if you’re interested in building a scarecrow, Nightfisher posted some great details on the build of his Creepy Scarecrow over at the HalloweenForum that are worth looking at. This project started by hot glueing some burlap over a foam skull and stretching it tight so most of the features of the skull would be visible through the burlap. After adding some stains and shadows Nightfisher added some large metal staples along the scarecrows mouth. The skull itself rests on a PVC spine. The shoulders and arms of the scarecrow were crafted with some heavy branches. The torso was created by spraying some Great Stuff over a 2 inch block of styrofoam. Nightfisher did an awesome job of spraying the ribs with expanding foam because I’ve got to imagine that was a fairly stressful process. A few vines were sprayed over the ribs as well to complete the torso. Once completed some black latex was painted in between the ribs and all of the crevices of the torso. A base coat of brown was dry brushed on after the black latex dried followed by another layer of black and a final coat of light brown. The vines were given a coat of green paint. Finishing touches included adding some stitches to the eyes, wrapping some twine around the joints of the arms and hands, and of course, adding a...
1-2-3 EZ Creep
posted by SkeleTony
It’s 5 pm on Halloween night and you’ve put up no decorations to great your trick or treaters. Actually, if you’re a regular at Haunter’s List, there’s probably no chance that this has ever happened to you, but it might be the type of recurring dream that plagues you. If anyone you know finds themselves in this predicament, though, tell them not to panic, because they’ve probably got all the materials they need to create this cheap and EZ Creep that SpookySam from HauntForum created. You’ll take your ladder and attach your skull (and arms if you’ve got them) to a piece of scrap wood and then set it on the paint shelf. You can add a cardboard box to the top rung of the ladder and attach it to the scrap wood. This will add a little bulk to your Creep as well as hold both items in place. The final step is to add your fabric or clothes to your creep, which can be stapled to itself to keep its shape. This creep looks great and is the perfect last minute no hassle prop to build. Items needed to create this include: Step stool (preferably with paint shelf) Foam skull (arms and hands optional) Scrap board Cardboard box Scrap cloth or landscaping fabric Shop These Materials on Amazon Realistic Replica Human Skull Statue 6.5" 5.4ft Full Size Halloween Foam Skeleton Affiliate Disclosure: HauntersList.com is a participant in the Amazon Services LLC Associates Program. As an Amazon Associate we earn from qualifying purchases at no extra cost to...

Mr. Gravedigger
posted by SkeleTony
I’ve wanted to build every prop I’ve come across lately, but none as much as I want to build this one. The Gravedigger that Mizerella at 102 Wicked Things To Do created for her cemetery is amazing looking and doesn’t seem that difficult to pull off (said the guy that’s never created an entire person out of paper mache). The head of this fellow will take the most care and attention to detail when creating. It’s made using a foam skull that’s a blend of paper mache, mache pulp, and Creative paper clay. The features of his face including the nose, ears, tongue, teeth and eye brows will need to be built up with the Creative paper clay which is where some basic sculpting abilities will come in handy. Once you’ve got the head done you’re almost done. The rest of the prop is a pvc frame that’s been heated and bent to give him a warped stance. The pvc frame is then covered in chicken wire and paper mached numerous times. The arms and legs incorporated pool noodles to build them up before coating them in paper mache. The final piece of the puzzle when creating this fellow were the hands, which were a mixture of wire, cut straws and many layers of paper mache and mache pulp. Once all of the pieces of the puzzle are complete it’s just a matter of dressing this guy up in your favorite old clothes and finding a final resting spot for him. Mizerella’s gravedigger looks incredible and I’m a little skeptical on whether I can make one that looks as nice, but I will definitely be giving this guy a shot. Shop These Materials on Amazon 5-Pack Foam RIP Tombstone Blanks for Carving...
Zombie Build
posted by SkeleTony
I’m truly amazed at some of the great looking props that people are able to build that cost next to nothing, and the creative ways they go about accomplishing it. Sytnathotep is one such prop builder with his 1/2 zombie build, which looks great and probably didn’t cost a whole lot. The spine of the zombie is crafted using three three foot sections of 12/2 electrical wire that are braided together to give it some extra rigidity. Since this is a 1/2 zombie it doesn’t have to support any real weight (no legs). The shoulders are 3/4″ pvc connected via a cross fit connection that slides over the spine while the collar bones are more 12/2 electrical wire, and the scapulas are styrofoam insulation. With a wire clothes hanger ribcage and hands made out of wire with plastic pen tube fingers this project is not exactly breaking the bank. Once the skull slides onto the electrical wire all that’s left to do is corpse and paint this bad boy! What I really like about Sytnathotep’s zombie is his corpsing technique. He used the melted plastic method as a base, but then stretched cheesecloth and spider web dipped in a 50/50 mixture of black latex house paint and elmers glue all over the zombie. It really does give the appearance of rotting flesh and is well worth the effort and the mess that it creates. Items needed to complete this include: 12′ – 12/2 electrical wire Skull 6 wire clothes hangers 1 pvc cross fit connector Scrap styrofoam 10 Plastic pen tubes Duct tape Plastic for corpsing Cheesecloth / Spider webbing Latex paint Elmers glue Shop These Materials on Amazon 1" Schedule 40 PVC Pipe 6-Pack Ratcheting PVC Pipe Cutter (up to 1-1/4") 1" PVC...
PVC Skeletons
posted by SkeleTony
Not all grave grabbers need to be motorized, and if you’re interested in building an inexpensive one that still looks good then checkout LastHouse’s tutorial over at HalloweenForum. It’s a pretty easy project that allows for plenty of artistic freedom, but you will need a little bit of skill to cut the PVC for the rib cage, and of course you’ll need a blowtorch to get the PVC hot enough to bend. Once the ribcage is done, though, you’re all set to pose and bring your skeleton to life. The nice thing about this prop is that while it may look like a complete disaster while you’re framing it, once you’ve coated it with the Great Stuff and painted it up, it’ll take on a life of its own. And don’t forget to reference LastHouse’s tutorial on skeletal hands to add to your skeleton. Items needed to complete this include: Two 3/4 ” pieces of PVC 3 PVC T’s Some scrap 2 x 4 Hot glue ( LOTS) Liquid Nails Great Stuff Some Scrap foam Duct tape Drylock paint Model Magic clay Skull Shop These Materials on Amazon Great Stuff Gaps & Cracks Expanding Foam 12oz Professional Spray Foam Applicator Gun (2-Pack) 1" Schedule 40 PVC Pipe 6-Pack Ratcheting PVC Pipe Cutter (up to 1-1/4") 1" PVC Furniture Fittings Assortment 12-Pack Oatey PVC Clear Cement + Primer Handy Pack Realistic Replica Human Skull Statue 6.5" 5.4ft Full Size Halloween Foam Skeleton Affiliate Disclosure: HauntersList.com is a participant in the Amazon Services LLC Associates Program. As an Amazon Associate we earn from qualifying purchases at no extra cost to...
Milk Jug Skulls
posted by SkeleTony
What was it that Dr Kreepy said? “A home haunt without skulls is like a cake without icing”? Well what if I like a whole lotta icing? I’m a big proponent of saving money, and the less money I have to pay for a quality prop the better. Bearing that in mind, I don’t think that you can get more cost effective than this tutorial, especially if you have little kids running around your house. You see, we go through milk in my house like they’re giving it away on street corners. And being a good eco-friendly household, we’ve recycled all of our containers. But now that I’ve seen this cool tutorial that Mystang posted on the HauntForum, I realize that for every empty gallon of milk I’ve recycled, I may as well have chucked a skull in the trash. And I would never throw a skull in the trash. So if you like drinking milk and saving money on your haunt props, check out Mystang’s video tutorials on how to make Milk Jug Skulls. http://youtu.be/Os1Wj-VeYvA Shop These Materials on Amazon Realistic Replica Human Skull Statue 6.5" 5.4ft Full Size Halloween Foam Skeleton Affiliate Disclosure: HauntersList.com is a participant in the Amazon Services LLC Associates Program. As an Amazon Associate we earn from qualifying purchases at no extra cost to...

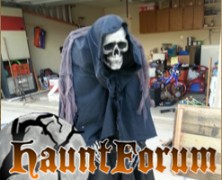
Merlin’s Reaper Stone...
posted by SkeleTony
The old abandoned Haunter’s Hangout has a nice tutorial on how to make a great looking Monster Mud Reaper holding a faux flame light. I’ve seen a lot of tutorials on making similar props, but this one looks especially nice, and the tutorial is pretty straight forward (albeit a bit lacking in some of the details). You’ll need to create a base for the Reaper to stand on, but it’s pretty much a PVC Frame with skull and hands, chicken wire, and burlap covered in Monster Mud. Of course the faux flame light adds a bit of a wrinkle that really isn’t covered much by the tutorial, but by the looks of it, it’s well worth the extra planning. Items needed to create this include (but are not limited to): 12′ – 2 x 2″ Wood 6′ – 2 X 3″ Wood 1 – 2 x 4′ sheet 1/4″ plywood 1 – 2 x 4′ sheet 1/2″ foam board 1-1/4 by 4″ piece of pipe 1″ PVC 4 way joint 4 – 90 degree joints 3 – 45 degree joints Skull Skeletal hands Chicken wire Burlap 1/4″ bolts Aluminum stock Flame box Shop These Materials on Amazon 1/2" Hardware Cloth 19-Gauge 48"x100ft Galvanized Roll Aviation Tin Snips 3-pc Set (straight/left/right) USG Sheetrock Drywall Joint Compound 4.5 Gallon Cheesecloth Unbleached 36×36" (for Monster Mud draping) 1" Schedule 40 PVC Pipe 6-Pack Ratcheting PVC Pipe Cutter (up to 1-1/4") 1" PVC Furniture Fittings Assortment 12-Pack Oatey PVC Clear Cement + Primer Handy Pack Realistic Replica Human Skull Statue 6.5" 5.4ft Full Size Halloween Foam Skeleton Affiliate Disclosure: HauntersList.com is a participant in the Amazon Services LLC Associates Program. As an Amazon Associate we earn from qualifying purchases at no extra cost to...