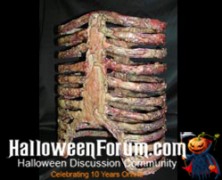
If you need a rib cage for your haunt and are down to you last few bucks, don’t worry, be happy, because the Count over at the HalloweenForum has created a tutorial on how to create a Cheap Skeletal Rib Cage. It all starts with a trip to WalMart to pickup one of their 18″ high, plain white plastic trash cans. You’ll want to draw your ribcage, sternum and spine on the trash can (the Count recommends using 1/2″ masking tape to delineate the ribs). Once your outline is complete you’ll need to grab a pair of tin snips and carefully cut out the dead space between the ribs. Make sure to save the bottom and top for last to provide extra stability to the trash can. Once the ribcage is cut it’s time to put some meat on those ribs! The Count mixed and quickly spread several batches of a two part polyurethane foam on his ribcage. Once dried a few layers of reddish brown and black latex paint were added followed by a final coat of lacquer. The finished ribcage looks great and I never would have guessed that it came from WalMart! Items needed to complete this include: 18″ White trash can 2 part Polyurethane foam Reddish brown latex paint Black latex paint...