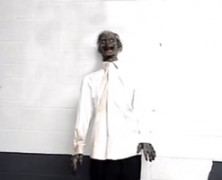
Spider Hill Prop Works has posted a great video detailing the framework for their Swaying Zombie prop. This silent film is meant to be more of a companion to the full Swaying Zombie Tutorial they put together which details the build. The parts list included details everything you’ll need to get this up and running and contains many of the pvc fittings and articulating joints that they sell. The frame consists of a plywood base with two pvc legs attached that connect to another plywood base that forms the waist. The wiper motor is mounted on the waist plywood and a swivel assembly is created out of pvc that connects the upper body of the zombie to the drive arm of the wiper motor. This will eventually create the swaying motion for your zombie. It’s a pretty intricate build that will require a delicate hand when setting up. The tutorial is well laid out with great images and descriptions to give you everything you need to get your zombie swaying short of a hula hoop and some extra brains. Items needed to complete this include: 10.5 feet of schedule 40 1 inch PVC pipe 4 feet of schedule 40 ½ inch PVC pipe (6) UMB-1 Universal Mounting Bases (2) ST-1 1 inch PVC slip-T fittings (1) Schedule 40 1 inch PVC cross fitting (1) Schedule 40 1 inch PVC T fitting (2) Schedule 40 1 inch PVC 45 elbows (1) Schedule 40 1 inch to ½ inch PVC reducer 12 Volt wiper motor with 5 volt power supply wiper motor bracket (hauntedparts.com) Approx. 25 #10 x 5/8” self drilling screws (1) ¼” x 20 x 3 ½” hex bolt (4) ¼” x 20 x 1 inch hex bolts (1) ¼” x 20...
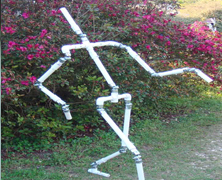
The Bride of Articulation...
posted by SkeleTony
If you’re building any type of body form PVC is ultimately going to be the best framing option. Wood is good, but PVC is worry free (I want credit for that phrase if it catches on). Anyway, if you like the Movable PVC Joints tutorial then you’re really going to like this one. The Bride of Articulation tutorial that Beelce over at HauntForum has provided us is an incredible example of how to create the skeleton for any form you’re creating. You can literally create any pose that you want, and then cover it in any fashion you see fit. This is not a difficult tutorial, and allows for incredibly detailed forms. Items needed to complete this include (but will need to be calculated per joint): 1″ PVC (for the bones) 1″ PVC coupling Post caps for each joint Flat washers Lock washers Bolts Lock nuts Drywall / Deck screws Shop These Materials on Amazon 1" Schedule 40 PVC Pipe 6-Pack Ratcheting PVC Pipe Cutter (up to 1-1/4") 1" PVC Furniture Fittings Assortment 12-Pack Oatey PVC Clear Cement + Primer Handy Pack Realistic Replica Human Skull Statue 6.5" 5.4ft Full Size Halloween Foam Skeleton Affiliate Disclosure: HauntersList.com is a participant in the Amazon Services LLC Associates Program. As an Amazon Associate we earn from qualifying purchases at no extra cost to...