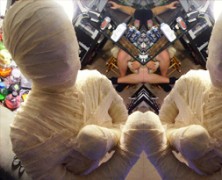
I’ve wanted to post a tutorial for a full-sized mummy for a while and haven’t been able to find one that I thought turned out a really good looking classic mummy. It’s ironic that when I did find one it came from the Crafty Mommy and Me website, which is probably not where I would have started looking in the first place, but I’m really glad I found it. This prop started with Crafty Mommy wrapping her waist and legs in trash bags and having someone start wrapping duct tape around her starting at the waist down. Once she was wrapped all the way down to her feet she was cut out of the duct tape wrapping by cutting a straight line down the back. The same technique should be used to wrap the torso as well,only when cutting your model out you’ll have to cut the back as well as both arms. The lower half was then connected to the upper half and they were taped together. When taping the head you can choose to wrap your model’s head, or if anxiety is an issue, wrap a styrofoam head and then attach it to the body. Once the mummy form was complete, Crafty Mommy coated the form with some white spray paint before wrapping the entire form with a layer of tea stained gauze. The final wrapping consists of tea stained cheese cloth. This last layer is the most important since it will be the most visible layer, so make sure you cover your mummy well. This prop can be a tricky and labor intensive project, but the mummy you will produce will be well worth the time and effort. Items needed to complete this include: Trash bags 3 Rolls duct tape White spray...
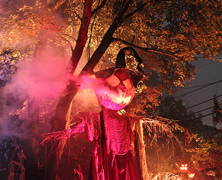
The Build of a GIANT PumpkinHead!...
posted by SkeleTony
Some props are big and some props are larger than life. Rania Peet’s Build of a Giant Pumpkin tutorial falls into the “larger than life” category. I’m not even sure I would want to attempt to duplicate this, I’m pretty content to just revel in its awesomeness. This Giant Pumpkinhead Scarecrow that she built for her Haunted Garden measures in at an impressive 18-feet tall and breathes fog. That’s not just a little too cool, now, is it? If you’ve got some prop building skills you should be good to go with this tutorial as it’s a pretty straightforward build. The Pumpkin is constructed using Great Stuff sprayed over a chicken wire frame. The threaded rods are wrapped in chicken wire to help give the pumpkin its shape before the Great Stuff is sprayed on. The hat was updated on July 26th, 2013 and is now made of chicken wire with tension wire wrapped around it and tension rods to support it. The frame is then wrapped with landscape fabric with burlap applied to give it a more seasoned look. The chilled fog is pumped in through the back of the Pumpkin’s head and should be considered mandatory if you are going to attempt this prop because it looks incredible. Items needed to complete this include: PumpkinHead 2×2 wood Flat pieces of wood for bases 1/4″ threaded rods Wing nuts for rods 1″ Galvanized Chicken wire Stainless Steel Screw Eye Tie Line/Rope Cheesecloth A ton of Great Stuff Spray Foam Protective Eyewear/goggles Protective Mask White Spandex Burlap Hat 1″ and 2″ rolls of Galvanized Chicken Wire Galvanized Steel Chain Link Fence tension wire Galvanized Steel Chain Link Fence Tension Bars Zip Ties Craft wire Black Craft Fabric/Landscape Fabric...
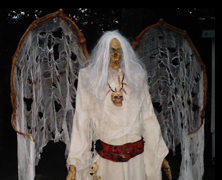
Winged Reaper
posted by SkeleTony
I love it when you set out to build a prop a certain way and a better prop or process reveals itself to you along the way. That very scenario happened to SpyderWood when he saw a grossly overpriced Winged Reaper prop and decided to alter the course of an existing prop and build his own version. His Winged Reaper tutorial marries a Bucky skull to a Blucky torso and throws in a variety of Bucky bones for the wings. The build originally utilized the whole Blucky, but as the project progressed he realized that he’d only need the top half. With the robe covering the reaper, though, you may not even need much more than the Skull! The tricky part with this prop is obviously the wings, but if you can get the Bucky bones screwed together so they can hold the weight of the cheesecloth, the results will be spectacular. Items needed to create this include but are not limited to: 1 Blucky Skeleton 1 Bucky skull 10 to 12 assorted Bucky bones Cheesecloth Latex (for wings) 3′ – 2×4 wood 6′ – 2″ PVC Shop These Materials on Amazon Instant Paper Mache Powder Mix 3.3 lbs Assorted 12" Latex Balloons 120-Pack Affiliate Disclosure: HauntersList.com is a participant in the Amazon Services LLC Associates Program. As an Amazon Associate we earn from qualifying purchases at no extra cost to...
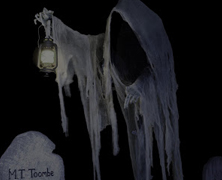
Grim Hollow’s Cloaked Ghost...
posted by SkeleTony
There’s a great tutorial on how to make a Cloaked Ghost over at Grim Hollow that is well worth your time to check out. This eerie prop was inspired by Pumpkinrot’s Cloaked Ghost and is pretty easy to build for something so awesome looking. It looks great both day and night and is sure to be an attention grabber at your haunt. Items needed to create this include: 5′ – 1-1/2″ pvc pipe 10′ – 1 x 2 wood Chicken Wire Burlap Monster Mud Glue Sticks Cheesecloth Lantern Plywood (for base) Shop These Materials on Amazon Instant Paper Mache Powder Mix 3.3 lbs Assorted 12" Latex Balloons 120-Pack 1/2" Hardware Cloth 19-Gauge 48"x100ft Galvanized Roll Aviation Tin Snips 3-pc Set (straight/left/right) USG Sheetrock Drywall Joint Compound 4.5 Gallon Cheesecloth Unbleached 36×36" (for Monster Mud draping) 1" Schedule 40 PVC Pipe 6-Pack Ratcheting PVC Pipe Cutter (up to 1-1/4") 1" PVC Furniture Fittings Assortment 12-Pack Oatey PVC Clear Cement + Primer Handy Pack Affiliate Disclosure: HauntersList.com is a participant in the Amazon Services LLC Associates Program. As an Amazon Associate we earn from qualifying purchases at no extra cost to...