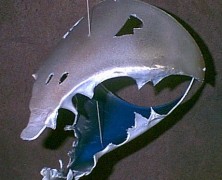
TheIronMan has a tutorial that proves that if you’re creative enough you can make a monster out of just about anything. The Bucket Head Monster is a surreal looking character that is easy to make and costs next to nothing (quite possibly nothing if you look hard enough). You’ll start by cutting your craft paper so that it wraps all the way around the bucket, then cutting the paper lengthwise, folding it over, and then taping the two pieces together. You’ll need to draw your monster head on the paper similar to the image. Once complete, cut the shape with the scissors and tape the resulting template onto the pail. Using the marker trace the template onto the bucket. Cut out the template you just traced onto the bucket with your jigsaw and connect the two pieces by drilling holes in the base of each piece and securing the bolts. Once your head starts to take shape you’ll want to use the heat gun to shape the monster’s teeth. Simply heat the plastic until soft and let gravity do the rest. Add a coat of spray paint to your Bucket Head Monster and your build is complete! You can rig your monster with some fishing line by drilling a few small holes in the top of the head and the lower jaw which will allow you to add some motion to the jaw. Items needed to complete this include: 5 gallon bucket. Marker. Jig saw. Heat gun Craft paper Scissors. (2) #8-32 X 3/4″ bolts and nuts. High strength fishing line Spray paint ...
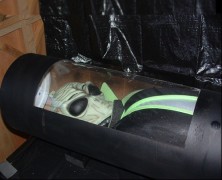
Alien Sleep Tube
posted by SkeleTony
Aliens exist. And since aliens exist it is not much of a stretch to assume that aliens sleep. And if aliens do sleep, I am going to assume that their advanced alien minds have probably followed jakel’s lead and bypassed the box spring and mattress in favor of Alien Sleep Tubes. This prop is super easy to make and looks seriously cool when lit up. Start out by cutting a square approximately 18″ x 20″ on one end of the tube. Spray the two lids and tube with the black spray paint and start to build your alien. Once the paint is dry you can roll the plexiglass and slide it into the tube so that it is covering the opening you cut. Letting the Alien Sleep Tube sit in a warm area for a couple of days will allow the plastic to relax inside the tube. Once the plexiglass has set you can insert your alien into his sleep chamber and seal him in with the bucket lids for his eternal (if not seasonal) slumber. Items needed to complete this include: Alien mask / costume 12″ concrete tube Pillow for alien body (2) – 5 gallon bucket lids (one with a port if you want to add fog) Flashlight 24″ x 24″ x 1/16″...
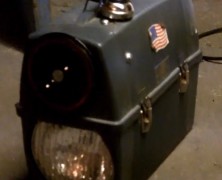
Blow Horn Light
posted by SkeleTony
A quick blast from a horn coupled with a burst of light can be startling and disorienting when you’re making your way through a haunt, and those are always two great benchmarks to strive for. Brad Silvertein of Brads Boo Barn has a tutorial for making Blow Horn Lights, which will more than accomplish this, and the idea of putting it inside a lunch pail allows for it to become the perfect portable solution as well! Items needed to complete this include: Lunch pail 12volt 8amp sealed lead acid battery Flashlight Horn Horn switch Wire Foam insulation ...
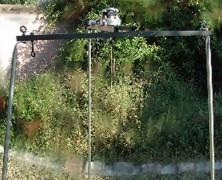
FCG Stand
posted by SkeleTony
Mounting your Flying Crank Ghost can be a challenge, especially if you’ve got nothing above it to hang it from. The Wolfstone Group had this same problem and came up with the idea to Mount a Flying Crank Ghost using electrical metallic tubing (EMT). Its a really creative and simple idea that allows you to get your Flying Crank Ghost really high off the ground. You’ll need to start by pounding the ends of three 1/2″ EMT conduit completely flat. Next, you’ll bend the flattened ends to almost 90 degrees and then drill a hole through the flattened end. Once flattened and drilled, you’ll simply bolt it to your Flying Crank Ghost frame at it’s three main points. The great part about this is you can join multiple lengths of EMT with EMT tubing couplers. You’ll have to determine how much wind you’re going to have to account for when deciding how high to go, but it shouldn’t be too much of a stretch to get your Flying Crank Ghost up at least 10 feet if not more! Items needed to complete this include: Flying Crank Ghost assembly (3) – 10′ sections of 1/2″ EMT (3) – 1/2″ EMT tubing couplets (3) – nuts / bolts to secure EMT to FCG frame Black spray paint Shop These Materials on Amazon 1/3HP Replacement Ceiling Fan Motor (for FCG builds) Braided Fishing Line — thin gauge for rigging 120" Wide White Sheer Voile Fabric x 25 Yards Affiliate Disclosure: HauntersList.com is a participant in the Amazon Services LLC Associates Program. As an Amazon Associate we earn from qualifying purchases at no extra cost to...

Pumpkin Demon
posted by SkeleTony
What do you get when you take a plastic skull and shove it into a funkin foam pumpkin? Epic awesomeness is what you get my friends! Think that’s overselling it just a bit? Well, maybe it is, but after looking at the wicked Pumpkin Demon prop The-Hog-Flu built by doing just that I am content with that designation. The prop started by cutting a hole in the funkin and shoving the skull inside. Some sculpting material was then added to fill the gap between the skull and the pumpkin and to also give the face a little bit more detail. Once the sculpting material was applied and sanded down a base coat of a darker blend of orangish-brown paint was applied. The eyes were crafted out of ping pong balls and it appears that the teeth were cut from an opaque plastic bottle (the tongue is a mystery). Note to self: hot glue makes for a nice coating of drool. The lower body was constructed with a hybrid 1 x 2 wood base and a PVC spine that was wrapped with some tree branches where visible, as well as chicken wire near the lower legs. The upper chest consists of a piece of plywood. The-Hog-Flu added some spray foam over the plywood and then inserted another branch for the neck of the pumpkin demon where the head will be attached. The lower portion was also spray foamed and a variety of skulls and lesser pumpkins were peppered throughout. Once completed the upper torso was given a coat of purple spray paint while the lower body was a mixture of blood red and green. The-Hog-Flu fabricated a rib cage and some incredibly detailed arms out of branches. The word epic is too easily tossed around, but if a picture is worth a thousand...
Home Made Pressure Plate...
posted by SkeleTony
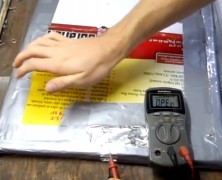
A while back I mentioned that I’m not much of an electrician, and this tutorial pretty much puts the exclamation point on that thought. I’m pretty sure there should be more than just cardboard and aluminum foil needed to generate power of any kind, but that’s literally all that’s needed to power the Pressure Plate that Rick Osgood made in this tutorial. It’s a great way to save a few bucks and still get a trigger for your props!...
How To Build A Treasure Chest...
posted by SkeleTony
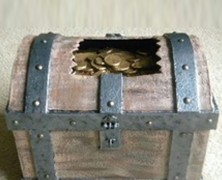
If you’re planning on going with a pirate themed haunt you’re going to need a treasure chest, and IMU posted a great tutorial on how to make a treasure chest out of a cardboard box at the HalloweenForum. Start by cutting the side flaps of your box into half rounds and then hot glue the front flaps to the side. You’ll have to cut a thin piece of cardboard to add to the center since the front flaps are now extending further since the sides are rounded. IMU cut out a space on top that the treasure will peek out through. The metal banding consists of foam core along the top and bottom edges as well as the side and centers. Once completed the gaps were smoothed out with a little paper towel mâché and then some wood grain was applied using monster mud. After applying a latch and some hinges crafted from a plastic coat hanger (if you don’t have access to a similar hanger you can buy some small hinges and a latch) it’s ready for paint! IMU gave it a base coat of black rubber spray paint since it would be sitting outside. Some various wood colors were dry brushed on as well as 2 varieties of metal colored paint for detail. The final touch was adding some rivets throughout the metal bands to give it a really sturdy appearance. The finished chest looks amazing, IMU did a spectacular job with this and it costs next to nothing to make. Items needed to complete this include: Cardboard box Foam core Hot glue Rivets Black spray paint Wood colored paint Metal colored paint ...
Blair Witch Dolls
posted by SkeleTony
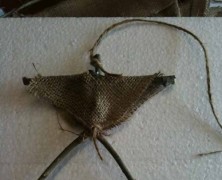
There are few things in life as disconcerting as waking up after a night camping in the woods than to see a bunch of these creepy totems hanging from the trees surrounding you. And thanks to the tutorial posted by pooky73 over at the HalloweenForum I’ll be well prepared to instill a bit of the Blair Witch fear into everybody on our next trip because these things are incredibly easy to make! Start by cutting some branches for your dolls, you’ll need an equal amount of “Y” pieces and straight pieces for however many you choose to make. Add some hot glue where you want your straight piece to sit and when it’s dry flip it over and add some more hot glue to reinforce the other side of it. Grab a piece of burlap and then fold it diagonally to form a triangle, then fold it diagonally again to form an even smaller triangle and cut the tip off of it. You’ll now have a perfect piece of burlap with a square hole in the dead center for you to slip over the doll. Add some hot glue to the stem of the doll as well as the arms, slide the burlap over it and press down so the glue will stick to the burlap. You’ll need to do this to both the front and back of your dolls. The final step is to cut a couple of pieces of jute. The first piece should be wrapped around your dolls waist to look like a belt and the other can be tied to the top of the doll to hang it from a tree. These dolls are easy to make and are a great way to add a little extra atmosphere to any haunt (or backyard). ...
Anti-Gravity Machine
posted by SkeleTony
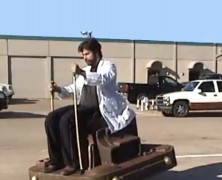
So is it a prop or is it a costume? That’s the question I was left with after watching the tutorial on the Anti-Gravity Machine that Brick in the Yard Mold Supply created. However you decide to categorize it, there is no question that it is completely awesome. It’s an incredibly intricate build that was definitely worth the effort. While an anti-gravity machine may not fit in a haunt (or be comfortable to wear at a Halloween party for that matter), the concept behind it could certainly be implemented and is worthy of at least a cursory look....

2014 Midwest Haunters Convention...
posted by SkeleTony
In less than one month the Midwest Haunters Convention will be descending upon Columbus, Ohio and if you have even the slightest passion for haunting you’re not going to want to miss this event! Billed as the largest Halloween show of its kind in the US this three-day event is filled with Haunt Tours, parties, fashion shows, the Miss Scary Midwest pageant, an enormous trade show, an insane amount of seminars, and of course, the Scariest Character Contest to boot! The 11th annual event (the first since the event was purchased by Transworld) will feature a 75,000 square foot vendor trade show with over 100 of the heaviest hitters in the haunt industry. 2014 Pricing: Bus Tours Thursday Pre-Con Bus Tour – $140 Online Friday Day Paranormal Bus Tour – $80 Online Friday Evening Combo (Hanted House Tour, Scare Factory Tour and After Party) Bus Tour – $59 Online Friday Night After Party ONLY – $29 Online Seminars For a list of seminars, instructors, times & locations, click HERE. Friday Friday Morning Seminars (Half-Day) – $65 Online / $75 On-Site Friday Afternoon Seminars (Half-Day) – $65 Online / $75 On-Site Friday All Day Pass – $100 Online / $120 On-Site All of Friday’s Seminars Weekend Pass – $195 Online / $220 On-Site Weekend Pass Includes Friday evening events, Saturday seminars, Trade show floor and masquerade party. Saturday Individual Saturday Classes (1 Hr) – $25 Online / $35 On-Site Individual Saturday Demos (1 Hr) – $25 Online / $35 On-Site Saturday All Day Pass – $125 Online / $145 On-Site Special Saturday Seminars Total Fabrication and Application of Silicone Prosthetics (3 Hrs.) – $75 Online – Allen Hopps, Stiltbeast Studios / Darkest Hour Weekend Pass Detailing Tips, Tricks and Secrets! (3 Hrs.) – $75 Online – Mike “Tattoo” Krausert, Thirteenth Floor Entertainment Group Sunday Sunday Morning Long Session (3 Hr) – $75 Online / $85 On-Site Sunday Afternoon Long Session (3 Hr) – $75 Online / $85 On-Site Other Events SCARY-OKE – FREE for...

Burlap Skulls
posted by SkeleTony
If you’re looking for a creative alternative to the paper mache skull then feast your eyes on the tutorial for Burlap Skulls that OctART posted over at the HalloweenForum. It’s pretty much the same process as making a paper mache skull (although considerably less messy) and the finished burlap skull looks amazingly creepy with a tea light inside. You’ll need to start by wrapping your skull with aluminum foil and then cut your burlap into strips. Grab your hot glue gun and start to apply the burlap over the foil covering as much of the skull as necessary. You’ll want to make sure that you don’t use too much glue in the back so you’ll be able to pull it off the skull. Also, if you’re planning on using a tea light, make sure you’re only applying one layer of burlap where your light will shine through. You’ll have to remove the foil from those areas as well. Once all the burlap is in place and dried you can remove it from the skull and spray it will some of your sealant. Items needed to complete this include: Skull Aluminum foil Burlap Hot glue Spray sealant Tea lights (optional) Shop These Materials on Amazon Instant Paper Mache Powder Mix 3.3 lbs Assorted 12" Latex Balloons 120-Pack Realistic Replica Human Skull Statue 6.5" 5.4ft Full Size Halloween Foam Skeleton Affiliate Disclosure: HauntersList.com is a participant in the Amazon Services LLC Associates Program. As an Amazon Associate we earn from qualifying purchases at no extra cost to...

How to Build a Rumble Bridge...
posted by SkeleTony
If you’re looking to add a little excitement to your haunt, or just want to give the trick or treaters a quick startle before sugaring them up for the season, then a rumble bridge might be just what you need. It’s a pretty simple project to build and the guys over at CreepyCreations have created a great video detailing how its done. How to Build A Rumble Bridge The completed Rumble Bridge: Items needed to complete this inlclude: (1) – 3/4″ sheet of plywood (4) – 2×2 wood, 36″ long (4) – 2×2 wood, 30″ long (1) – 2×2 wood, 48″ long (2) – 2×4 wood, 43″ long (4) – 2×4 wood, 25″ long (4) – 4×4 wood, 6 to 8″ long (2) – 4″ diameter rubber balls (1) – clamp (1) – bracket (1) – 2 oz fishing weight (8) – 7″ bolts with nuts & washer – 1/2″ diamter Assorted screws, nuts & bolts for weight Hot glue Metal strapping High speed motor Shop These Materials on Amazon 12V Wiper Motor 2.5" Shaft 110 Degree (prop building) PWM DC Motor Speed Controller 9-70V 35A 45Kg High-Torque Waterproof Digital Servo Motor Affiliate Disclosure: HauntersList.com is a participant in the Amazon Services LLC Associates Program. As an Amazon Associate we earn from qualifying purchases at no extra cost to...

Clear Plastic Tube Candles...
posted by SkeleTony
Everybody loves PVC candles. They’re easy to make and offer some nice ambient lighting without having to fear burning your house down. They’re also incredibly realistic looking, with the one exception being that they are not as translucent as an actual candle when lit. That’s precisely what led Sipesh at the HalloweenForum to come up with a Slightly Different Take on the PVC Candle, utilizing clear plastic fluorescent light bulb protectors instead of PVC. They’re available at Home Depot and come in four foot lengths. The process is the same as when making PVC candles. You’ll start by cutting you tube to the desired length and then dripping some hot glue along the outside edge of the tube so that it runs down the side. Once covered with glue you’ll need to give it a coat of spray paint. Lighter colors will achieve the translucent effect better than dark but don’t let that stop you from experimenting. After the spray paint has dried you’ll need to build a base for your tea light. Sipesh recommends putting a piece of styrofoam in there as a base, but I suspect you could spray a small amount of great stuff in the tube so that it rises to the desired height you want the tea ligh at as well. That’s all there is to it, but the end result looks great, these really glow nicely. Items needed to complete this include: Clear plastic tubes Hot glue Spray paint Styrofoam base Tea light Shop These Materials on Amazon 1" Schedule 40 PVC Pipe 6-Pack Ratcheting PVC Pipe Cutter (up to 1-1/4") 1" PVC Furniture Fittings Assortment 12-Pack Oatey PVC Clear Cement + Primer Handy Pack Affiliate Disclosure: HauntersList.com is a participant in the Amazon Services LLC Associates Program. As an Amazon...

Installing a Servo in a Bucky Skull...
posted by SkeleTony
There’s nothing more satisfying than creating your own talking skull. I would have no way of knowing this since I opted to purchase one for fear that I would horribly botch the installation, but I honestly suspect there’s nothing more satisfying than creating your own. With that in mind, Scary Terry has a great tutorial on Installing a Servo in a Bucky Skull. You’ll start by building a mounting bracket for your servo out of aluminum and then you’ll mount the servo bracket in the Bucky skull (ok, there’s a little more to it, but trust me, you’re going to need to check out Scary Terry’s Tutorial). You’re going to break the jaw of your skull next and reconnect it utilizing the zip ties as the new pivot point of the jaw. You’ll next drill a hole in the skull and connect the servo to the jaw using a piece of the music wire. That’s all there is to it, more or less, but you’ll still need an audio circuit to drive the servo. Luckily, Scary Terry has an audio circuit solution as well! Items needed to complete this include: Bucky Skull Servo (HiTec HS-425BB – See details at ServoCity) (2) 3/4″ long 1″x1″x1/16″ angle aluminum 0.039″ Music wire, aka piano wire (1) 1/2″ #6 screw, nut, washer Servo mounting hardware (#4/ 40 screws and nuts) (2) 4″ Zip ties Shop These Materials on Amazon Realistic Replica Human Skull Statue 6.5" 5.4ft Full Size Halloween Foam Skeleton Affiliate Disclosure: HauntersList.com is a participant in the Amazon Services LLC Associates Program. As an Amazon Associate we earn from qualifying purchases at no extra cost to...
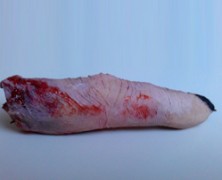
Severed Finger
posted by SkeleTony
If you’re looking to serve Ladyfingers you’ll want to pair them with tea, pudding, or ice cream. If you’re looking to sever Lady fingers, on the other hand, you’ll probably want to take a look at the tutorial that Rachel from SplatterFactoryTV posted. She details a remarkably easy way to make a quick casting of your own finger using liquid latex and makeup. The great thing is, all of the details of your finger will be imprinted on your castings, giving it a remarkably realistic appearance. The process is so simple you’ll have no problem making enough for everybody to eat! Items needed to complete this include: Liquid latex Tissue paper Hair dryer Flesh tone makeup/foundation...

2013 Home Haunter DVD Collection...
posted by SkeleTony
The 2013 Home Haunter DVD Collection is now available and if you have a passion for haunting you’re going to want to check this out! For a mere $28 (plus an additional $4.50 to help cover Postage and PayPal costs) you’ll get six full discs filled with 91 Home Haunts. If you are a contributer to the DVD you’ll get an additional 25% discount (e-mail will be verified). There’s sure to be something on these discs that will inspire you! Appearing on the 2013 DVD’s: DISK #1 Haunt Location Category 2nd Street Cemetery Covington, LA Yard Haunt The 39th Street Cemetery Saint Joseph, MO Yard Haunt Aaron Hart Halloween Ashburn, VA Yard Haunt Adams Haunted Manor Wichita Falls, TX Home Haunt Arcadia Asylum Home Haunt Home Haunt Black Friars Monastery Home Haunt A Haunted Halloween at Blackstone Cemetery Brampton, Ontario,Canada Home Haunt Bloody Moon Carnival Saint-Philibert, Qc Canada Home Haunt The Boneyard Sioux Falls, SD Home Haunt The Butcher of Prvincetown Haunted House Scarborough, Ontario, Canada Home Haunt Cannibal Clown Cafe Indiananapolis, IN Home Haunt Canyon Trail Cemetery Carol Stream, IL Yard Haunt Cappys FunHouse Arlington, TX Home Haunt DISK #2 Haunt Location Category Casa Fear Broomfield, CO Yard Haunt Darkrose Manor Aurora, CO Home Haunt Davis Manor Hood River, OR Home Haunt Davis Graveyard Milwaukie, OR Yard Haunt Dead End Yucaipa, CA Yard Haunt Denville Holiday Lights Denville, NJ Yard Haunt Desoto Asylum Needles, CA Home Haunt The Never Moor – Dimmick Family Halloween Haunt Spanish Fork, UT Home Haunt Dismal Hill Cemetery Portland, OR Yard Haunt Distant Screams Haunted House Maryville, IL Home Haunt Dr.Phobia’s Clown Experiment Mexico,MO Home Haunt Dunnett’s Dark Lair Barrie, Ontario Canada Yard Haunt Evil On Everest Lombard, IL Yard Haunt Fear House Fort Worth, TX Home...

Creepy Scarecrow
posted by SkeleTony
I love scarecrows. There’s something eerily majestic about the way they stand guard over isolated fields, just swaying in the wind. They’re selfless as they monitor everything that happens, day and night, silently watching. Waiting. I’m pretty sure they eat the birds that make the mistake of landing on them, and its entirely possible that they do get off their perches and walk around while I’m asleep, but, I can’t confirm that. With all of that said, if you’re interested in building a scarecrow, Nightfisher posted some great details on the build of his Creepy Scarecrow over at the HalloweenForum that are worth looking at. This project started by hot glueing some burlap over a foam skull and stretching it tight so most of the features of the skull would be visible through the burlap. After adding some stains and shadows Nightfisher added some large metal staples along the scarecrows mouth. The skull itself rests on a PVC spine. The shoulders and arms of the scarecrow were crafted with some heavy branches. The torso was created by spraying some Great Stuff over a 2 inch block of styrofoam. Nightfisher did an awesome job of spraying the ribs with expanding foam because I’ve got to imagine that was a fairly stressful process. A few vines were sprayed over the ribs as well to complete the torso. Once completed some black latex was painted in between the ribs and all of the crevices of the torso. A base coat of brown was dry brushed on after the black latex dried followed by another layer of black and a final coat of light brown. The vines were given a coat of green paint. Finishing touches included adding some stitches to the eyes, wrapping some twine around the joints of the arms and hands, and of course, adding a...
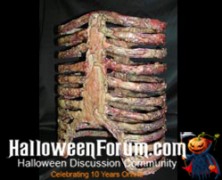
Cheap Skeletal Rib Cage...
posted by SkeleTony
If you need a rib cage for your haunt and are down to you last few bucks, don’t worry, be happy, because the Count over at the HalloweenForum has created a tutorial on how to create a Cheap Skeletal Rib Cage. It all starts with a trip to WalMart to pickup one of their 18″ high, plain white plastic trash cans. You’ll want to draw your ribcage, sternum and spine on the trash can (the Count recommends using 1/2″ masking tape to delineate the ribs). Once your outline is complete you’ll need to grab a pair of tin snips and carefully cut out the dead space between the ribs. Make sure to save the bottom and top for last to provide extra stability to the trash can. Once the ribcage is cut it’s time to put some meat on those ribs! The Count mixed and quickly spread several batches of a two part polyurethane foam on his ribcage. Once dried a few layers of reddish brown and black latex paint were added followed by a final coat of lacquer. The finished ribcage looks great and I never would have guessed that it came from WalMart! Items needed to complete this include: 18″ White trash can 2 part Polyurethane foam Reddish brown latex paint Black latex paint...