


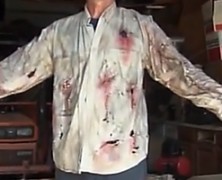
If a zombie can take the time to dig its way out of its grave, the least you can do is make sure he’s got some appropriate looking clothes, right? And if you’ve taken the time to build a Full Sized Zombie Prop, or just plan on becoming the zombie yourself, you should probably pay equal attention to the clothing since it’s a major part of your zombie’s appearance. If you want truly realistic looking zombie clothing you’re going to want to give Robertb7864’s video a look. This twenty minute trek through zombie clothes modification features a full five minutes dedicated to Robertb7864 taking a belt sander to a shirt. The end result is pretty great looking, though, and is way more authentic looking than you’d achieve by tearing or cutting the cloth yourself....
Full Size Zombie
posted by Tony
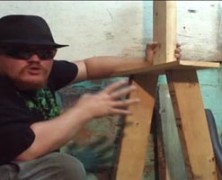
If you’re looking to build a full size zombie that you can leave outside you’re going to need something that is a little more solid, and once again, Dr. Kreepy has just the tutorial you’re looking for. The lower body is framed using 2 x 4’s for legs attached to a 1 x 6 waist while the spine, shoulders, and arms are crafted out of PVC. After the frame is in place you’ll need to bulk out the torso and the legs. You can certainly wrap the legs and body with foam and duct tape it tight, or you can use the Dr. Kreepy method and use balled up newspaper or plastic. When mounting it you can use a plywood base and screw the legs to it, otherwise you can grab a pair of old boots and throw in some quick drying cement. You’ll need to add your favorite mask and a pair of prop hands if they’ll be visible. Items needed to complete this include: 2 – 2×4 approximately 35″ 1 – 1 x 6 appoximately 17″ 1 – 20″ 2 x 4 6 pieces 3/4 PVC 4 – 3/4″90 degree PVC 3/8″ or thicker 2′ x 2′ plywood Old clothes Skull or mask Duct Tape Newspaper or foam Screws ...
Quick & Easy Armature...
posted by Tony
I’ve got to tip my hat to Nightrideproductions from the HalloweenForum, who has proof that literally everything you own can be incorporated into your next prop build. This Quick and Easy Armature is built using a tomato cage and is all you’ll need to get a few more last minute zombies popping out of your cemetery without exerting much effort along the way. You’ll start by flipping your tomato cage so the largest circle is on the ground and then bend the two side wires so they form shoulders and arms. The third and final wire should be bent inward and then up 90 degrees so the styrofoam head can slide down onto it. The newspaper and duct tape should be added around the shoulders and arms to add a little body to your armature before adding your mask and shirt, but that’s pretty much all there is to it. Bend the wires back into place when your done using it and it’ll be ready for the spring tomato crop. Items needed to complete this include: Tomato cage Styrofoam head Tent stakes Newspaper Duct tape Wire...
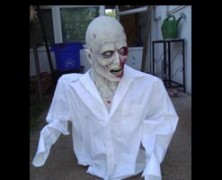
Spider Hill Prop Works Swaying Zombie...
posted by Tony
Spider Hill Prop Works has posted a great video detailing the framework for their Swaying Zombie prop. This silent film is meant to be more of a companion to the full Swaying Zombie Tutorial they put together which details the build. The parts list included details everything you’ll need to get this up and running and contains many of the pvc fittings and articulating joints that they sell. The frame consists of a plywood base with two pvc legs attached that connect to another plywood base that forms the waist. The wiper motor is mounted on the waist plywood and a swivel assembly is created out of pvc that connects the upper body of the zombie to the drive arm of the wiper motor. This will eventually create the swaying motion for your zombie. It’s a pretty intricate build that will require a delicate hand when setting up. The tutorial is well laid out with great images and descriptions to give you everything you need to get your zombie swaying short of a hula hoop and some extra brains. Items needed to complete this include: 10.5 feet of schedule 40 1 inch PVC pipe 4 feet of schedule 40 ½ inch PVC pipe (6) UMB-1 Universal Mounting Bases (2) ST-1 1 inch PVC slip-T fittings (1) Schedule 40 1 inch PVC cross fitting (1) Schedule 40 1 inch PVC T fitting (2) Schedule 40 1 inch PVC 45 elbows (1) Schedule 40 1 inch to ½ inch PVC reducer 12 Volt wiper motor with 5 volt power supply wiper motor bracket (hauntedparts.com) Approx. 25 #10 x 5/8” self drilling screws (1) ¼” x 20 x 3 ½” hex bolt (4) ¼” x 20 x 1 inch hex bolts (1) ¼” x 20...
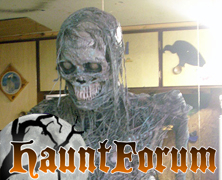
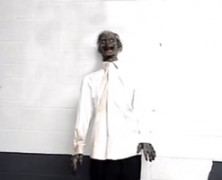
Zombie Build
posted by Tony
I’m truly amazed at some of the great looking props that people are able to build that cost next to nothing, and the creative ways they go about accomplishing it. Sytnathotep is one such prop builder with his 1/2 zombie build, which looks great and probably didn’t cost a whole lot. The spine of the zombie is crafted using three three foot sections of 12/2 electrical wire that are braided together to give it some extra rigidity. Since this is a 1/2 zombie it doesn’t have to support any real weight (no legs). The shoulders are 3/4″ pvc connected via a cross fit connection that slides over the spine while the collar bones are more 12/2 electrical wire, and the scapulas are styrofoam insulation. With a wire clothes hanger ribcage and hands made out of wire with plastic pen tube fingers this project is not exactly breaking the bank. Once the skull slides onto the electrical wire all that’s left to do is corpse and paint this bad boy! What I really like about Sytnathotep’s zombie is his corpsing technique. He used the melted plastic method as a base, but then stretched cheesecloth and spider web dipped in a 50/50 mixture of black latex house paint and elmers glue all over the zombie. It really does give the appearance of rotting flesh and is well worth the effort and the mess that it creates. Items needed to complete this include: 12′ – 12/2 electrical wire Skull 6 wire clothes hangers 1 pvc cross fit connector Scrap styrofoam 10 Plastic pen tubes Duct tape Plastic for corpsing Cheesecloth / Spider webbing Latex paint Elmers...
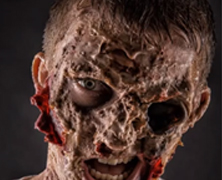
Zombie Mask Tutorial
posted by Tony
Ich fürchte, zombies, aber ich habe nichts dagegen, wie einer aussieht. Every now and then a tutorial comes along that is so good it leapfrogs it’s way to the front of the Haunters List line. Such is the case with this great video tutorial from Stefan Schäfer Photography. In this video you’ll learn how to turn a little bit of gelatin, glycerol, and water into an incredible zombie paste that will help in the zombification of any haunt. Sure, you’ll need some makeup and a little bit of blood, but the base coat is everything here, and this tutorial gives you everything you need to get started....
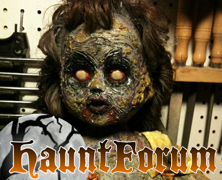
Zombie Doll
posted by Tony
What’s more creepy than those two little girls from The Shining? How about imagining the creepy dolls those girls would play with! I expect that they would look something like the zombie dolls that Cyclonejack from HauntForum creates, and he’s been nice enough to create a video detailing exactly how to make them. They look amazingly creepy and the only real cost involved is the doll and some paint! If you have a creepy little girl in your haunt, be sure to make one of these for her, because nothing says “abnormal” quite like a little girl that would play with one of these!...