


I’m truly amazed at some of the great looking props that people are able to build that cost next to nothing, and the creative ways they go about accomplishing it. Sytnathotep is one such prop builder with his 1/2 zombie build, which looks great and probably didn’t cost a whole lot. The spine of the zombie is crafted using three three foot sections of 12/2 electrical wire that are braided together to give it some extra rigidity. Since this is a 1/2 zombie it doesn’t have to support any real weight (no legs). The shoulders are 3/4″ pvc connected via a cross fit connection that slides over the spine while the collar bones are more 12/2 electrical wire, and the scapulas are styrofoam insulation. With a wire clothes hanger ribcage and hands made out of wire with plastic pen tube fingers this project is not exactly breaking the bank. Once the skull slides onto the electrical wire all that’s left to do is corpse and paint this bad boy! What I really like about Sytnathotep’s zombie is his corpsing technique. He used the melted plastic method as a base, but then stretched cheesecloth and spider web dipped in a 50/50 mixture of black latex house paint and elmers glue all over the zombie. It really does give the appearance of rotting flesh and is well worth the effort and the mess that it creates. Items needed to complete this include: 12′ – 12/2 electrical wire Skull 6 wire clothes hangers 1 pvc cross fit connector Scrap styrofoam 10 Plastic pen tubes Duct tape Plastic for corpsing Cheesecloth / Spider webbing Latex paint Elmers...
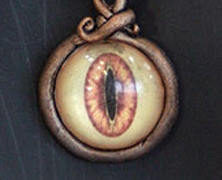
Jeepers Peepers!
posted by Tony
I’ve posted a couple of tutorials on how to make realistic eyes for your props, but the one that Sytnathotep posted over at HauntForum may be the easiest yet. This method only produces a half of an eye, but sometimes that’s more than enough. Before you get started on this you’re going to need to print and cut your iris to fit the circumference of your round palettes. Once you’re ready to start it’s just a matter of pouring some of the epoxy into the palette, making sure to leave a little room for another pour. Place your iris face down into the palette and push it slightly into the epoxy making sure that it’s completely covered, then add enough epoxy so it’s completely level with the top of your palette. That’s all there is to it! Once they’re dry, just pound them out of the palette and you’re good to go. Items needed to complete this include: Plastic paint palettes Smooth-On’s Epoxy Cast 690 Iris...