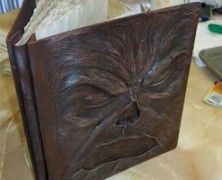
Writing the Necronomicon may take you a lifetime, but creating the cover for this ancient tome isn’t that difficult if you follow the tutorial from Zombie Nations. You’ll start by pulling the paper off of a photo album until you’re down to the cardboard. Create your basic shapes for the back cover using some Super Sculpey sculpting compound and then continue to cover the entire page. Once you’ve got the entire page covered you can use a little turpentine and an artists brush to smooth out the Sculpey. Once the turpentine dries you can add some wrinkles and other finer details. Once dried, put it in the oven at 250 degrees for about 30 minutes and once its fully baked, coat it with some black primer. The front of the Necronomicon created in this tutorial pretty much follows the same procedure as the back cover. You’ll use your Super Sculpey to create the face and then continue to cover the entire cover with Sculpey. You’ll need to smooth it out using turpentine, then cook it and prime it. Once you’ve got both side fully primed with the black paint you’re going to apply a base coat of brown to both covers. Once complete, you’ll be brushing some thinned down dark brown acrylic paint to it. This will settle into the cracks of the book and you’ll finish it off by drybrushing a lighter brown over the entire book. The eyes can be painted using whatever color scheme you see fit to use. When completed lightly spray the entire book with some Spray Matte Fixative. The book that was created in this tutorial turned out amazing, I wouldn’t mind having a copy of the one pictured above. Rest assured, though, that...


