


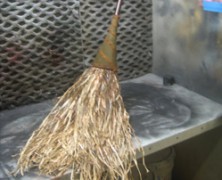
My mother was the driving force behind my love for all things Halloween. She was born on October 31st so I suppose there was little chance that she wouldn’t love Halloween herself, but It was more than just Halloween. She had a great appreciation for classic horror films, too. I remember on Saturday evenings our local UHF channel (UHF, how’s that for dating yourself!?) would show a classic horror film followed with a few of the old Flash Gordon episodes. Saturday Night at the Movies was a staple at our house and those films have always been a major source of my inspiration. For that I have my mother to thank, and while I can’t imagine my mother doing many of the tutorials on HauntersList, this Deluxe Witches Broom tutorial that Stanley Basconbe (aka Gary Benson) posted is exactly the kind of crafting project that my mother would have loved to do. And she would have owned it, too. You’ll need to start off with a standard straw broom. You’re going to want to remove the metal band if it has one and then cut off the twine that holds the bristles in place. Once you’ve got the twine removed you’ll have a pretty nicely fanned out broom. You’ll want to remove the outer layer of the bristles to create a more narrow broom. At this point you’ll want to focus your attention on creating the ferrule, which is crafted from an automotive oil funnel. You’ll need to cut it down so that it will fit down the broom handle. Once you’ve got the ferrule in place you’re going to want to hot glue some grass skirt to the top of the bristles which will complete your witches broom. Of course you can decorate...
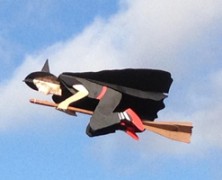
The Broom Flyer Witch...
posted by Tony
If you have some serious crafting skills and a ton of ambition, you too can create a Flying Witch prop just like the one that Otto Dieffenbach created. Or you could just watch the video of Otto’s prop and marvel at his creation. Seriously, this prop is one of the coolest builds I’ve ever seen, it turned out amazing, but the third sentence of the tutorial pretty much rules me out from ever attempting it: “This is a difficult build and should not be attempted by a newcomer to the hobby. There is a lot of wood work involved. You may want to find a friend with superior build skills if you are a newcomer.” I’m not even sure I could find a friend with enough moxy to try to build this, but if you can find one, the full tutorial is posted over at the RCgroups.com website. Items needed to complete this include: Frame Broom Flyer cutouts in 6 mm Depron (available from Hoosier Cutout Service) Two 0.196″ OD x 0.125″ ID x 40″ Carbon Fiber square tubes (Midwest Products) One 0.125″ OD x 0.060″ ID x 40″ Carbon Fiber tube (Midwest Products) One .034″ x .121″ x 40″ Carbon Fiber strip (Midwest Products) 1/8 inch plywood sheet 1 ft x 2 ft ¼ inch plywood sheet 6 x 12 inches 8 Sheet metal screws 8 x ½ E-Flite Sea Fury retract landing gear (Optional) Master Air Screw 3 blade 10 x 7 propeller Two packages of Dubro micro pushrods #852 One bag of 15 Dubro Hinges #117 Two 1 7/8 inch wheels (Parkzone T-28 or F4u) Clear Gorilla Glue Foam safe CA and activator 5 minute epoxy 30 minute epoxy Paint Electronics: At least a 3 channel full range receiver Three...